background image

2 in

(51 mm)

1

3

4

2

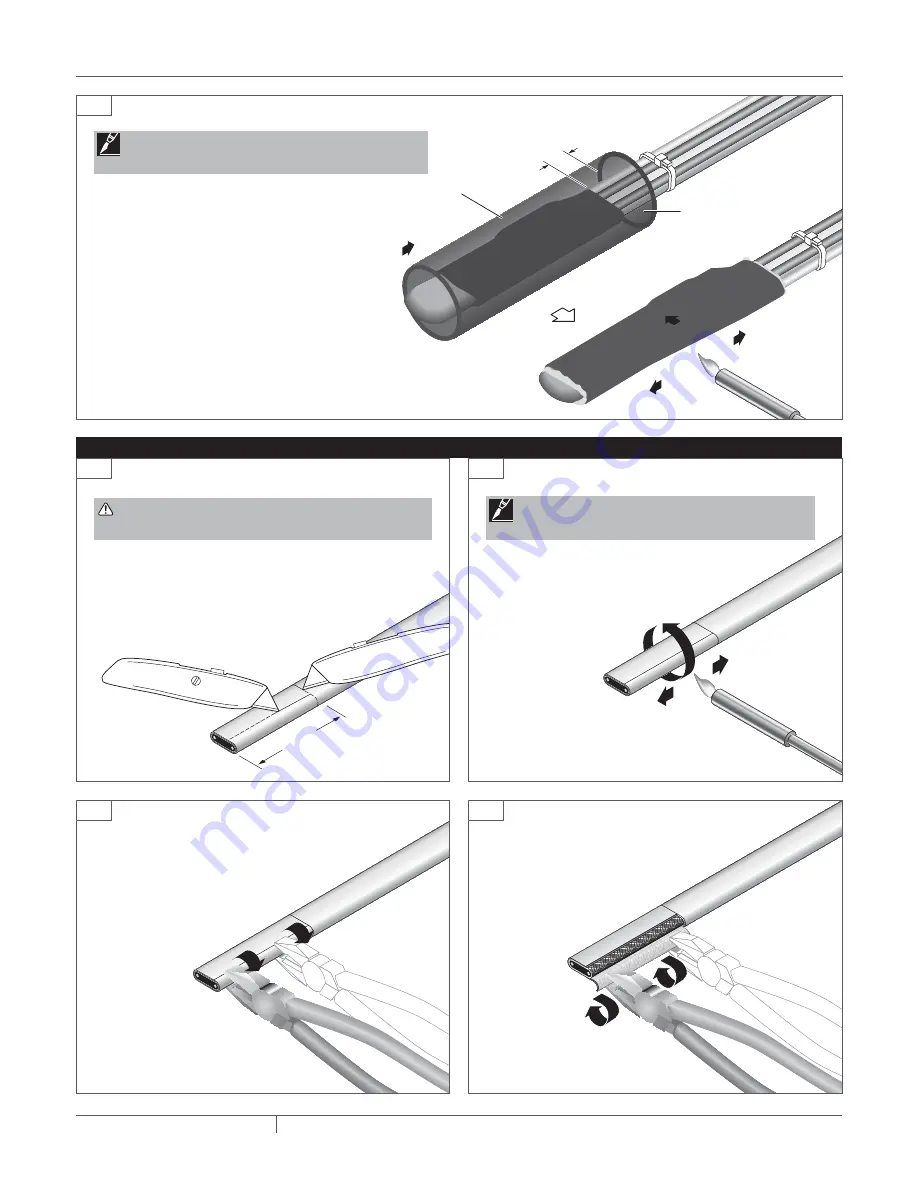
•  Allow 12 in (305 mm) of heating cable in junction box for 

proper assembly.

•  Score around outer jacket 2 in (51 mm) from end.
•  Make one lengthwise score as shown.

•  Use Ideal crimp tool No. 30-425 or blunt 

nose pliers to pull outer jacket from braid.

•  Gently heat cable to loosen bond 

between outer jacket and braid.

•  Roll outer jacket back around 

heating cable to remove.

7 / 10

tHerMAl builDing solutions

Raychem-IM-H57284-EMKXP-EN-1612

½ in

(13 mm)

6 in (152 mm) tube

Heat this end first

24

•  Position the 6 in (152 mm) long heat-

shrinkable tube (Item A) over the mastic sheet, 

1/2 in (13 mm) from end of mastic sheet. 

•  Begin heating tube at end near cable tie.
•  Heat until tube is recovered completely and 

adhesive or mastic flows from ends.

•  Continue to heat center section to melt mastic 

inside but do not blister or burn tube.

•  Allow the connection to cool before placing in 

junction box.


 note: see step 1 for proper heating techniques.


 note: see step 1 for proper heating techniques.

end seal installation instructions

  WArning: Do not cut into braid or inner jacket. this 

could result in a short circuit.

Summary of Contents for Raychem EMK-XP

Page 1: ...etorcore Donotburyanyofthecomponents Boththepowerconnectionandendsealmustbe installedinadryjunctionbox Heat damagedcomponentscanshort Useaheatgunortorchwithasoft yellow low heatflame Keeptheflamemovingtoavoidoverheating blistering orcharringthe heat shrinkabletubes Avoidheatingothercomponents Replaceanydamagedpart Buswireswillshortiftheycontacteachother Keepbuswiresseparated Connectionkitsandheati...

Page 2: ...ck around heating cable to remove Note See Step 1 for proper heating techniques Instructions for using a heat gun or torch Read important warnings on page 1 and follow safety precautions provided with heat gun or torch When using a torch use a soft yellow low heat flame Apply just enough heat to do the job Keep torch or heat gun moving continuously to distribute the heat evenly to avoid overheatin...

Page 3: ...m F over bus wires Shrink tubes completely Lightly score inner jacket around and down as shown Bend heating cable to break jacket at score Peel off jacket Score between bus wires at inner jacket Bend core to break free at inner jacket Peel core and any remaining material from bus wires Remove 1 1 2 in 38 mm insulation from power supply lines Remove 1 in 25 mm insulation from equipment grounding co...

Page 4: ...he correct crimp tool Ideal 30 425 when making the connections To make the proper crimp connection position the heating cable bus wire directly below the larger supply wire Position the supply wire and bus wire in the crimp connectors and crimp tool exactly as shown Crimp each connector twice see detail Use only one crimp connector to attach equipment grounding conductor to heating cable braid see...

Page 5: ...immediately pinch end while tube is still hot hold for 5 seconds to ensure seal Allow tubes to cool Cut two 3 in x 1 3 4 in 76 mm x 44 mm pieces from one mastic sheet Item J Cut a 3 in x 5 in 76 mm x 127 mm piece from one mastic sheet Item J Wrap each power wire with a 3 in x 1 3 4 in 76 mm x 44 mm piece of mastic Fold the covered power wires flat against the heating cable Use the 3 in x 5 in 76 m...

Page 6: ...at the cap until it shrinks completely Cut second mastic sheet Item J into two pieces 3 in x 6 in 76 mm x 152 mm Secure all wires 2 in 51 mm from end of outer jacket using cable tie Item I Position braid connection next to cap Wrap braid connection and 1 2 in 13 mm of outer jacket with 3 in x 6 in 76 mm x 152 mm mastic sheet Item J Note See Step 1 for proper heating techniques IMPORTANT If cap sta...

Page 7: ...n 13 mm 6 in 152 mm tube Heat this end first 24 Position the 6 in 152 mm long heat shrinkable tube Item A over the mastic sheet 1 2 in 13 mm from end of mastic sheet Begin heating tube at end near cable tie Heat until tube is recovered completely and adhesive or mastic flows from ends Continue to heat center section to melt mastic inside but do not blister or burn tube Allow the connection to cool...

Page 8: ...l adhesive or mastic flows out ends Remove heat source and immediately pinch end with needle nose pliers for 20 seconds to ensure a complete moisture seal Allow tube to cool completely Refer to Material Safety Data Sheet RAY4566 Position short tube Item L over end of heating cable as shown Heat tube until it shrinks and adhesive flows out ends While still hot gently pinch end and hold for 5 second...

Page 9: ...at center section to melt mastic inside but do not blister or burn tube Remove heat source and immediately pinch end with needle nose pliers for 20 seconds to ensure a complete moisture seal Allow end seal to cool completely Position end seal so it does not come in contact with power connection Route heating cable so that power connection and end seal are in same junction box Use an EMK XJB juncti...

Page 10: ...NORTH AMERICA Tel 1 800 545 6258 Fax 1 800 527 5703 Tel 1 650 216 1526 Fax 1 650 474 7711 thermal info pentair com Pentair and ElecroMelt are owned by Pentair or its global affiliates All other trademarks are the property of their respective owners Pentair reserves the right to change specifications without prior notice ...

Reviews: