background image

Operation • Maintenance 

5

Operation

 Risk of fire and explosion. Can cause 

severe injury, property damage or death. Do not use in 
explosive atmospheres. Pump water only with this pump.
NOTICE Do not allow the pump to run in a dry sump. It 
will void the warranty and may damage the pump.
An automatic overload protector in the motor will 
protect the motor from burning out due to overheating/
overloading. When the motor cools down, the overload 
protector will automatically reset and start the motor.
If the overload trips frequently, check for the cause. 
It could be a stuck impeller, wrong/low voltage, or 
an electrical failure in the motor. If an electrical 
failure in the motor is suspected, have it serviced by a 
competent repairman.
The pump is permanently lubricated. No oiling or 
greasing is required.

Maintenance

General

 Risk of electric shock. Can shock, burn 

or kill. Before removing the pump from the basin for 
service, always disconnect electrical power to the pump 
and the control switch. Do not lift the pump by the 
power cord. See Cord Lift Warning.
After removing the basin cover and the necessary 
discharge piping, lift the pump out of the basin.
Place the pump in an area where it can be cleaned 
thoroughly. Remove all scale and deposits on the pump.
Submerge the complete pump in a disinfectant solution 
(dilute chlorine bleach) for at least one hour before 
disassembling the pump.
The pump motor housing contains a special lubricating 
oil which should be kept clean and free of water at 
all times.
NOTICE Whenever the motor housing is being removed 
for service, remove oil and replace it with new oil at 
reassembly. Use only oil listed in parts list in this manual. 
When filling with new oil, DO NOT overfill. Allow about 
7/8” (22mm) air space from top of boss in housing for 
expansion of oil when the pump is operating.

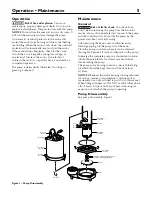
Pump Disassembly

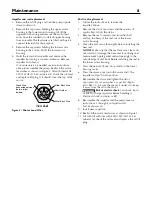
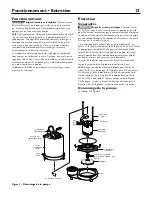
See pump disassembly, Figure 1.

1050 0312

Oil fill plug

Upper motor

housing

Housing

capscrew

Power cord

connector

Blk

Blk

Grn

Rotor/Stator

Assembly

Lower Motor

Housing

Rotor/Stator

Capscrew

Volute

A

A

(See Fig. 2)

Shaft Seal, Stationary Head Assembly
Shaft Seal, Rotating Mating Ring

Impeller 

Spacer

Figure 1 - Pump Disassembly

Summary of Contents for SHEF42A1

Page 1: ...tículas sólidas 1050 0797 SPC ASB SHEF42M1 SHEF42A1 Installation Operation Parts For further operating installation or maintenance assistance Call 1 888 957 8677 English Pages 2 8 Installation Fonctionnement Pièces Pour plus de renseignements concernant l utilisation l installation ou l entretien Composer le 1 888 957 8677 Français Pages 10 16 Instalación Operación Piezas Para mayor información so...

Page 2: ...d lead to the system ground 6 Do not run the pump dry Dry running can overheat the pump causing burns to anyone handling it and will void the warranty 7 The pump normally runs hot To avoid burns when servicing pump allow it to cool for 20 minutes after shut down before handling it 8 The pump is permanently lubricated No oiling or greasing is required in normal operation for overhaul see instructio...

Page 3: ...e will be accepted if received after the Warranty Period has expired This warranty is not transferable EXCEPTIONS Hydromatic Special Application Pumps Battery Back Up Sump Pumps Filtered Effluent Pumps Grinder Pumps and 2 1 2 Sewage Pumps are warranted for a period of 12 months from date of purchase or 18 months from date of manufacture whichever comes first HYDROMATIC SHALL NOT BE LIABLE FOR ANY ...

Page 4: ...ve to prevent airlocking the pump Electrical Risk of electric shock Can shock burn or kill When installing operating or servicing this pump follow the safety instructions listed below 1 DO NOT splice the electrical power cord 2 DO NOT allow the electrical cord plug to be submerged 3 DO NOT use extension cords They are a fire hazard and can reduce voltage sufficiently to prevent pumping and or dama...

Page 5: ...rol switch Do not lift the pump by the power cord See Cord Lift Warning After removing the basin cover and the necessary discharge piping lift the pump out of the basin Place the pump in an area where it can be cleaned thoroughly Remove all scale and deposits on the pump Submerge the complete pump in a disinfectant solution dilute chlorine bleach for at least one hour before disassembling the pump...

Page 6: ...m the shaft and tap the body of the seal out of the lower motor housing 4 Clean the seal cavity thoroughly before installing the new seal NOTICE Make sure that the seal faces are clean do not scratch or damage the new seal face during seal replacement Apply gasket sealant sparingly to the outside edge of seal body before installing the seal in the lower motor housing 5 Press the new seal body into...

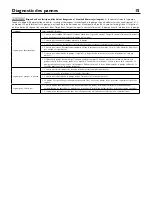
Page 7: ...16 5mm vent hole in discharge pipe is not plugged 5 Check for blockage in pump inlet impeller check valve or discharge pipe 6 Disconnect the pump from the power source for a minimum of 30 minutes to allow the motor to cool and to protect yourself from sudden starts See Warning above Check for the cause of overheating Pump is running dry because the float switch is caught up on something Inlet pipe...

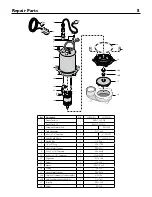
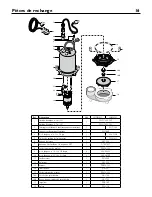
Page 8: ...screw 1 U30 539SS 5 Switch Cord Clamp 1 CC0030 13 6 Handle Ring 1 U97 128 7 1 4 NPT Plug 1 U78 57DT 8 Upper Motor Housing 1 PW18 133 9 10 32 x 3 4 Capscrew 6 U30 482SS 10 10 32 x 3 1 8 Capscrew 2 U30 963ZP 11 Capacitor 1 PS18 148 12 Spacer 2 U43 139 13 Motor 1 PW118 145 14 O Ring 1 U9 339 15 Lower Motor Housing 1 PW18 134 16A Shaft Seal Stationary Head Assembly 1 U9 379A 16B Shaft Seal Rotating Ma...

Page 9: ...THIS PAGE INTENTIONALLY LEFT BLANK ...

Page 10: ...r la pompe à sec sinon elle risque de surchauffer et causer des brûlures à quiconque la manipulera De plus cette pratique annule la garantie 7 Il est normal que la pompe soit chaude pendant qu elle fonctionne Pour éviter de se brûler lorsque l on intervient sur la pompe la laisser refroidir au moins 20 minutes après l avoir arrêtée et ceci avant de la manipuler 8 La pompe est lubrifiée en permanen...

Page 11: ...e demande de service en vertu de sa garantie ne sera acceptée après expiration de la durée de sa garantie Ces garanties ne sont pas transférables EXCEPTIONS Les pompes pour applications spéciales les pompes de puisard de secours à batterie les pompes d effluents à filtre les pompes broyeuses et les pompes d eaux d égout de 2 1 2 po Hydromatic sont garanties pendant une période de 12 mois suivant l...

Page 12: ...à 51 mm au dessus du branchement du refoulement de la pompe mais pas sous le clapet de non retour pour empêcher la formation de bouchons d air dans la pompe Électricité Risque de secousses électriques Pouvant causer des brúlures voire la mort Lorsque l on installe fait fonctionner ou intervient sur cette pompe respecter les consignes de sécurité suivantes 1 NE PAS épisser le cordon électrique 2 NE...

Page 13: ...r le cordon électrique Après avoir déposé le couvercle du puisard et débranché au besoin le tuyau de refoulement sortir la pompe du puisard Mettre la pompe dans un endroit où elle pourra être nettoyée à fond Enlever tout le tartre et tous les dépôts de la pompe Immerger toute la pompe dans une solution désinfectante agent chloré pendant au moins une heure avant de la démonter Le carter de la pompe...

Page 14: ... inférieur du moteur 4 Nettoyer à fond la cavité du joint avant de poser le joint neuf AVIS S assurer que les surfaces du joint sont propres ne pas rayer ni endommager les surfaces du joint neuf pendant qu on le pose Appliquer un mastic joint sur le bord extérieur du corps du joint neuf avant de le poser dans le carter inférieur du moteur 5 Pousser le corps du joint neuf en position dans la cavité...

Page 15: ... est pas bouché 5 S assurer que l admission de la pompe l impulseur le clapet de non retour ou le tuyau de refoulement ne sont pas obstrués 6 Débrancher la pompe du courant qui l alimente pendant au moins 30 minutes pour laisser refroidir le moteur et se protéger contre les démarrages soudains Se reporter à l avertissement ci dessous Vérifier la cause de la surchauffe La pompe fonctionne à sec par...

Page 16: ...neau de levage 1 U97 128 7 Bouchon fileté mâle de 1 4 de pouce NPT 1 U78 57DT 8 Carter supérieur du moteur 1 PW18 133 9 Vis à chapeau n 10 32 x 3 4 de po 6 U30 482SS 10 Vis à chapeau n 10 32 x 3 1 8 po 2 U30 963ZP 11 Condensateur 1 PS18 148 12 Entretoise 2 U43 139 13 Moteur 1 PW118 145 14 Joint torique 1 U9 339 15 Carter inférieur du moteur 1 PW18 134 16A Tête fixe du joint d arbre 1 U9 379A 16B B...

Page 17: ...Cette page est intentionnellement BLANK ...

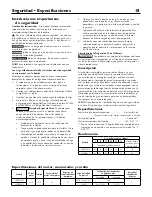
Page 18: ...iente causando quemaduras a la persona que la esté manipulando y anulará la garantía 7 La bomba está caliente al tacto durante la operación Para evitar quemaduras durante las operaciones de reparación y mantenimiento deje que se enfríe durante 20 minutos después de haberla apagado y antes de manipularla 8 La bomba viene con lubricación permanente Bajo un servicio normal no se necesitará aceitar ni...

Page 19: ...citud de servicio bajo garantía que se reciba después del vencimiento del Período de Garantía Esta garantía no se puede transferir EXCEPCIONES Las bombas para aplicaciones especiales las bombas de sumidero con baterías de respaldo les bombas efluentes con filtro las bombas trituradoras y las bombas para aguas residuales de 2 1 2 de marca Hydromatic están garantizadas por un período de 12 meses a p...

Page 20: ...válvula de retención para evitar la creación de bolsas de aire en la bomba Sistema eléctrico Riesgo de choque eléctrico Puede provocar choque quemadura o muerte Cuando instale opere o repare esta bomba observe las instrucciones de seguridad indicadas a continuación 1 NO empalme el cordón de corriente eléctrica 2 NO permita que se sumerja el enchufe del cordón eléctrico 3 NO use cordones de alargue...

Page 21: ...ria levante y saque la bomba fuera de la esclusa Coloque la bomba en una zona en donde se pueda limpiar bien Saque toda oxidación y depósitos que se hayan acumulado en la bomba Sumerja toda la bomba en una solución desinfectante lejía con cloro por lo menos durante una hora antes de desarmar la bomba La caja del motor de la bomba contiene un aceite especial de lubricación que se debe mantener limp...

Page 22: ... cuerpo de la junta para sacarla de la caja inferior del motor 4 Limpie bien la cavidad de estancamiento antes de instalar la nueva junta AVISO Asegúrese de que las caras de la junta estén limpias no raye ni dañe la cara de la nueva junta durante el cambio Aplique junta de sellador con moderación en el borde exterior del cuerpo de la junta antes de instalarla en la caja inferior del motor 5 Presio...

Page 23: ... hayan bloqueos en la admisión de la bomba en el impulsor en la válvula de retención o en la tubería de descarga 6 Desconecte la bomba de la fuente de energía por lo menos durante 30 minutos para permitir que el motor se enfríe y para protegerse contra arranques repentinos Consulte la Advertencia que aparece arriba Verifique la causa del recalentamiento La bomba está marchando en seco debido a que...

Page 24: ...U30 539SS 5 Abrazadera del cordón del conmutador 1 CC0030 13 6 Manija anular 1 U97 128 7 Enchufe de 1 4 NPT 1 U78 57DT 8 Caja superior del motor 1 PW18 133 9 Tornillo prisionero 10 32 x 3 4 6 U30 482SS 10 Tornillo prisionero 10 32 x 3 1 8 2 U30 963ZP 11 Capacitor 1 PS18 148 12 Espaciador 2 U43 139 13 Motor 1 PW118 145 14 Aro tórico 1 U9 339 15 Caja inferior del motor 1 PW18 134 16A Ensamblaje del ...

Reviews: