107
4
Tak
ing Pi
cture
s
C
Q
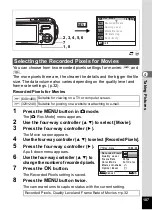
You can choose from two recorded pixels settings for movies:
m
and
D
.
The more pixels there are, the clearer the details and the bigger the file
size. The data volume also varies depending on the quality level and
frame rate settings. (p.32)
Recorded Pixels for Movies
1
Press the
3
button in
A
mode.
The [
A
Rec.Mode] menu appears.
2
Use the four-way controller (
23
) to select [Movie].
3
Press the four-way controller (
5
).
The Movie screen appears.
4
Use the four-way controller (
23
) to select [Recorded Pixels].
5
Press the four-way controller (
5
).
A pull-down menu appears.
6
Use the four-way controller (
23
) to
change the number of recorded pixels.
7
Press the
4
button.
The Recorded Pixels setting is saved.
8
Press the
3
button twice.
The camera returns to capture status with the current setting.
Selecting the Recorded Pixels for Movies
m
(640×480) Suitable for viewing on a TV or computer screen.
D
(320×240) Suitable for posting on a website or attaching to e-mail.
Recorded Pixels, Quality Level and Frame Rate of Movies
R e c . M o d e
MENU
E x i t
E x i t
E x i t
1 / 3
6
M
Recorded Pixels
Q u a l i t y L e v e l
W h i t e B a l a n c e
A E M e t e r i n g
S e n s i t i v i t y
AWB
ISO
AUTO
2, 3, 4, 5, 6
1, 8
MENU
7
MENU
15:02:26
640
320
3 0 f p s
F u l l C o l o r
R e c . t i m e
Recorded Pixels
Q u a l i t y L e v e l
C o l o r M o d e
Movie anti-shake
O p t i c a l Z o o m
F r a m e R a t e
C a n c e l
C a n c e l
O K
C a n c e l
OK


