background image

143

6

Play

bac

k

/D

el

eting

/Editi

n

g

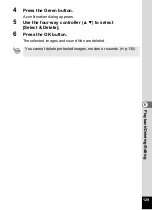
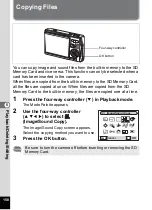
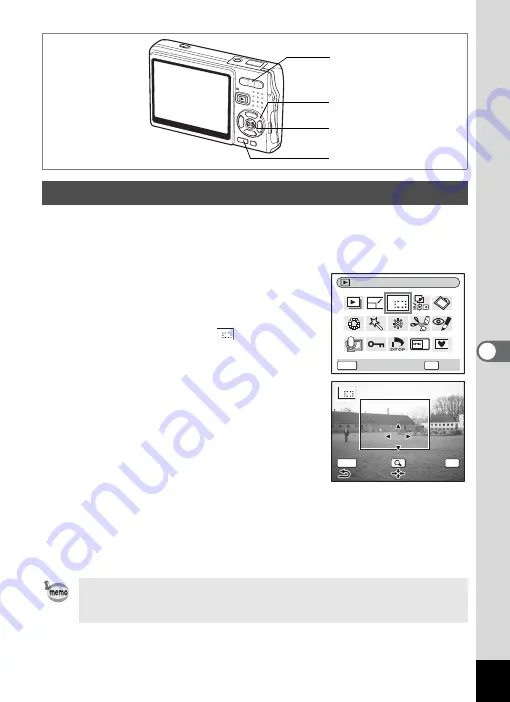
You can crop a part of a picture and save it as a separate image.

1

Use the four-way controller (

45

) in Playback mode to 

select an image to crop.

2

Press the four-way controller (

3

).

The Mode Palette appears.

3

Use the four-way controller 

(

2345

) to select 

 (Cropping).

4

Press the OK button.

The Cropping screen appears.

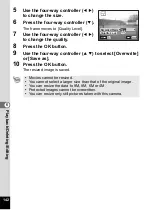
5

Crop the image.

Zoom button (

x

)

: Enlarges the cropping 

frame.

Zoom button (

w

) : Reduces the cropping 

frame.

Four-way controller : Moves the cropping 

(

2345

)

frame.

MENU button

: Returns to the Mode Palette.

6

Press the OK button.

The cropped image is saved as a separate image.

Cropping Images

• Movies cannot be cropped.

• The image size is changed and saved.

• You can only crop still pictures taken with this camera.

Four-way controller

OK button

Zoom button

MENU button

Cropping

OK

MENU

OK

Cancel

OK

OK

OK

OK

MENU

Summary of Contents for 19211 - Optio A30 10MP Digital Camera

Page 1: ... 95106 Argenteuil Cedex FRANCE http www pentax fr PENTAX Schweiz AG Widenholzstrasse 1 8304 Wallisellen Postfach 367 8305 Dietlikon SWITZERLAND http www pentax ch PENTAX Scandinavia AB P O Box 650 75127 Uppsala SWEDEN http www pentax se PENTAX Imaging Company A Division of PENTAX of America Inc Headquarters 600 12th Street Suite 300 Golden Colorado 80401 U S A PENTAX Service Department 12000 Zuni ...

Page 2: ...uminate when they should not However this has no effect on the recorded image Regarding trademarks PENTAX Optio and smc PENTAX are trademarks of PENTAX Corporation SD logo and SDHC logo are trademarks DivX DivX Certified and associated logos are trademarks of DivX Inc and are used under license All other brands or product names are trademarks or registered trademarks of their respective owners Thi...

Page 3: ...e keep the SD Memory Card out of the reach of small children Seek medical attention immediately if a memory card is accidentally swallowed Use an AC adapter that is of the power and voltage specified for exclusive use with this product The use of an AC adapter other than that specified exclusively for use with this product may cause fire or electric shocks If the camera emits smoke or a strange sm...

Page 4: ...t to burn yourself during removal Some portions of the camera heat up during use so please take care as there is a risk of low temperature burns if such portions are held for long periods of time Should the LCD be damaged be careful of glass fragments Also be careful not to allow the liquid crystal to get on your skin or in your eyes or mouth Warning Do not use the product at a voltage other than ...

Page 5: ...oduct while it is still plugged in Remove the battery and unplug the AC plug cord when not using the battery charger Do not plug in the AC plug cord with wet hands This can cause an electrical shock Do not subject the product to strong impacts or allow it to drop onto a hard surface This can cause a malfunction To reduce the risk of hazards use only CSA UL Certified power supply cord set cord is T...

Page 6: ...t inside Storing the camera where pesticides and chemicals are handled should be avoided Remove the camera from its case and store in a well ventilated place to prevent the camera from becoming moldy during storage Do not use the camera where it may come in contact with rain water or any other liquid because the camera is not weather water or liquid resistant Ensure that the camera is not subjecte...

Page 7: ...memory at your own risk The AC plug cord supplied with the camera is for exclusive use with the Battery charger D BC8 Do not use it with any other equipment Please do not press forcefully on the LCD monitor This could cause breakage or malfunction Be careful not to sit down with the camera in your back pocket as this may damage the exterior of the camera or the LCD monitor When using a tripod with...

Page 8: ...e Display Language 26 Setting the Date and Time 27 Quick Start 30 Taking Still Pictures 30 Playing Back Still Pictures 34 Playing Back an Image 34 Playing Back the Previous or Next Image 34 Common Operations 36 Turning the Camera On and Off 36 Turning the Camera On in Capture Mode 36 Turning the Camera On in Playback Mode 37 Using the Button Functions 38 Capture Mode 38 Playback Mode 39 Voice Reco...

Page 9: ...us Settings 92 Setting the Light Metering Mode to Determine the Exposure 95 Setting the Sensitivity 96 Setting the Exposure EV Compensation 98 Selecting the Settings for Taking Movies 99 Setting the Shake Reduction Function for Still Images to On 102 Setting the Instant Review Time 103 Setting the Green Button 104 Setting the Image Sharpness 107 Setting the Color Saturation 108 Setting the Image C...

Page 10: ...with Color Filters 145 Editing Pictures with the Digital Filter 147 Editing Pictures with Brightness Filter 149 Editing Movies 151 Removing Red eye 154 Adding a Frame Frame Composite 156 Copying Files 158 Settings 160 Camera Settings 160 Setting Up the Start up Screen 160 Formatting an SD Memory Card or the Built in Memory 162 Changing the Sound Settings 163 Changing the Date and Time 166 Setting ...

Page 11: ...nctions including how to use the Capture Mode screen to select the capture mode best suited to the situation 5 Recording and Playback of Sound This chapter explains how to record sound only or add a voice memo to an image and how to play back voice memos 6 Playback Deleting Editing This chapter explains how to play back images on the camera or on a TV how to delete resize and crop images and how t...

Page 12: ...mera Attach the strap p 15 Power the camera Charge p 17 and install the battery p 16 Install the SD Memory Card p 21 Make the initial settings p 26 29 Let s get used to the basic operations Turn the camera on and off p 36 Take still pictures p 30 33 Play back and delete the pictures p 34 35 Switch between Capture mode and Playback mode p 50 Mastering the shutter release is the key to taking good p...

Page 13: ... pictures you took Zoom display nine image display and calendar display p 117 122 Slideshow p 123 For availability of functions for each Capture Mode see p 182 Once you get used to the basic operations enjoy taking movies editing pictures or printing your favorite pictures Let s use the menus Set menu items p 42 43 Select the recorded pixels and quality level for still pictures p 87 89 Just by sel...

Page 14: ... the Battery charger kit K BC8 For details on the optional accessories refer to Optional Accessories p 184 Checking the Contents of the Package Camera Optio A30 Strap O ST20 Software CD ROM S SW66 AV cable I AVC7 USB cable I USB7 Rechargeable lithium ion battery D LI8 Battery charger D BC8 AC plug cord D CO2 Operating Manual this manual Operating Manual PC Connection Manual ...

Page 15: ...een Microphone Self timer lamp Auxiliary AF light Shutter release button DC input terminal Shake Reduction preview button Lens Strap lug Remote control receiver Flash PC AV terminal Terminal cover LCD monitor Tripod socket Battery card cover Access lamp Speaker ...

Page 16: ...controller 2 2 Zoom button Four way controller 3 3 for cropping Four way controller 4 4 Green i button Four way controller 5 5 for operating as the Green button MENU button for deleting an image Shutter release button OK button Zoom button OK Display button MENU button Four way controller Power switch Q Playback button Green i button Shake Reduction preview button OK b g q MODE Four way controller...

Page 17: ...15 1 Getting Started Getting Started Attaching the Strap Pass the narrow end of the strap through the strap lug and pass the other end through the loop ...

Page 18: ...elease the battery by using your finger to press the battery lock lever in the same direction as when you inserted the battery The battery will be ejected Pull the battery out of the camera Installing the Battery Removing the Battery If you intend to use the camera continuously for a long period use of the AC adapter kit K AC63 optional is recommended 1p 19 Insert the battery correctly If the batt...

Page 19: ...en charging is finished Charging the Battery The time required to fully charge the battery is about 100 minutes max The appropriate ambient temperature for charging the battery is 0 C to 40 C 32 F to 104 F The charging time may vary depending on the ambient temperature and charging conditions The battery has reached the end of its service life if it runs down soon after being charged Replace with ...

Page 20: ...Level Indicator You can check the battery level by the symbol on the LCD monitor In general battery performance temporarily deteriorates as the temperature decreases When using the camera in a cold environment keep it warm by putting it in your pocket or inside your coat Battery performance that has deteriorated due to low temperature will be restored when the battery is returned to room temperatu...

Page 21: ...er 4 Plug the AC plug cord into the power outlet Using the AC Adapter optional Make sure that the camera is turned off when connecting or disconnecting the AC adapter Make sure that the AC plug cord and connecting cable are inserted securely The data may be lost if the cable becomes disconnected while you are taking pictures Be sure to read the operating manual accompanying the AC adapter before u...

Page 22: ...ric shock when using the battery charger or AC adapter be sure to read the section on Using your camera safely on page 1 Refer to page 191 for the specifications of the battery charger and AC adapter Precautions When Using the Battery Charger or AC Adapter ...

Page 23: ...y Card so the label the side with the 2 symbol is facing toward the LCD monitor and push the card in until it clicks 3 Close the battery card cover To remove the card eject the card by pressing it in the direction indicated by the arrow and pull it out Make sure that the camera is turned off before inserting or removing the SD Memory Card Be sure to format unused cards or cards that have been used...

Page 24: ...is mishandled by the user 2 when the SD Memory Card is exposed to static electricity or electrical interference 3 when the card has not been used for a long time 4 when the card is ejected the AC adapter is disconnected or the battery is removed while the data on the card is being recorded or accessed The SD Memory Card has a limited service life If it is not used for a long time the data on the c...

Page 25: ...ording to Use The default setting is D Image Size and Quality of Still Pictures How to Set the Menus 1p 42 Selecting the Recorded Pixels of Still Pictures 1p 87 Selecting the Quality Level of Still Pictures 1p 89 10M 3648 2736 7M 3072 2304 For printing images with high resolution settings in your printer printing at A4 size or larger or editing and processing images 5M 2592 1944 3M 2048 1536 2M 16...

Page 26: ...produced but the file size is increased Select the appropriate size and quality on the A Rec Mode menu Appropriate Sizes Recorded Pixels According to Use The default setting is 640 640 480 Quality Level C Best D Better E Good Sound Recorded Pixels 10M 3648 2736 75 109 152 4 hr 25 min 59 sec 7M 3072 2304 107 155 215 5M 2592 1944 151 218 303 3M 2048 1536 229 331 459 2M 1600 1200 321 464 643 1024 102...

Page 27: ...mes when using a 256 MB SD Memory Card The table above is based on standard shooting conditions specified by PENTAX and may vary depending on the subject shooting conditions capture mode SD Memory Card etc Quality Level C Best D Better E Good Recorded Pixels 640 640 480 11 min 51 sec 14 min 50 sec 17 min 49 sec 320 320 240 45 min 50 sec 56 min 56 sec 65 min 39 sec ...

Page 28: ...he menus and error messages are displayed from the following English French German Spanish Portuguese Italian Dutch Danish Swedish Finnish Polish Czech Hungarian Turkish Russian Thai Korean Chinese traditional and simplified and Japanese 1 Press the four way controller 5 The Language screen appears 2 Use the four way controller 2345 to select a language The default setting is English If you want t...

Page 29: ...rrent date and time and the display style 1 Press the four way controller 5 The frame moves to mm dd yy 2 Use the four way controller 23 to select the date display style 3 Press the four way controller 5 The frame moves to 24h 4 Use the four way controller 23 to select 24h 24 hour display or 12h 12 hour display 5 Press the four way controller 5 The frame returns to Date Style Setting the Date and ...

Page 30: ...me If you have selected 12h in Step 4 the setting switches between am and pm corresponding to the time When you finish the settings and press the OK button the camera clock is reset to 00 seconds To set the exact time press the OK button when the time signal on the TV radio etc reaches 00 seconds Date Adjust MENU Cancel Date Style mm dd yy Date 01 01 2007 Time 0 00 OK OK 24h Date Adjust MENU Cance...

Page 31: ...nd Time p 166 The video output format is automatically set according to the language you have selected If the output format is different from the one used in your country or region change the format following the procedures described in Changing the Video Output Format p 173 Language Video Output Format English English NTSC French PAL German Deutsch PAL Spanish PAL Portuguese PAL Italian Italiano ...

Page 32: ...elease button halfway The focus frame on the LCD monitor will light green when the camera is in focus When Shake Reduction is set to O On Shake Reduction On appears on the LCD monitor To take the picture compensating for camera shake go to step 4 after is displayed 4 Press the shutter release button fully The picture is taken The image appears on the LCD monitor for 0 5 seconds Instant Review The ...

Page 33: ...il the focus frame turns green The camera is in focus 3 Press the shutter release button fully Press it down slowly until the shutter is released Pressing the shutter release button You can press the shutter release button all the way down single step if the camera is in the following status Either Green Mode or Auto Picture mode is selected Focus mode is set to Standard Autofocus Drive mode is se...

Page 34: ... While holding the shutter release button halfway move the camera to obtain the desired composition The focus is locked at the point you set in step 3 even if you recompose Focus lock 5 Press the shutter release button fully You may have difficulty in auto focusing on such subjects as Subject contrast is very week blue sky solid white wall etc Dark places black object or subject that does not refl...

Page 35: ...our way controller 2 to select Delete and press the OK button The image displayed on the LCD monitor is deleted You can temporaliry brighten the LCD backlight to improve viewing LCD Bright Mode It is useful when you view the LCD monitor outdoors or in brighter places 1 In Capture mode press and hold the OK Display button for more than 1 second The LCD monitor turns brighter for a certain amount of...

Page 36: ... amount of time Still pictures can be played back one at a time proceeding either forward or backward 1 Press the Q Playback button after taking a picture The image appears on the LCD monitor 2 Press the four way controller 45 Four way controller 4 Displays the previous image Four way controller 5 Displays the next image Playing Back an Image Zoom Display 1p 117 Playing Back the Previous or Next I...

Page 37: ...splayed Image The last picture taken appears on the LCD monitor when you switch to the Playback mode You can enlarge the image displayed on the LCD monitor by pressing the zoom button If you press the zoom button to enlarge a rotated image the enlarged image will return to its original position If you stop enlarging the image the image will be rotated again If there is no image stored the message ...

Page 38: ...the Playback mode The lens is not retracted Press and hold the Q Playback button for 2 seconds to switch to the Playback mode The lens is retracted Press and hold the Q Playback button for more than 4 seconds to show the images stored in the built in memory with the SD memory card installed 2 Press the power switch again The camera turns off with the lens retracted Turning the Camera On in Capture...

Page 39: ...g the Q Playback button The power indicator lights green and the camera turns on in the Playback mode with the lens retracted To switch to the Capture mode press the Q Playback button again Turning the Camera On in Playback Mode Playing Back Still Pictures 1p 34 ...

Page 40: ... Changes the focus mode 1p 82 g2 Changes the drive mode 1p 76 to p 79 X 3 Displays the Capture Mode Palette 1p 47 b4 Changes the flash mode 1p 85 OK Display button Changes the information displayed on the LCD monitor 1p 50 When you press and hold the button for more than 1 second the LCD Bright Mode is activated The LCD monitor turns brighter for a certain amount of time 1p 33 Green i button Enter...

Page 41: ...Voice Recording mode Four way controller 2345 For playing back still images 45 Displays the previous or next image in single image display 1p 34 When rotating the displayed image the image is rotated 90 degrees clockwise each time you press the 5 and 90 degrees counter clockwise each time you press the 4 1p 144 3 Displays the Playback Mode Palette 1p 49 2345 Moves the display area of the enlarged ...

Page 42: ... the previous index 5 Starts playback from the next index OK Display button Changes the information displayed on the LCD monitor 1p 120 When you press and hold the button for more than 1 second the LCD Bright Mode is activated The LCD monitor turns brighter for a certain amount of time 1p 34 Returns to a single image display in nine image display 1p 121 Displays the selected image full screen in c...

Page 43: ...utton is held down and stops when the button is released Q Playback button Switches to Playback mode 1p 37 When pressed again returns to Voice Recording mode OK Display button Turns the LCD monitor on and off MENU button When pressed during recording an index can be added When pressed during standby or before playback displays the A Rec Mode menu 1p 42 Voice Recording Mode 3 1 2 4 1 2 3 4 ...

Page 44: ...nu and H Set up menu 3 Use the four way controller 23 to select an item Moves the highlight up or down 4 Press the four way controller 5 A pull down menu or setting screen appears The pull down menu displays only those items that can be selected for the current camera settings 5 Use the four way controller 23 to change the setting The setting changes each time the four way controller 23 is pressed...

Page 45: ...the operation and return to the original screen Capture or Playback mode Saves the current setting and return to Step 1 Cancel Cancels the current selection exit the operation and return to Step 3 To Save the Setting and Begin Playback of Images To Save the Setting and Continue with Menu Operations To Cancel the Changes and Continue with Menu Operations If you press the MENU button with the pull d...

Page 46: ...0M AUTO 800 Rec Mode MENU Exit Recorded Pixels Quality Level White Balance AF Setting AE Metering Sensitivity AWB 10M AUTO 800 Rec Mode Recorded Pixels Quality Level White Balance AF Setting AE Metering Sensitivity AWB Auto 10M MENU Cancel OK OK Rec Mode MENU Exit EV Compensation Movie Digital Zoom Instant Review Memory 0 5sec 0 5 0 0 Shake Reduction Memory Flash Mode Drive Mode Focus Mode Zoom Po...

Page 47: ...ine the exposure p 95 Sensitivity For setting the sensitivity p 96 EV Compensation For adjusting the exposure between 2 0EV and 2 0EV p 98 Movie Recorded Pixels For selecting the recorded pixels of the movie p 99 Quality Level For selecting the quality level of the movie p 100 Movie SR For compensating for camera shake of the movie automatically p 101 Shake Reduction For reducing camera shake whil...

Page 48: ...e way of naming image folders p 171 USB Connection For changing the USB connection mode p 172 Video Out For setting the video output format p 173 Brightness Level For changing the brightness of the LCD monitor p 174 Power Saving For setting the Power Saving function p 175 Quick Zoom For displaying the image at specified magnification by pressing the zoom button once p 118 Auto Power Off For turnin...

Page 49: ...er 3 In Capture mode the Capture Mode Palette appears In Playback mode the Playback Mode Palette appears 2 Use the four way controller 2345 to select an icon 3 Press the OK button The screen for the selected mode appears Capture Mode Palette How to operate the Mode Palette Mode Palette List Icon Item Description Page Auto Picture mode Selects the best capture mode p 58 R Program mode Lets you take...

Page 50: ...port mode Lets you take clear pictures of moving subjects with a high shutter speed to prevent motion blur E Pet mode Lets you take clear pictures of pets to fit the hair color p 68 Text mode Lets you take clear pictures of text or writing Also lets you turn colored text black white or reverse color p 69 K Food mode Lets you take appetizing pictures of prepared food p 64 Digital SR mode Lets you s...

Page 51: ... slim effect to still pictures according to your taste p 147 Brightness Filter For adjusting the brightness of images using a filter p 149 Movie Edit For editing movies p 151 Z Red eye Compensation For retouching red eyes a phenomenon that can happen when shooting with a flash p 154 Voice Memo For adding a voice memo to an image p 115 Z Protect For protecting images and sounds to avoid accidental ...

Page 52: ...mal Display Shooting information is displayed when the power is turned on 1 Capture mode 2 Flash mode 3 Drive mode 4 Focus mode 5 Focus frame 6 Digital zoom 7 Card Built in memory 8 Battery indicator 9 Remaining number of recordable images 10 Date and time 11 World time setting 12 Shake Reduction On 13 Aperture 14 Shutter speed The information on Shake Reduction is displayed as follows Shake Reduc...

Page 53: ...hows the number of pixels 1 Recorded Pixels 2 Quality Level 3 White Balance 4 AE Metering 5 Sensitivity 6 Histogram Grid Display The grids divide the screen into nine parts These grids will help you to improve composition No icons No shooting information is displayed The focus frame appears in Autofocus mode If any of the settings are changed the icon of the setting appears for a few seconds LCD B...

Page 54: ...unt of time 1p 33 Under shooting conditions where camera shake is likely to occur Anti shake warning will be displayed Take pictures using the Shake Reduction function or with the camera secured on a tripod or other stable surface 1p 54 All the camera buttons function as usual even when the LCD backlight is off Press the shutter release button to take pictures as usual ...

Page 55: ...tends to appear on the left side for a darker image and the graph peak tends to appear on the right side for a brighter image In general when the exposure metering of your image is well balanced the graph peaks tend to appear in the middle On the contrary when the exposure metering of the subject is imbalanced that is with dark areas and or bright areas the peaks will appear on the sides rather th...

Page 56: ...r image blur You can preview the compensated image on the LCD monitor before taking the picture The unique shake reduction system of PENTAX Digital SR mode The mode allows you to set the sensitivity to maximum ISO3200 The higher shutter speed enables the reduction of both camera shake and blurring Movie SR function for movies The movie anti shake function electronically compensates for image blur ...

Page 57: ...aken Do not press the Shake Reduction preview button unless it is necessary If you press the button even when the camera is not in the Capture mode the Shake Reduction function is activated and will waste battery power If you do not wish to preview the compensated image before shooting take pictures in the basic way that is press the shutter release button halfway and then press it fully Be sure t...

Page 58: ...e Green Mode you cannot change the information displayed on the LCD monitor by pressing the OK Display button In the Green Mode you cannot display the A Rec Mode menu or the Capture Mode Palette If you try to show them the message Green mode must be canceled to use this function and key lock icon appear When the camera switches from the Green Mode to Playback Mode you cannot display the H Set up m...

Page 59: ...he default is P Standard g Self timer can be selected Focus mode The default is Standard q Macro mode can be selected Recorded Pixels Quality level D Better White Balance F Auto Focusing Area J Multiple Focus Limiter O On Aux AF Light O On AE Metering Multi segment Sensitivity AUTO EV Compensation 0 0 Digital Zoom O On Instant Review 0 5sec Sharpness Standard Saturation Standard Contrast Standard ...

Page 60: ...mode 3 Press the OK button 4 Press the shutter release button halfway The focus frame on the LCD monitor will light green when the camera is in focus and the selected mode icon will appear on the top left of the LCD monitor 5 Press the shutter release button fully The picture is taken Taking Pictures Automatically Auto Picture Mode Taking Still Pictures 1p 30 Shutter release button Four way contro...

Page 61: ...d to 0 0 1p 98 When the camera selects Portrait mode Face Recognition AF and Face Recognition AE are activated When you point the camera at your subject s face the camera automatically recognizes it adjusting focus and exposure to take a high quality picture 1p 66 ...

Page 62: ... for proper exposure Shutter Priority Set shutter speed manually Aperture is set automatically Manual Exposure Set both shutter speed and aperture manually Slower shutter speed The shutter remains open for a longer time If the subject is moving the image will be blurred while the shutter is open thus enhancing the effect of motion Faster shutter speed The shutter remains open for a shorter time It...

Page 63: ...gram mode and press the OK button The camera is ready for taking pictures Set other functions when necessary 4 Use the four way controller 23 to select Shutter Priority mode and press the OK button 5 Press the four way controller 3 The screen for selecting the shutter speed appears To Select the Program mode Setting the Shooting Functions 1p 82 p 109 To Select the Shutter Priority mode OK MENU OK ...

Page 64: ...he OK button 5 Press the four way controller 3 The screen for selecting the shutter speed and aperture value appears 6 Use the four way controller 45 to select a desired shutter speed and 2 to select a desired aperture value Depending on the shutter speed and aperture value you set an exposure warning may appear for your reference If you compensate the exposure p 98 already set in Shutter Priority...

Page 65: ...e You can display the Capture Mode Palette by pressing the four way controller 3 while showing the screen for selecting the shutter speed and aperture value In Shutter Priority mode Sensitivity is fixed to AUTO800 In Shutter Priority mode and Manual Exposure mode the exposure warning is shown as follows When the exposure is greater than 2 0EV or less than 2 0EV an icon or is displayed When the exp...

Page 66: ...raits with spatial effect by emphasizing the person Kids Ideal for taking pictures of moving children Also gives them a healthy look L Surf Snow Lets you take photos against dazzling backgrounds like beaches or snow covered mountains Sport Lets youtake clearpicturesofmovingsubjects withahigh shutterspeed E Pet Lets you take clear pictures of pets to fit their hair color Text Lets you take clear pi...

Page 67: ...lease button halfway The focus frame on the LCD monitor will light green when the camera is in focus 5 Press the shutter release button fully The picture is taken In Picture modes Saturation Contrast Sharpness White Balance and AE Metering are automatically set to their default settings You cannot change these settings Landscape OK MENU OK Cancel Picture modes ...

Page 68: ...Portrait mode When Kids mode is previously selected is displayed on the Mode Palette Select Kids mode then 3 Press the OK button The screen for selecting one of the two modes appears 4 Press the four way controler 23 to select Portrait mode or Kids mode Taking Pictures of People Portrait Mode Kids Mode Portrait Lets you take portraits with spatial effect by emphasizing the person Kids Ideal for ta...

Page 69: ...uses using the Focusing Area Multiple Only the selected mode icon and the focus frame appear on the LCD monitor No other shooting information is displayed You cannot change the display mode by pressing the OK Display button Face Recognition AF and Face Recognition AE may not work if the subject s face is partly covered for example with sunglasses or when the subject does not face the camera The AE...

Page 70: ...er the cat or dog icon does not affect the resulting picture Select whichever you prefer 5 Press the OK button The desired Pet mode is selected and the camera is ready for taking pictures 6 Press the shutter release button halfway The focus frame turns green when the subject is in focus 7 Press the shutter release button fully The picture is taken Taking Pictures of Your Pet Pet Mode When you sele...

Page 71: ...ller 23 to select Press the four way controller 45 to adjust the contrast 5 Press the OK button The desired text mode is selected and the camera is ready for taking pictures 6 Press the shutter release button halfway The focus frame turns green when the subject is in focus 7 Press the shutter release button fully The picture is taken Taking Pictures of Text Text Mode Color Maintains original color...

Page 72: ...ure is taken Taking Pictures of Dark Scenes Night Scene Mode Total recording time will be longer when the picture is taken at slower shutter speed approximately 1 4 second or slower because the noise reduction function is activated to reduce noise The shutter speed becomes slower when taking pictures of dark scenes The camera shake is likely to occur under such condition The followings are good wa...

Page 73: ... the four way controller 2345 to select Digital SR mode 3 Press the OK button 4 Press the shutter release button halfway The focus frame on the LCD monitor will light green when the camera is in focus 5 Press the shutter release button fully The picture is taken Reducing Camera Shake and Blurring in Pictures Digital SR Mode The recorded pixels are fixed to 5M and cannot be changed In Digital SR mo...

Page 74: ... Movie mode icon 2 Flash Off icon 3 Card Built in memory 4 Recordable time 5 Movie SR On 4 Press the shutter release button Shooting starts Press the zoom button to change the size of the subject using Digital Zoom Zoom button x Enlarges the subject Zoom button w Diminishes the subject 5 Press the shutter release button Shooting ends Taking Movies Movie Mode Shutter release button Four way control...

Page 75: ...g with a remote control unit Optical zoom and Intelligent Zoom Available before shooting starts Set Movie SR to Off in A Rec Mode menu to use Digital Zoom in Movie mode 1 p 101 The Focusing Area is fixed to Spot and the Focus Limiter and the auxiliary AF light are set to Off in Movie mode When Focus Mode is set to Standard Autofocus Macro or Super Macro the AF operation is performed once right bef...

Page 76: ... Use the four way controller 45 to select a frame 5 Press the OK button The subject appears in the selected frame 6 Press the shutter release button halfway The focus frame on the LCD monitor will light green when the camera is in focus Taking Pictures in Frame Composite mode Shutter release button Four way controller OK button Green button Frame Composite OK MENU OK Cancel Select the frame Select...

Page 77: ...ress the Green button A message appears and the frames on the SD Memory Card that you can register in the built in memory appear 2 Use the four way controller 45 to select the frame you want to register and press the OK button The frame is registered in the built in memory instead of the frame selected in Step 1 The Recorded Pixels is fixed to 3M and cannot be changed to any other size Continuous ...

Page 78: ...g g Self timer The picture is taken after the self timer lamp lights for about seven seconds then blinks for about three seconds 2 sec Self timer The picture is taken after the self timer lamp blinks for about two seconds Using the Self timer Focusing may be compromised if you move the camera while the self timer is running The countdown appears on the LCD monitor when you press the shutter releas...

Page 79: ...ly Pictures are taken continuously while pressing the shutter release button Shooting stops when you release the shutter release button Continuous Shooting Continuous Shooting Mode You can continue shooting until the SD Memory Card or the built in memory is full The interval will vary depending on the Recorded Pixels and Quality Level settings The flash will not discharge in Continuous Shooting mo...

Page 80: ...ntrol unit i Remote control The picture is taken after the self timer lamp blinks quickly for about three seconds h 0 sec remote control The picture is taken immediately Using the Remote Control Unit optional Taking Pictures Using the Remote Control Focusing may be compromised if you move the camera while the self timer lamp is blinking You cannot use the remote control unit in Movie mode Shutter ...

Page 81: ...e Battery for the Remote Control Unit A signal can be sent from the remote control unit to the camera approximately 30 000 times Contact your nearest PENTAX customer service center if the battery needs changing A charge is made for changing the battery Changing the Magnification Using the Remote Control Unit You cannot change the zoom magnification with the remote control unit in Super Macro mode ...

Page 82: ...zoom to Intelligent Zoom and Intelligent Zoom to Digital Zoom The zoom bar is displayed as follow 1 You can zoom in maximum 3 optically 2 The Intelligent Zoom range differs depending on the recorded pixels See the following table Using Zoom to Change the Subject Size Shutter release button Four way controller MENU button Zoom button 198 198 2 0 x 2 0 x 198 2 0 x Zoom bar Zoom ratio Zoom in with hi...

Page 83: ...lable Equivalent to approx 16 3 7M Approx 3 6 5M Approx 4 2 3M Approx 5 3 2M Approx 6 7 1024 Approx 10 4 640 Approx 16 3 Same as 16 3 Digital Zoom Intelligent Zoom is not available under the following conditions When Digital Zoom is set to Off When the recorded pixels is 10M 3 optical zoom available In Digital SR Mode or Movie mode The image enlarged using Intelligent Zoom may appear rough on the ...

Page 84: ...hen the distance to the subject is approx 6 cm 15 cm 2 3 in 5 9 in The camera focuses on the object in the autofocus area when the shutter release button is pressed halfway Pan Focus mode This mode is used when shooting close and distant subjects together or the subject is hard to focus on You can adjust the focus on a subject in the following ranges When taking still pictures approx 2 3 m 7 55 ft...

Page 85: ... light may be activated under low lighting in Autofocus mode The auxiliary AF light of this camera conforms to the safety standard IEC60825 1 for Class 1 LED product Looking at the light directly will not create safety hazard However do not look into the emitter from a very short distance since you may feel dazzled The default setting is Standard Autofocus The zoom is fixed at the full wide angle ...

Page 86: ... When focusing hold down the four way controller 23 to focus quickly When you use Manual Focus in Movie mode adjust the focus right before starting taking a movie You cannot adjust the focus while taking the movie To change Focus Mode from Manual Focus to another one press the four way controller 5 while the indicator is displayed on the LCD monitor 2 12 00 12 00 2 12 00 01 26 2007 01 26 2007 01 2...

Page 87: ...cally d Flash On Red eye This mode reduces the phenomenon of red eyes caused by the light from the flash being reflected in the subject s eyes The flash will discharge regardless of lighting conditions b Soft Flash This mode reduces the intensity of the flash so that the flash is not too bright even when fired at close range The flash will discharge regardless of the light conditions The Flash Mod...

Page 88: ... however you can still select the desired flash mode Firing the flash in Super Macro mode causes vignetting in the bottom left corner of the image Note that the shutter speed becomes slower when taking pictures with the flash in Night Scene mode When using very slow shutter speeds taking pictures of night scenes for example the Shake Reduction function may not be effective It is recommended you se...

Page 89: ... 5 The pull down menu appears Selecting the Recorded Pixels of Still Pictures 10M 3648 2736 7M 3072 2304 For printing images with high resolution settings in your printer printing at A4 size or larger or editing and processing images 5M 2592 1944 3M 2048 1536 For printing at postcard size For using as images on websites or attaching images to e mails 2M 1600 1200 1024 1024 768 640 640 480 Rec Mode...

Page 90: ...ctures Selecting a large size produces a clear picture when it is printed out The Recorded Pixels setting is saved when the camera is turned off The Intelligent Zoom range differs depending on the selected recorded pixels 1p 81 Image Size and Quality of Still Pictures 1p 23 Rec Mode Recorded Pixels Quality Level White Balance AF Setting AE Metering Sensitivity AWB Auto MENU Cancel OK OK 3M 2M 1024...

Page 91: ...mera is ready for taking pictures Selecting the Quality Level of Still Pictures C Best Lowest compression ratio Suitable for photo prints D Better Standard compression ratio Suitable for viewing the image on a computer screen E Good Highest compression ratio Suitable for attaching to e mails or creating websites The Quality Level setting is saved when the camera is turned off Image Size and Qualit...

Page 92: ...ra adjusts the white balance automatically G Daylight Use this mode when taking pictures outside in sunlight H Shade Use this mode when taking pictures outside in the shade I Tungsten Light Use this mode when taking pictures under electric or other tungsten light J Fluorescent Light Use this mode when taking pictures under fluorescent light K Manual Adjusts the white balance manually Use this mode...

Page 93: ... so that it fills the screen 3 Press the Green button The white balance is automatically adjusted Complete appears on the LCD monitor 4 Press the OK button The setting now adjusted is saved and the screen returns to the A Rec Mode menu 5 Press the shutter release button halfway The camera is ready for taking pictures Manual Setting White Balance AWB AWB OK OK AWB OK OK MENU Cancel Cancel Adjust Ad...

Page 94: ...a wide range in the center of the monitor within the focusing area and focuses on the nearest subject K Spot The camera measures a narrow range in the center of the monitor the spot focusing area making easier for you to focus on a specific subject Automatic tracking AF The camera continues to focus on the moving subject while you are pressing the shutter release button halfway Rec Mode MENU Exit ...

Page 95: ...u set the Focus Limiter to On the focusing range of the lens is limited to the long range side for normal shooting and to the close up side for macro shooting You can adjust the focus on the subject quickly 4 Use the four way controller 23 to select Focus Limiter 5 Use the four way controller 45 to select O On P Off 6 Press the shutter release button halfway The camera is ready for taking pictures...

Page 96: ...uxiliary AF Light The auxiliary AF light of this camera conforms to the safety standard IEC60825 1 for Class 1 LED product Looking at the light directly will not create safety hazard However do not look into the emitter from a very short distance since you may feel dazzled The camera does not emit the AF light under the following conditions In Movie mode In Landscape mode The AF light is available...

Page 97: ...segment The exposure is determined by the entire screen M Center weighted The exposure is determined mainly by the center of the screen N Spot The exposure is determined by the small area in the center of the screen only Saving the AE Metering Mode 1p 110 In Shutter Priority mode and Manual mode Multi segment cannot be selected Rec Mode MENU Exit Recorded Pixels Quality Level White Balance AF Sett...

Page 98: ...fault You can also set ISO Correction in AUTO to 64 100 64 200 64 400 64 800 or 64 1600 In Digital SR mode 64 3200 is also selectable 64 At lower sensitivity images are sharper and noise is reduced but the shutter speed will be slower under dark conditions At higher sensitivity the shutter speed will be higher but image noise will increase In Digital SR mode 3200 is also selectable 100 200 400 800...

Page 99: ...y 1 p 110 The sensitivity for Movie mode is fixed to Auto The setting cannot be changed The sensitivity for Shutter Priority mode is fixed to AUTO800 The setting cannot be changed In Manual Exposure mode AUTO cannot be selected Even if you set Sensitivity to Off in Memory the selected range for ISO Correction in AUTO is saved when the camera is turned off The selected sensitivity will be saved onl...

Page 100: ...the EV setting Brightens the picture overexposed Darkens the picture underexposed You can select the EV setting in the range of 2 0 EV to 2 0 EV in 1 3 EV steps 4 Press the shutter release button halfway The camera is ready for taking pictures Setting the Exposure EV Compensation Saving the EV Compensation Value 1p 110 In Auto Picture mode the exposure is fixed to 0 0 Rec Mode MENU Exit Recorded P...

Page 101: ...epending on the quality level setting Recorded Pixels Selecting the Settings for Taking Movies Selecting the Recorded Pixels of Movies 640 640 480 You can view high quality movies at VGA size The recordable time is shorter 320 320 240 The file size is smaller and the recordable time is longer Rec Mode MENU Exit Recorded Pixels Quality Level White Balance AF Setting AE Metering Sensitivity AWB 10M ...

Page 102: ...er 23 to select Quality Level 5 Press the four way controller 5 The pull down menu appears 6 Use the four way controller 23 to select a desired quality level The recordable time for the selected quality level appears 7 Press the shutter release button halfway The camera is ready for taking pictures Size and Quality of Movies 1p 24 Selecting the Quality Level of Movies Size and Quality of Movies 1p...

Page 103: ... image blur to allow you to take smooth movies 4 Use the four way controller 23 to select Movie SR 5 Use the four way controller 45 to select O On or P Off Compensating for Camera Shake While Taking Movies Movie SR Set Movie SR to Off to use Digital Zoom while taking movies MENU Recorded Pixels Quality Level Movie SR Movie 640 ...

Page 104: ...f Shake Reduction Off is always displayed on the LCD monitor 4 Press the shutter release button halfway The camera is ready for taking pictures Setting the Shake Reduction Function for Still Images to On You can also select On Off using the Green button This function cannot be used when assigning a function other than Shake Reduction to the Green button 1p 104 Rec Mode MENU Exit Recorded Pixels Qu...

Page 105: ...lease button halfway The camera is ready for taking pictures Setting the Instant Review Time The Instant Review setting is saved when the camera is turned off Rec Mode MENU Exit Recorded Pixels Quality Level White Balance AF Setting AE Metering Sensitivity AWB 10M AUTO 800 MENU Shutter release button MENU button Four way controller Rec Mode MENU Exit EV Compensation Movie Digital Zoom Instant Revi...

Page 106: ...g screen appears 4 Use the four way controller 23 to select the function you want to register 5 Press the shutter release button halfway The camera is ready for taking pictures Setting the Green Button Assigning a Function Green Mode Shake Reduction Green Mode is registered as the default setting Rec Mode MENU Exit Recorded Pixels Quality Level White Balance AF Setting AE Metering Sensitivity AWB ...

Page 107: ... four way controller 5 The pull down menu appears 8 Use the four way controller 23 to select a function you want to assign 9 Press the OK button 10 Press the shutter release button halfway The camera is ready for taking pictures Registering Frequently Used Functions Fn Setting This function is activated only when you assign the Fn Setting to the Green button You can assign only one function to eac...

Page 108: ...pensation 3 EV Compensation 4 Recorded Pixels 4 Recorded Pixels 5 Quality Level 5 Quality Level still picture mode Movie mode Setting items Recorded Pixels Recorded Pixels Quality Level Quality Level White Balance Movie SR Focusing Area White Balance AE Metering EV Compensation Sensitivity Sharpness EV Compensation Saturation Shake Reduction Contrast Sharpness Off Saturation Contrast Off ...

Page 109: ...sharpness Softens the contours Sharpens the contours 4 Press the shutter release button halfway The camera is ready for taking pictures Setting the Image Sharpness The Sharpness setting is saved when the camera is turned off Rec Mode MENU Exit Recorded Pixels Quality Level White Balance AF Setting AE Metering Sensitivity AWB 10M AUTO 800 MENU Shutter release button MENU button Four way controller ...

Page 110: ...aturation Increases the saturation 4 Press the shutter release button halfway The camera is ready for taking pictures Setting the Color Saturation The Saturation setting is saved when the camera is turned off Rec Mode MENU Exit Recorded Pixels Quality Level White Balance AF Setting AE Metering Sensitivity AWB 10M AUTO 800 MENU Shutter release button MENU button Four way controller Rec Mode MENU Ex...

Page 111: ...contrast Increases the contrast 4 Press the shutter release button halfway The camera is ready for taking pictures Setting the Image Contrast The Contrast setting is saved when the camera is turned off Rec Mode MENU Exit Recorded Pixels Quality Level White Balance AF Setting AE Metering Sensitivity AWB 10M AUTO 800 MENU Shutter release button MENU button Four way controller Rec Mode Green Button M...

Page 112: ...ed using the four way controller 2 is saved P Focus Mode The focus mode setting on the q button is saved P Zoom Position The optical zoom position setting on the zoom button is saved P MF Position The manual focus position is saved P White Balance The White Balance setting on the A Rec Mode menu is saved P AE Metering The AE Metering setting on the A Rec Mode menu is saved P Sensitivity The Sensit...

Page 113: ...ter release button halfway The camera is ready for taking pictures The current zoom position in Intelligent Zoom or Digital Zoom will not be saved even if you set Zoom Position to On in Memory Even if you set Sensitivity to Off in Memory the selected range for ISO Correction in AUTO is saved when the camera is turned off Rec Mode MENU Exit EV Compensation Movie Digital Zoom Instant Review Memory 0...

Page 114: ...oice Recording 3 Press the OK button The recordable time appears on the LCD monitor 1 Remaining recordable time 2 Recording time 4 Press the shutter release button Recording starts The access lamp lights during recording When the shutter release button is pressed for more than one second recording continues for as long as the button is held down and stops when the button is released Shutter releas...

Page 115: ...ay Mode Palette and change to another mode You can exit the Voice Recording mode Sound is saved in WAVE monaural files The microphone is located on the front of the camera Aim the camera to obtain the best sound An index can be added by pressing the MENU button during recording You can record sound for a maximum of 24 consecutive hours on a high capacity SD memory card ...

Page 116: ...ecorded indexes Four way controller 4 Rewinds about five seconds Four way controller 5 Advances about five seconds If there are recorded indexes Four way controller 4 Plays back starting from the previous index Four way controller 5 Plays back starting from the next index Zoom button x Increases the volume Zoom button w Reduces the volume 4 Press the four way controller 3 Playback stops Four way c...

Page 117: ...s 3 Use the four way controller 2345 to select Voice Memo 4 Press the OK button Recording starts You can record for up to 30 seconds 5 Press the OK button Recording stops Recording a Voice Memo U appears on the screen when a voice memo is added A voice memo cannot be added to an image which already has a voice memo Delete the old voice memo and record a new one 1p 126 A voice memo cannot be added ...

Page 118: ...on the displayed image a voice memo has been recorded 2 Press the four way controller 2 Playback starts Zoom button x Increases the volume Zoom button w Reduces the volume 3 Press the four way controller 3 Playback stops Playing Back a Voice Memo Deleting Voice Memos Only 1p 126 Four way controller Zoom button 12 00 12 00 12 00 01 26 2007 01 26 2007 01 26 2007 100 0010 100 0010 100 0010 ...

Page 119: ...age p 34 or Playing Back the Previous or Next Image p 34 for instructions on playing back images You can display images magnified up to eight times 1 Enter the Playback mode and use the four way controller 45 to select the image to magnify 2 Pressx y on the zoom button Each time you press the button the zoom scaling changes as follows 1 3 2 0 2 6 4 0 5 3 8 0 You can use the guide at the bottom lef...

Page 120: ...d down the Q Playback button for more than 4 seconds in Capture mode The lens retracts two seconds after you press the Q button The images and sounds in the built in memory are played back after two more seconds Setting the Quick Zoom Function Calling Up the Images from the Built in Memory You can play back my album in the same way as you play back images and sounds recorded on the SD Memory Card ...

Page 121: ...auses the movie OK button Changes the display mode 1p 120 Zoom button w x Adjusts the volume The following operations can be performed during pause Four way controller 4 Reverses the movie frame by frame Four way controller 5 Advances the movie frame by frame Four way controller 2 Restarts playback OK button Changes the display mode 1p 120 3 Press the four way controller 3 Playback stops and the s...

Page 122: ... the number of pixels 1 Recorded pixels 2 Quality level 3 White balance 4 AE metering 5 Sensitivity 6 Histogram 7 Aperture 8 Shutter speed No icons No shooting information is displayed Displaying Shooting Information in Playback Mode Saving the Display Mode 1p 110 If you press and hold the OK Display button for more than 1 second the LCD Bright Mode is activated The LCD monitor turns brighter for ...

Page 123: ...troller 5 Displays the next page when the frame is on the lower right image Available only when ten or more files are saved The icons that appear on the images indicate the following No icon Still picture without voice memo O with image Still picture with voice memo C Movie The first frame of the movie is shown O without image Sound file only Undisplayable image 3 Press the OK button The selected ...

Page 124: ...oes back to the previous month Four way controller 5 When the frame is on the last day of the month goes to the next month 4 Press the OK button or x y on the zoom button OK button Displays on full screen the first image recorded on the selected date Zoom button x y Displays the images recorded on the selected date in nine image display Calendar Display O appears on the date on which a sound file ...

Page 125: ...Mode Palette appears 3 Use the four way controller 2345 to select Slideshow 4 Press the OK button 5 Use the four way controller 45 to change the playback interval Select from the following 3 sec 5 sec 10 sec 20 sec 30 sec 6 Use the four way controller 3 to select Screen Effect Slideshow Four way controller OK button Slideshow OK MENU OK Cancel Screen Effect Screen Effect Sound Effect Sound Effect ...

Page 126: ...A button other than OK button Stops the slideshow Wipe The effect is like a slide show that slides the displayed images one by one to the left Fade The current image gradually disappears and the next image appears under it Shrink The current image shrinks towards the center Off No screen effect The slideshow will continue until you press any button Movies and pictures with a voice memo will be pla...

Page 127: ... appears 3 Use the four way controller 2 to select Delete 4 Press the OK button The image movie or sound is deleted Deleting a Single Image Movie or Sound Once deleted images movies or sounds cannot be restored You can also delete images during the Instant Review 1p 33 You cannot delete protected images movies or sounds 1p 130 OK button Four way controller Green button MENU button Delete Delete 10...

Page 128: ...with a voice memo to delete 2 Press the Green button The Delete screen appears 3 Use the four way controller 2 to select Delete sound 4 Press the OK button The voice memo is deleted Deleting a Voice Memo only Select Delete in Step 3 above to delete both the image and the voice memo Delete Delete Delete sound Delete sound 100 0010 100 0010 100 0010 Cancel Delete Delete sound OK OK OK OK All All All...

Page 129: ...oller 2 to select Delete All 3 Press the OK button All the images and sounds will be deleted Deleting All Images Once deleted images movies or sounds cannot be restored You cannot delete protected images movies or sounds 1p 130 OK button Four way controller Green button Cancel Delete All Delete All Delete All OK OK OK OK MENU Delete all images sounds Delete all images sounds Delete all images soun...

Page 130: ...o an image or sound file you want to delete and press the OK button O appears on the selected images and sound files To check the image before deleting place the frame on the image and press x y on the zoom button to show it in single image display You cannot show a protected image in single image display Press the OK button to return to the nine image display Deleting Selected Images and Sound Fi...

Page 131: ...ress the Green button A confirmation dialog appears 5 Use the four way controller 23 to select Select Delete 6 Press the OK button The selected images and sound files are deleted You cannot delete protected images movies or sounds 1p 130 ...

Page 132: ...alette appears 3 Use the four way controller 2345 to select Z Protect 4 Press the OK button The Protect screen appears 5 Use the four way controller 23 to select Select image sound 6 Press the OK button Protecting Images Movies and Sounds from Deletion Protect Protecting Images Movies and Sounds OK button Four way controller Protect OK MENU OK Cancel Cancel Cancel Cancel All Images Sounds All Imag...

Page 133: ...s played back Protecting All Images Movies and Sounds Select Unprotect in Step 7 to cancel the Protect setting on all the images movies and sounds Even protected images movies and sounds will be deleted by formatting the SD Memory Card or built in memory 100 0010 100 0010 100 0010 Unprotect Unprotect Protect this image sound Protect this image sound Cancel Cancel Unprotect Protect this image sound...

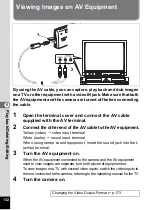
Page 134: ...er end of the AV cable to the AV equipment Yellow video video input terminal White audio sound input terminal When using stereo sound equipment insert the sound jack into the L white terminal 3 Turn the AV equipment on When the AV equipment connected to the camera and the AV equipment used to view images are separate turn both pieces of equipment on To view images on a TV with several video inputs...

Page 135: ... Refer to the operating manual for the TV or equipment to which the camera is connected Images may not be displayed properly depending on the countries or areas when the Video Out setting is the default In this situation change the Video Out setting While the camera is connected to the TV the LCD monitor of the camera is turned off Playing Back an Image Using the Remote Control Unit optional As th...

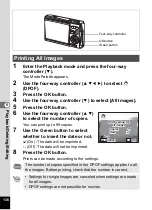
Page 136: ... Specify whether you want the date imprinted on the print or not 1 Enter the Playback mode and use the four way controller 45 to select the image to print 2 Press the four way controller 3 The Mode Palette appears 3 Use the four way controller 2345 to select DPOF 4 Press the OK button The DPOF screen appears 5 Press the OK button Printing Single Images Four way controller OK button Green button DP...

Page 137: ... and press the OK button You cannot set the printing service for movies or sound only files Depending on the printer or printing equipment at the photo processing lab the date may not be imprinted on the pictures even if the DPOF settings were made Date Date Copies Copies 1 DPOF setting for DPOF setting for this image this image Date Date 100 0010 100 0010 100 0010 Date Copies 1 OK OK OK OK MENU C...

Page 138: ...ot O On The date will be imprinted P Off The date will not be imprinted 8 Press the OK button Prints can be made according to the settings Printing All Images The number of copies specified in the DPOF settings applies to all the images Before printing check that the number is correct Settings for single images are canceled when settings are made for all images DPOF settings are not possible for m...

Page 139: ... optional while the camera is connected to the printer The printer may not work properly or the image data may be damaged if the battery runs out of power while the camera is connected to the printer The access lamp blinks slowly while data is being transferred from the camera to the printer Do not disconnect the USB cable during data transfer Depending on the type of printer not all the settings ...

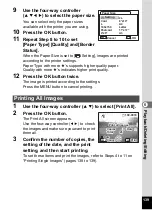
Page 140: ...tings go to Step 7 7 Press the Green button The Change setting screen appears 8 Select Paper Size and press the four way controller 5 Printing Single Images DPOF setting DPOF setting Print All Print All Select printing mode Select printing mode DPOF setting Print One Print All OK OK OK OK Select printing mode Date Date Copies Copies 1 Cancel Cancel 100 0010 100 0010 100 0010 Date Copies Print this...

Page 141: ...button to cancel printing 1 Use the four way controller 23 to select Print All 2 Press the OK button The Print All screen appears Use the four way controller 45 to check the images and make sure you want to print them all 3 Confirm the number of copies the setting of the date and the print setting and then start printing To set these items and print the images refer to Steps 4 to 11 on Printing Si...

Page 142: ...to Steps 4 to 11 on Printing Single Images pages 138 to 139 Disconnect the camera from the printer when you have finished printing 1 Turn the camera off 2 Disconnect the USB cable from the camera 3 Disconnect the USB cable from the printer Printing Using the DPOF Settings Disconnecting the Camera from the Printer If you disconnect the USB cable from the camera before you turn the camera off the ca...

Page 143: ...o make more space available in the memory After changing the size and quality the image can be saved as a new image or written over the original image 1 Use the four way controller 45 in Playback mode to select an image to resize 2 Press the four way controller 3 The Mode Palette appears 3 Use the four way controller 2345 to select Resize 4 Press the OK button The Resize screen appears Changing th...

Page 144: ...tton 9 Use the four way controller 23 to select Overwrite or Save as 10 Press the OK button The resized image is saved Movies cannot be resized You cannot select a larger size than that of the original image You can resize the data to 9M 8M 6M or 4M Protected images cannot be overwritten You can resize only still pictures taken with this camera Quality Level Quality Level Quality Level Recorded Pi...

Page 145: ... Cropping screen appears 5 Crop the image Zoom button x Enlarges the cropping frame Zoom button w Reduces the cropping frame Four way controller Moves the cropping 2345 frame MENU button Returns to the Mode Palette 6 Press the OK button The cropped image is saved as a separate image Cropping Images Movies cannot be cropped The image size is changed and saved You can only crop still pictures taken ...

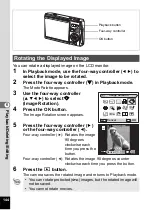
Page 146: ...our way controller 5 or the four way controller 4 Four way controller 5 Rotates the image 90 degrees clockwise each time you press the button Four way controller 4 Rotates the image 90 degrees counter clockwise each time you press the button 6 Press the Q button The camera saves the rotated image and returns to Playback mode Rotating the Displayed Image You can rotate protected Z images but the ro...

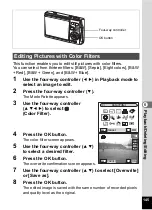
Page 147: ... way controller 2345 to select Color Filter 4 Press the OK button The color filter screen appears 5 Use the four way controller 23 to select a desired filter 6 Press the OK button The overwrite confirmation screen appears 7 Use the four way controller 23 to select Overwrite or Save as 8 Press the OK button The edited image is saved with the same number of recorded pixels and quality level as the o...

Page 148: ...elect a desired color 7 Press the OK button The Overwrite confirmation screen appears 8 Use the four way controller 23 to select Overwrite or Save as 9 Press the OK button The edited image is saved with the same number of recorded pixels and quality level as the original Selecting the Color Filter Eight Colors Cancel Cancel OK OK MENU Cancel OK OK ...

Page 149: ...elect an image to edit 2 Press the four way controller 3 The Mode Palette appears 3 Use the four way controller 2345 to select Digital Filter 4 Press the OK button The Digital Filter screen appears 5 Press the four way controller 23 to select a desired filter 6 Press the OK button The overwrite confirmation screen appears Editing Pictures with the Digital Filter Four way controller OK button Digit...

Page 150: ...ay controller 23 to select Slim Filter 6 Press the four way controller 45 to adjust the strength of the slim effect 7 Press the OK button The overwrite confirmation screen appears 8 Use the four way controller 23 to select Overwrite or Save as 9 Press the OK button The edited image is saved with the same number of recorded pixels and quality level as the original Selecting the Slim Filter MENU OK ...

Page 151: ...Use the four way controller 2345 to select Brightness Filter 4 Press the OK button The brightness filter screen appears 5 Use the four way controller 45 to adjust the brightness Four way controller 5 Brightens the image Four way controller 4 Darkens the image The brightness is selected between 2 0EV and 2 0EV by 1 3EV step Editing Pictures with Brightness Filter Four way controller OK button Brigh...

Page 152: ...the OK button The overwrite confirmation screen appears 7 Use the four way controller 23 to select Overwrite or Save as 8 Press the OK button The edited image is saved with the same number of recorded pixels and quality level as the original ...

Page 153: ...er 2345 to select Movie Edit 4 Press the OK button The Movie Edit screen appears Select the editing function that you want to use 5 Use the four way controller 23 to select Save as Still Image 6 Press the OK button The screen for choosing a frame appears Editing Movies Saving a Frame from a Movie as a Still Picture Four way controller OK button Movie Edit OK MENU OK Cancel Divide Movies Divide Mov...

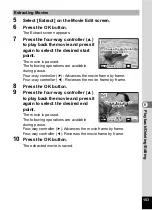
Page 154: ...ovie at the desired dividing position The following operations are available during pause Four way controller 4 Reverses the movie frame by frame Four way controller 5 Advances the movie frame by frame 8 Press the OK button The confirmation screen appears 9 Use the four way controller 23 to select Divide 10 Press the OK button The movie is divided at the specified position and the two portions are...

Page 155: ... 9 Press the four way controller 2 to play back the movie and press it again to select the desired end point The movie is paused The following operations are available during pause Four way controller 5 Advances the movie frame by frame Four way controller 4 Reverses the movie frame by frame 10 Press the OK button The extracted movie is saved Extracting Movies Choose the start point Choose the sta...

Page 156: ...annot process correctly appears go to the step 5 in Removing Red eye Manually page 155 5 Use the four way controller 23 to select Overwrite or Save as When the image is protected Save as will be selected automatically 6 Press the OK button The edited image is saved with the same number of recorded pixels and quality level as the original Removing Red eye Red eye compensation function cannot be use...

Page 157: ...starts When no error message appears the compensation was successfully done Go to the step 8 If the error message Cannot process correctly appears repeat the steps 5 6 and 7 8 Press the OK button A confirmation dialog for overwriting the image appears 9 Use the four way controller 23 to select Overwrite or Save as When the image is protected Save as will be selected automatically 10 Press the OK b...

Page 158: ...he four way controller 45 to select a frame 6 Press the OK button A confirmation dialog for overwriting the image appears 7 Use the four way controller 23 to select Overwrite or Save as Save as is the only option available for protected images Adding a Frame Frame Composite Four way controller OK button Green button MENU OK OK Frame Composite Cancel OK OK OK Change Change OK Select the frame Selec...

Page 159: ...nd the frames on the SD Memory Card that you can register in the built in memory appear 2 Use the four way controller 45 to select the frame you want to register and press the OK button The frame is registered in the built in memory and replaces the frame selected in Step 1 The frame composite function cannot be used on movies or images with a size of 2M or smaller An error message appears in Step...

Page 160: ... are copied at once When files are copied from the SD Memory Card to the built in memory the files are copied one at a time 1 Press the four way controller 3 in Playback mode The Mode Palette appears 2 Use the four way controller 2345 to select Image Sound Copy The Image Sound Copy screen appears Select the copying method you want to use 3 Press the OK button Be sure to turn the camera off before ...

Page 161: ...ed to the built in memory To Copy Files from the Built in Memory to the SD Memory Card To Copy Files from the SD Memory Card to the Built in Memory If the image has a voice memo the sound file will be copied at the same time as the image When a file is copied from the SD Memory Card to the built in memory it is assigned a new file name OK Cancel Cancel OK OK Cancel OK Cancel Cancel Cancel MENU OK ...

Page 162: ...ler 3 in Playback mode The Mode Palette appears 2 Press the four way controller 2345 to select Start up Screen 3 Press the OK button The screen for setting start up screen appears You can select from five different types of start up screens including USER and Off Setting Up the Start up Screen Four way controller OK button Green button Start up Screen OK MENU OK Cancel ...

Page 163: ...gain to show the screen for selecting a captured image 5 Press the OK button The camera is ready for playing back images Setting Up the Start up Screen Using a Captured Image Go to Step 5 to select a start up screen other than USER Once the start up screen has been set it will not be deleted even if the original image is deleted or the SD Memory Card or built in memory is formatted You cannot set ...

Page 164: ...remove the SD Memory Card while the card is being formatted as this may damage the card and render it unusable SD Memory Cards formatted on a PC or device other than the camera cannot be used Be sure to format the card with the camera Note that formatting will also delete protected files If formatting was performed in Playback mode the camera returns to Playback mode after it was completed then th...

Page 165: ...Use the four way controller 45 to change the operation volume 4 Use the four way controller 3 to select Playback Volume 5 Use the four way controller 45 to change the volume of playback sounds 6 Press the shutter release button halfway The camera is ready for taking pictures Changing the Sound Settings Changing the Volume Set up MENU Exit Format Sound Date Adjust English World Time Language Folder...

Page 166: ...imer Sound in the same mannar 8 Press the shutter release button halfway The camera is ready for taking pictures Changing the Sound How to recall the H Set up menu Four way controller MENU button OK button Rec Mode MENU Exit Recorded Pixels Quality Level White Balance AF Setting AE Metering Sensitivity AWB 10M AUTO 800 MENU Shutter release button Sound MENU Operation Volume Playback Volume Start u...

Page 167: ...Four way controller 2 Plays back the first two seconds of the sound file Four way controller 3 Stops playback 4 Press the OK button The selected sound is set as the USER sound 5 Set Shutter sound Operation Sound and Self timer Sound in the same mannar 6 Press the shutter release button halfway The camera is ready for taking pictures Changing the Sound Using a Recorded Sound File The Sound settings...

Page 168: ...Press the four way controller 5 The frame moves to 24h 6 Use the four way controller 23 to select 24h 24 hour display or 12h 12 hour display 7 Press the four way controller 5 The frame moves to Date Style Changing the Date and Time How to recall the H Set up menu Four way controller MENU button OK button Rec Mode MENU Exit Recorded Pixels Quality Level White Balance AF Setting AE Metering Sensitiv...

Page 169: ...t 12h in Step 6 the setting switches between am and pm corresponding to the time 11 Press the OK button The settings are made 12 Press the shutter release button halfway The camera is ready for taking pictures Set up MENU Exit Format Sound Date Adjust English World Time Language Folder Name Standard OK Date Adjust MENU Cancel Date Style mm dd yy Date 01 01 2007 Time 0 00 OK OK 24h Date Adjust MENU...

Page 170: ...elected as the Hometown city 4 Press the four way controller 3 to select X Destination 5 Press the four way controller 5 The Destination screen appears The city that is currently selected blinks on the map 6 Use the four way controller 45 to change the Destination city The location of the destination and the time difference between the hometown and the destination appear Setting the World Time How...

Page 171: ...ing time 9 Press the OK button The World Time setting is saved 10 Press the four way controller 3 to select W Hometown Set the location and the current time in the same manner as Steps 5 to 9 11 Press the shutter release button halfway The camera is ready for taking pictures Set up MENU Exit Format Sound Date Adjust English World Time Language Folder Name Standard OK ...

Page 172: ...hinese traditional and simplified and Japanese 1 Select Language on the H Set up menu 2 Press the four way controller 5 3 Use the four way controller 2345 to select the language 4 Press the OK button 5 Press the MENU button Changing the Display Language How to recall the H Set up menu Four way controller MENU button OK button Rec Mode MENU Exit Recorded Pixels Quality Level White Balance AF Settin...

Page 173: ...folder number Date xxx_mmdd 3 digit folder number_month day If you set Date Style to dd mm yy the folder name appears as xxx_ddmm 3 digit folder number_day month The capacity of an image folder is 500 files maximum When the number of files reaches 500 a new folder will be automatically created Set up MENU Exit Format Sound Date Adjust English World Time Language Folder Name Standard OK DCIM DCIM 1...

Page 174: ...ess the Q Playback button The camera is ready for playing back images Changing the USB Connection Mode For details on connecting the camera to a computer see PC Connection Manual a separate volume Do not connect the camera to a computer when Pictbridge is selected Do not connect the camera to a printer when PC is selected How to recall the H Set up menu Four way controller MENU button OK button Re...

Page 175: ... controller 5 The pull down menu appears 3 Use the four way controller 23 to select NTSC or PAL Select the video output format to match the output format of the TV 4 Press the Q Playback button The camera is ready for playing back images Changing the Video Output Format Set up MENU Exit Format Sound Date Adjust English World Time Language Folder Name Standard OK ...

Page 176: ...tor When you press and hold the OK Display button for more than 1 second the LCD monitor turns brighter for a certain amount of time LCD Bright Mode It is useful when you view the LCD monitor outdoors or in brighter places 1p 33 p 34 The function is not available under the following conditions When the menu or the Mode Palette is displayed In Voice Recording mode How to recall the H Set up menu Fo...

Page 177: ...menu 2 Press the four way controller 5 The pull down menu appears 3 Use the four way controller 23 to select 2 min 1 min 30 sec 15 sec 5 sec or Off 4 Press the Q Playback button The camera is ready for playing back images Setting Power Saving The Power Saving function will not work in the following conditions In Playback mode When the USB cable is connected While taking movies During the video out...

Page 178: ...on when you start up the camera in Capture mode or switch from other modes to Capture mode You can also show the description for the selected mode on the Mode Palette 1 Select Guide Display on the H Set up menu 2 Use the four way controller 45 to select O On P Off 3 Press the Q Playback button The camera is ready for playing back images Setting Auto Power Off The Auto Power Off function will not w...

Page 179: ...four way controller 5 The Reset screen appears 3 Use the four way controller 2 to select Reset 4 Press the OK button The settings return to the defaults and the camera is ready for taking or playing back images Resetting to Default Settings Set up MENU Exit Format Sound Date Adjust English World Time Language Folder Name Standard OK Reset Reset Reset to initial setting Cancel OK OK ...

Page 180: ...ork Dacca Halifax East Asia Yangon Central and South America Mexico City Bangkok Lima Kuala Lumpur Santiago Vientiane Caracas Singapore Buenos Aires Phnom Penh Sao Paulo Ho chi Minh Rio de Janeiro Jakarta Europe Lisbon Hong Kong Madrid Beijing London Shanghai Paris Manila Amsterdam Taipei Milan Seoul Rome Tokyo Copenhagen Guam Berlin Perth Prague Adelaide Stockholm Oceania Sydney Budapest Noumea W...

Page 181: ...s saved even after reset z A Rec Mode Menu Items Item Default Setting Last Memory Setting Reset Setting Page Recorded Pixels 10M Yes Yes p 87 Quality Level D Better Yes Yes p 89 White Balance F Auto Yes p 90 AF Setting Focusing Area J Multiple Yes Yes p 92 Focus Limiter On Yes Yes p 93 Aux AF Light On Yes Yes p 94 AE Metering L Multi segment Yes p 95 Sensitivity AUTO800 Yes p 96 EV Compensation 0 ...

Page 182: ...4 Sharpness Standard Yes Yes p 107 Saturation Standard Yes Yes p 108 Contrast Standard Yes Yes p 109 Item Default Setting Last Memory Setting Reset Setting Page Format p 162 Sound Operation Volume 3 Yes Yes p 163 Playback Volume 3 Yes Yes Start up Sound 1 Yes Yes Shutter Sound 1 Yes Yes Operation Sound 1 Yes Yes Self timer Sound 1 Yes Yes Date Adjust Date Style According to initial setting Yes No ...

Page 183: ...el No Yes p 177 Item Default Setting Last Memory Setting Reset Setting Page u Slideshow Interval 3 sec Yes Yes p 123 Screen Effect Wipe Yes Yes Sound Effect On Yes Yes n Resize According to the taken picture No p 141 o Cropping No p 143 p Image Sound Copy Cancel No p 158 s Image Rotation Normal No No p 144 Color Filter B W No p 145 Digital Filter SOFT No p 147 Brightness Filter 0 No p 149 Movie Ed...

Page 184: ... Infinity Manual Focus Rec Mode menu Recorded Pixels Quality Level White Balance 1 1 1 1 1 Focusing Area 15 Focus Limiter 7 Aux AF Light 7 17 AE Metering 2 4 4 2 2 2 2 Sensitivity 5 6 EV Compensation Sharpness 3 3 3 3 3 Saturation 3 3 3 3 3 Contrast 3 3 3 3 3 Others Digital Zoom Intelligent Zoom LCD Backlight Off 1 Fixed to AWB 2 Fixed to Multi segment 3 Fixed to Standard 4 Multi segment cannot be...

Page 185: ...s Limiter 17 17 12 Aux AF Light 2 2 2 2 2 13 AE Metering 16 Sensitivity EV Compensation 3 3 3 3 3 Sharpness 3 3 3 3 3 Saturation 3 3 3 3 3 Contrast 14 Digital Zoom Others Intelligent Zoom LCD Backlight Off 9 Fixed to 5M for Digital SR Fixed to 3M for Y Frame Composite 10 Automatic tracking AF cannot be selected 11 Fixed to Spot 12 Fixed to Off 13 Fixed to Center weighted 14 Available only when Mov...

Page 186: ...Strap O ST30 Remote control unit E zoom function Remote control unit F Rechargeable lithium ion battery D LI8 Battery charger kit D BC8 Battery charger kit K BC8 AC adapter kit K AC63 Battery charger K BC8 and AC adapter kit K AC63 include AC plug cord D CO2 The ending of the AC plug cord name differs depending on the country Products marked with an asterisk are the same as those supplied with the...

Page 187: ...ete unwanted files to continue recording Memory card error Shooting and playback are impossible due to a problem with the SD Memory Card You may be able to play back the images or sounds on a PC Card not formatted The SD Memory Card you have inserted is unformatted or has been formatted on a PC or other device and is not compatible with this camera p 162 Card locked The SD Memory Card is write pro...

Page 188: ... Card or format the SD Memory Card or built in memory p 21 162 Protected The image or sound you are trying to delete is protected This image sound cannot be processed You are trying to resize crop protect an image or you are trying to set an image for DPOF or you are trying to edit an image with a digital filter or edit a movie while the image or movie cannot be processed with these functions No i...

Page 189: ... is charging When flash icon blinks red on the LCD monitor flash is charging and no pictures can be taken Flash icon lights red when charging is completed No available space on SD Memory Card or in built in memory Insert SD Memory Card with available space or delete unwanted images p 21 125 Recording Wait until recording is finished The number of image movie and sound files recorded on the SD Memo...

Page 190: ...lock the focus on the desired subject focus lock and then move the camera to recompose p 30 Subject is too close Set focus mode on q Macro or r Super Macro p 82 Focus mode is set on q Macro or r Super Macro Normal pictures will be out of focus if taken with focus mode set on q Macro or r Super Macro Flash does not discharge Flash mode is set to Off Set to Auto or b p 85 The Capture mode is set to ...

Page 191: ...and 3M 2048 1536 for Frame Composite mode Movie 640 640 480 320 320 240 Sensitivity AUTO Manual 64 100 200 400 800 1600 3200 Digital SR mode File Format Still Picture JPEG Exif2 2 DCF DPOF PRINT Image Matching III Movie AVI MPEG 4 DivX approx 30 fps with sound Movie SR 25 fps image signals recorded at 30 fps Sound WAV PCM system monaural max recording time approx 4 hours 25 min 59 sec when using a...

Page 192: ...splay Select Delete Playback Mode Palette Slideshow Resize Cropping Image Sound Copy Image Rotation display Color Filter Digital Filter Brightness Filter Movie Edit Red eye Compensation Voice Memo Protect DPOF Start up Screen Frame Composite Color filter B W Sepia Color filter Bar display Eight colors B W Red B W Green and B W Blue Digital filter Soft Illustration Special Effect 1 Special Effect 2...

Page 193: ...mer 2 sec Self timer 3 sec Remote Control Instant Remote Control Self timer Electronic control type delay time approx 10 sec 2 sec Time Function World Time setting for 75 cities 28 time zones Power Supply Rechargeable lithium ion battery D LI8 AC adapter optional Battery Life Still Images Approx 150 at 23 C with LCD monitor on flash fired for 50 of shots and using a rechargeable lithium ion batter...

Page 194: ...ufacturer If there is no representative of the manufacturer in your country send the equipment to the manufacturer with postage prepaid In this case it will take a considerable length of time before the equipment can be returned to you owing to the complicated customs procedures required If the equipment is covered by warranty repairs will be made and parts replaced free of charge and the equipmen...

Page 195: ...ors in some countries can supersede this warranty policy Therefore we recommend that you review the warranty card supplied with your product at the time of purchase or contact the PENTAX distributor in your country for more information and to receive a copy of the warranty policy The CE Mark is a Directive conformity mark of the European Union ...

Page 196: ...an radiate frequency energy and if not installed and used in accordance with the instructions may cause harmful interference to radio communications However there is no guarantee that interference will not occur in a particular installation If this equipment does cause harmful interference to radio or television reception which can be determined by turning the equipment off and on the user is enco...

Page 197: ...with the standards Records maintained continue to reflect the equipment being produced can be expected to be within the variation accepted due to quantity production and testing on the statistical basis as required by 47CFR 2 909 Operation is subject to the following two conditions 1 This device may not cause harmful interference and 2 This device must accept any interference received including in...

Page 198: ... In some countries your local retailer may also take back your old product free of charge if you purchase a similar new one Please contact your local authority for further details By disposing of this product correctly you will help ensure that the waste undergoes the necessary treatment recovery and recycling and thus prevent potential negative effects on the environment and human health which co...

Page 199: ...de 64 Digital SR mode 71 Y Frame Composite mode 74 SD Memory Card 21 117 Built in memory 21 117 c Battery level indicator 18 k Movie SR On 72 101 Shake Reduction On 50 102 l Shake Reduction Off 102 A AC Adapter 19 AC plug cord 17 Access lamp 13 Auto Picture Mode 58 Auto Power Off 176 Autofocus mode 82 Autofocus Settings 92 Auxiliary AF light 94 AV cable 132 B Battery 16 Battery Level Indicator 18 ...

Page 200: ...2 Initial Settings 26 Instant Review 33 103 Intelligent Zoom 80 K Kids Mode 66 L LCD Bright Mode 33 34 38 40 174 Lens 13 Light Metering mode 95 M Macro mode 82 Manual Exposure mode 60 Manual Focus mode 82 Memory 110 MENU button 14 38 40 Menu List 45 Messages 185 Microphone 13 Movie Edit 151 Movie SR 101 N Night Scene Mode 70 Nine Image Display 121 NTSC 29 173 Number of recordable images 18 O OK Di...

Page 201: ... Reduction for Still Pictures 54 102 Shake Reduction preview button 13 54 Shutter Priority Mode 60 Shutter release button 13 30 Shutter Sound 164 Slideshow 123 Sound Settings 163 Speaker 13 Start up Screen 160 Start up Sound 164 Strap 15 Super Macro mode 82 Symbols 9 T Take Movies 72 Take Still Pictures 30 Tele 80 Text 69 Tripod socket 13 TV 132 U USB cable 137 USB Connection 172 V Video Output Fo...

Page 202: ...Memo ...

Page 203: ...Memo ...

Reviews: