background image

36

P

re

pa

rat

io

n a
nd in
sp

ec

tio

n  

3

Inspection of the bite block (OF-Z5)

Caution

NEVER use a bite block with any abnormality. Replace it with a new one.
Using a bite block with an abnormality may result in endoscope damage and injury to the oral 
cavity of patients.

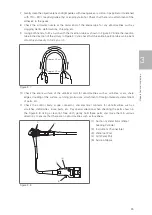
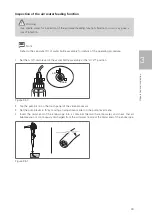
Check the bite block for any abnormalities such as attachment of foreign materials, cracks, deformity, 
chipping, and discoloration.

Bite Block (OF - Z5)

Figure 3.26 

Summary of Contents for EG29-i10c

Page 1: ...dical Video Upper GI Scope EG29 i10c Operation EG29 i10c For cleaning high level disinfection and sterilization of the product after use refer to the separate Instructions for Use Reprocessing with th...

Page 2: ......

Page 3: ...for reprocessing hereinafter referred to as IFU Reprocessing Inappropriate use of the product may result in damage to the equipment or injuries including but not limited to burns electric shock perfo...

Page 4: ...essories and or on their packaging are as follows Symbol Description Caution Attention Year of Manufacture Ann e de fabrication Type BF applied part Partie appliquee du type BF Do not re use Ne pas re...

Page 5: ...3...

Page 6: ...dy and insertion portion 16 2 2 Scope connector 18 3 Preparation and inspection 19 3 1 Preparation of the equipment 20 3 2 Inspection of the endoscope 22 3 3 Inspection of accessories and attachment t...

Page 7: ...ooting guide 76 5 2 Withdrawal of an endoscope with an abnormality 79 5 3 Returning the endoscope for repair 80 Disposal 81 Electromagnetic compatibility EMC 82 Electromagnetic disturbances 85 Endosco...

Page 8: ...a video monitor and therapeutic access to the upper gastrointestinal tract This anatomy includes but is not restricted to the organs tissues and subsystems esophagus stomach and duodenum This endosco...

Page 9: ...us operation Specifications Environment Operating environment Ambient temperature 10 to 40 C Relative humidity 30 to 85 RH Air pressure 700 to 1 060 hPa Storage transportation environment Ambient temp...

Page 10: ...t or accessory to confirm the compatibility and instructions for use with PENTAX Medical products Note When this endoscope is used in combination with other equipment depending on how it is connected...

Page 11: ...23L035 Injection Needle NI D1816 T2304 NI D1816 T2305 NI D1816 T2306 NI D1816 T2308 NI D2416 T2304 NI D2416 T2306 NI D2423 T2305 NI D1816 T2504 NI D1816 T2505 NI D2416 T2504 NI D2416 T2505 NI D2416 T2...

Page 12: ...and after repair Insufficient reprocessing may increase the risk of cross contamination Note The wording high level disinfection in this IFU defines the disinfection of the endoscope and the accessori...

Page 13: ...at have been stored inappropriately or for a prolonged period of time must be subjected to appropriate cleaning high level disinfection and or sterilization processes according to the separate IFU Rep...

Page 14: ...ent injuries including bleeding and perforation Do NOT perform retroflexed observations inside a narrow lumen Doing so may cause patient injury or make it impossible to withdraw the endoscope After us...

Page 15: ...t them Doing so may cause internal damage to the endoscope that may lead to water leaks Do NOT attach or remove the scope connector of the endoscope while the power of the video processor is turned on...

Page 16: ...gure 1 1 and 1 2 If there are any damaged or missing components do not use the endoscope Immediately contact your local PENTAX Medical service facility Endoscope EG29 i10c Figure 1 1 Accessories Inlet...

Page 17: ...t OF B127 For Suction Control Valve OF B120 Cleaning Brush CS C13A Cleaning Brush CS5522A Bite Block OF Z5 Water Jet Check Valve Adapter OE C12 Installed Air Water Feeding Valve OF B188 Installed Suct...

Page 18: ...insertion portion 1 1 2 5 3 4 6 8 7 9 10 10 11 12 13 Control Body Distal End Bending Section Insertion Portion Endoscope components that come into direct contact with the patient Insertion Tube Alter...

Page 19: ...rection the bending lock is released 6 Suction Cylinder Attach the suction control valve OF B120 7 Suction Control Valve OF B120 Attach to the suction cylinder Depress it to suction fluids or air thro...

Page 20: ...air water feeding hose on the water bottle assembly to the air water port 16 Water Jet Port Attach a water jet check valve adapter OE C12 17 Water Jet Check Valve Adapter OE C12 Use it by attaching to...

Page 21: ...or assistance in diagnosing an endoscope malfunction If the problem persists after troubleshooting or there is an apparent failure do not use the endoscope Send it for repair according to 5 3 Returnin...

Page 22: ...s to prepare the ancillary equipment as necessary and to the IFU provided with the video processor for its inspection Endoscope Accessories Air Water Feeding Valve OF B188 Suction Control Valve OF B12...

Page 23: ...doscopic Device Gas Water Feeding Valve OF B194 Optional item Gas Adapter OF G11 Optional item Suction Source Irrigation Pump EGA 500P CO2 Insufflator EGA 501P Protective Equipment example Gloves Gogg...

Page 24: ...ination of the endoscope with waterborne bacteria and other microorganisms Do NOT use water that has been left uncovered for a prolonged period of time Do NOT excessively twist bend or rotate any of t...

Page 25: ...erature before using it Lens fogging which will result in blurry images might result from abrupt changes in environmental temperature Carrying the endoscope by hand When carrying the endoscope by hand...

Page 26: ...c 3 Check the surface of the adhesive bands on both ends of the bending section for abnormalities such as scratches clouding and peeling With clean gauze lightly wipe the surface of the adhesive bands...

Page 27: ...be bent smoothly and easily to form an arch Approx 30 cm Approx 20 cm Figure 3 7 10 Check the entire surface of the umbilical cord for abnormalities such as wrinkles scars sharp edges clouding of the...

Page 28: ...ently dry Inspection of the angulation mechanism Ensure that there is nothing near the bending section that would hinder its operation and inspect the angulation mechanism while the insertion portion...

Page 29: ...te smoothly with no roughness or catching Figure 3 10 3 Check that the bending section angulates in the direction in which the angulation control knobs are turned and that the maximum angulation can b...

Page 30: ...n the up down angulation control knob slowly in the U or D direction until it stops Figure 3 14 3 Check that the curved form of the bending section is fixed when releasing the angulation control knob...

Page 31: ...n the right left angulation control knob slowly in the R or L direction until it stops Figure 3 17 3 Check that the curved form of the bending section is fixed when releasing the angulation control kn...

Page 32: ...ensure that they have been cleaned high level disinfected and or sterilized according to the separate IFU Reprocessing for this endoscope Warning NEVER disassemble or modify the accessories and endosc...

Page 33: ...bnormality is detected with the O ring stop using it immediately and replace it with a new one Use the compatible O ring set for replacement Using an O ring with abnormalities or non compatible O ring...

Page 34: ...ring with abnormalities or non compatible O ring could result in unintended continuous suction and may hinder the examination It could also pose a risk of infection to the user as a result of reflux o...

Page 35: ...he slit in the cap of the inlet seal OF B190 and the hole of the body of the inlet seal for any abnormalities such as cracks wear chipping and attachment or presence of foreign materials Check that th...

Page 36: ...lves are consumables Using a damaged check valve may result in potential reflux or dispersal of patient s body fluids posing a risk of infection Note Use the check valve set OE C15 a packed set of mul...

Page 37: ...ilization may not be effective due to the insufficient reprocessing Irrigation Tube OF B113 2 4 5 1 3 1 Luer Connector 2 Hole 3 Connector 4 Hole 5 O ring Figure 3 25 1 Check the entire surface of the...

Page 38: ...abnormality Replace it with a new one Using a bite block with an abnormality may result in endoscope damage and injury to the oral cavity of patients Check the bite block for any abnormalities such a...

Page 39: ...pic devices specified by PENTAX Medical whose compatibility has been confirmed Using endoscopic devices whose compatibility has not been confirmed may result in endoscope damage and or patient injury...

Page 40: ...exible shaft at approximately 20 30 cm from the tip of the insertion portion of the biopsy forceps Check that the cups of the biopsy forceps open close smoothly by operating its handle 20cm 30cm 20cm...

Page 41: ...d or patient injury Attach the air water feeding valve OF B188 and suction control valve straight into their respective valve cylinders Inserting them into their valve cylinders at an angle may damage...

Page 42: ...lign the metal tab on the shaft of the suction control valve with the notch on the suction cylinder of the endoscope 1 2 1 Notch 2 Metal Tab Figure 3 34 5 Attach the suction control valve OF B120 to t...

Page 43: ...channel inlet without gaps Correct Incorrect Gap Figure 3 38 Attachment of the water jet check valve adapter OE C12 and water jet connector cap OF B118 1 Attach the water jet connector cap OF B118 and...

Page 44: ...ording to their respective IFU Video processor Monitor Suction source Endoscopic device Water bottle assembly Irrigation pump CO2 Insufflator etc Inspection of the video processor Only use compatible...

Page 45: ...k the electrical contacts for any attachment of foreign materials such as residual chemical solution water deposit sebum dust and gauze lint etc before connecting Failing to do so may result in the en...

Page 46: ...Connect the suction tube of the suction source firmly to the suction nipple Failure to do so may result in disconnection of the suction tube during use and pose a risk of cross contamination to the u...

Page 47: ...t clicks Figure 3 44 Caution Do NOT orient the irrigation tube OF B113 at an angle when attaching it to or removing it from the water jet check valve adapter OE C12 Doing so may break the irrigation t...

Page 48: ...he operation of a video processor are general in nature For specific information regarding your video processor model refer to the IFU provided with the video processor 1 Turn on the main power switch...

Page 49: ...the brightness at both distances is similar Figure 3 47 Caution Do NOT directly touch the distal end of the endoscope particularly the light guide for a prolonged period of time when the light is bei...

Page 50: ...ted to be used During a procedure the endoscopic image may freeze or other abnormalities may occur which may result in patient injury Remote Button 3 Remote Button 4 Remote Button 2 Remote Button 1 Al...

Page 51: ...perating procedure 1 Set the A W drain lever of the water bottle assembly at the A W position A W DRAIN Figure 3 50 2 Tap the pump icon on the touch panel of the video processor 3 Set the pump level t...

Page 52: ...pose a risk of pain to the patient 5 Block the hole in the top of the air water feeding valve Confirm that a steady stream of air bubbles is being released from the air water nozzle on the distal end...

Page 53: ...le stops when you remove your finger from the hole in the valve Figure 3 55 Caution Do NOT attempt to clear the air or water nozzles with a needle or any other sharp object if nozzle blockage is suspe...

Page 54: ...erile water into the inlet seal OF B190 as shown in Figure 3 56 Figure 3 56 3 Infuse sterile water into the instrument channel and check to ensure that it flows from the instrument channel opening on...

Page 55: ...e distal end of the endoscope into a container filled with sterile water and press the suction control valve OF B120 Check that water is being suctioned up Figure 3 57 3 Check that when the suction co...

Page 56: ...age to the inside of the channel and unforeseen events to patients and or medical professionals Caution Slowly and gently insert and withdraw the forceps from the inlet seal OF B190 Applying strong fo...

Page 57: ...water jet feeding function Failure to do so may pose a risk of infection 1 To use the irrigation pump prepare to feed sterile water by following the instructions for use for the irrigation pump 2 Chec...

Page 58: ...the luer connectors are properly locked Do not use irrigation tube OF B113 if its luer connector is damaged and or if it is not properly connected 5 Check that a certain amount of water flows out forw...

Page 59: ...devices and endoscope insertion and withdrawal Ensure that these operations are performed in the normal non frozen non magnified mode Endoscope operation in the freeze or magnification mode may result...

Page 60: ...mitted from it This may result in mucosal injury to the patient Do NOT use the endoscope when adherence of patient materials e g blood other body fluids is suspected as this will darken the image This...

Page 61: ...containing alcohol or non medical lubricants such as petroleum jelly Doing so could cause cracking or peeling of the external surface of the insertion portion and may result in endoscope damage 1 Appl...

Page 62: ...de Continued use of the light guide with any foreign material attached to it might cause visible steam like vaporization associated with water vaporization of the organic material heated by the light...

Page 63: ...the up down angulation lock lever and right left angulation lock knob to hold the bending angle of the distal end of the endoscope as necessary Air Water feeding Caution Be careful NOT to feed too muc...

Page 64: ...nd of the endoscope and the mucosa to ensure that the instrument channel opening of the distal end of the endoscope does NOT suction the mucosa Immediately stop suctioning if the mucosa is suctioned D...

Page 65: ...OF B113 and delivering water into it Note When the irrigation tube OF B113 is connected with locking type of luer connector ensure that the luer connectors are properly locked Do not use irrigation t...

Page 66: ...ndoscopic devices NOT specified by PENTAX Medical may result in clogging and or damage to the instrument channel and or endoscopic device If a liquid such as sterile water or physiological saline is i...

Page 67: ...ath In case of biopsy forceps operate the forceps to fully close the cups at the tip There is a certain amount of resistance when inserting the endoscopic device for the first time Insert it into the...

Page 68: ...an gauze and withdraw the device slowly in a straight direction away from the inlet seal Immediately stop the therapeutic procedure if significant resistance is encountered when withdrawing the endosc...

Page 69: ...on in the room may pose a health risk to the room s occupants Turn off the air water feeding pump of the video processor before opening closing the gas cylinder Failure to do so may damage the air wat...

Page 70: ...the water bottle assembly to the gas adapter Figure 4 7 5 Ensure that all the devices are securely connected before opening the gas cylinder valve Note In addition to the procedure described above a...

Page 71: ...level necessary If the laser is continuously emitted at a high level the endoscopic image may become white whiteout Do NOT perform laser cautery during whiteout as it may result in patient injury Cont...

Page 72: ...priately according to usage Minimize the duration of time during which high frequency current is delivered as prolonged exposure to electrosurgical energy can result in patient injury Check the entire...

Page 73: ...vent dispersal of patient s body fluids into the environment by holding clean gauze along the insertion portion Failure to do so may pose a risk of infection to the user 1 Operate the suction control...

Page 74: ...and other optional equipment Perform cleaning high level disinfection and or sterilization according to the procedure specified in the respective IFU provided with them Endoscopic devices Reusable en...

Page 75: ...owered on Doing so may damage the endoscope 1 Immediately after use perform pre cleaning according to the separate IFU Reprocessing of this endoscope 2 After completion of pre cleaning in the examinat...

Page 76: ...74 Directions for use 4 4 While depressing the endoscope eject lever remove the scope connector from the processor Figure 4 11...

Page 77: ...oubleshooting guide If an abnormality persists after troubleshooting do not use the endoscope Send it to PENTAX Medical for repair according to 5 3 Returning the endoscope for repair p 80 Warning Do N...

Page 78: ...hanol for disinfection then dry it sufficiently before connecting to the video processor The image is too bright or too dark The brightness level setting of the video processor is not appropriate Set...

Page 79: ...s damaged Replace with a new air water feeding valve The air water feeding valve O ring is broken Replace the air water feeding valve O ring The O ring is not coated with silicone oil Remove the air w...

Page 80: ...uction control valve gets stuck when depressed and does not return to the original position The pressure setting of the suction source is too high Set the pressure of the suction source at an appropri...

Page 81: ...withdraw the endoscope when any abnormality occurs When the endoscopic image is displayed 1 When using an endoscopic device close the distal tip or retract it within the sheath Slowly withdraw the en...

Page 82: ...ctionality of PENTAX Medical endoscopes built with these unauthorized untested and unapproved items materials repair assembly methods must be referred to the third party service organization and or de...

Page 83: ...national or local laws guidelines to appropriately dispose of the consumables Failure to do so may create a risk of cross contamination or infection Contact your local PENTAX Medical service facility...

Page 84: ...internal function Therefore its RF emissions are very low and are not likely to cause any interference in nearby electronic equipment RF emissions CISPR 11 Class B This product is suitable for use in...

Page 85: ...ower supply input lines IEC 61000 4 11 5 UT 95 dip in UT for 0 5 cycle 40 UT 60 dip in UT for 5 cycle 70 UT 30 dip in UT for 25 cycle 5 UT 95 dip in UT for 5 s 5 UT 95 dip in UT for 0 5 cycle 40 UT 60...

Page 86: ...should be less than 3 V m Recommended separation distances between portable and mobile RF communications equipment and this product This product is intended for use in the electromagnetic environment...

Page 87: ...ternal function Therefore its RF emissions are very low and are not likely to cause any interference in nearby electronic equipment RF emissions CISPR 11 Class B This product is suitable for use in al...

Page 88: ...s and voltage variations on power supply input lines IEC 61000 4 11 95 dip in UT for 0 5 cycle Single phase 0 45 90 135 180 225 270 315 40 UT 0 dip in UT for 1 cycle 70 UT 30 dip in UT for 25 30 cycle...

Page 89: ...by absorption and reflection from structures objects and people Interference may occur in the vicinity of equipment marked with the following symbol Field strengths from fixed RF transmitters as deter...

Page 90: ...uct as recommended below according to the maximum output power of the communications equipment Warning Portable RF communications equipment should be used no closer than 30 cm to any part of this prod...

Page 91: ...rosurgery treatment Available Water jet feeding function Available Illumination White LED Color temperature 5 000 K Specifications are subject to change without prior notice and without any obligation...

Page 92: ...so may result in lowered function and patient user injury or damage to the equipment Note When this endoscope is used in combination with other equipment depending on how it is connected it may resul...

Page 93: ...OF B188 3 OF B194 Option 4 OF B190 or OF B215 Option 5 OE C12 6 OF B113 Water Bottle Assembly 7 OF G11 Option 8 OF Z5 Endoscopic Device Refer to Compatible products p 8 Electrosurgical Device Refer t...

Page 94: ......

Page 95: ......

Page 96: ...1 201 571 2300 Toll Free 1 800 431 5880 Fax 1 201 391 4189 PENTAX Medical Shanghai Co Ltd Room 701 291 Fumin Road Shanghai 200031 P R China Tel 86 21 6170 1555 Fax 86 21 6170 1655 PENTAX Medical Singa...

Reviews: