background image


EPK-700


VIDEO PROCESSOR

OWNER‘S MANUAL

Summary of Contents for EPK-700

Page 1: ...EPK 700 VIDEO PROCESSOR OWNER S MANUAL...

Page 2: ...evice for any other purpose than that for which it has been designed If you have any questions regarding any of the information in this manual or concerns pertaining to the safety and or use of this e...

Page 3: ...cklist 17 5 Operation 20 5 1 Function key indexes 20 5 2 Setting the date and clock 20 5 3 Second adjustment 21 5 4 Entering screen patient data 21 1 Clearing screen information 21 2 Entering screen i...

Page 4: ...ation 31 2 1 Steam sterilization 31 2 2 ETO Sterilization 32 3 Care during storage 32 6 3 Storage 32 6 4 Changing the lamp 32 6 5 Resetting the circuit breakers 33 7 Trouble shooting guide 34 8 Functi...

Page 5: ...that other devices used in conjunction with this equipment function properly and that these other devices will not adversely affect the operation or safety of this equipment If any component of the en...

Page 6: ...ected to impact or vibration 4 Cords accessories etc should be cleaned and neatly stored 5 This equipment should be maintained in a clean condition during storage and be ready for subsequent use 1 7 S...

Page 7: ...to the mains Attention consult Owner s Manual Protective earth ground Conventions The following conventions have been established in the text of this manual to aid in the identification of potential...

Page 8: ...tting at zero flow rate 0 38 0 42 kg cm2 37 41 kPa 0 42 0 63 kg cm2 41 62 kPa Standard air feed volume at inlet of water bottle 3 1 5 3 L min 4 5 8 0 L min Water Feed System Water bottle assembly pres...

Page 9: ...hile the processor is ON could damage the endoscope CAUTION When you take the fiber optic out of this socket the sleeve of the fiber optic might be hot Take care when removing the fiber optic from the...

Page 10: ...g AUTO will require selection of light measuring method AVERAGE or CENTER AVERAGE the brightness level is adjusted with respect to an averaging of the brightness of the video signal CENTER the brightn...

Page 11: ...tes hours for Metal Halide lamp installed in video processor The lamp life meter should be replaced when the Metal Halide lamp is replaced Breaker Activates with a red button protruded out when abnorm...

Page 12: ...endoscope umbilical connector Air Water Drain Lever Must be set to upright A W position for delivery of air and water Water Feeding Stem Channel for water to be displaced from bottle and into scope N...

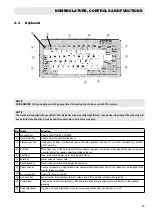
Page 13: ...and pressing alpha numeric key will be typed to the monitor screen as a capital letter or the special character pictured on the key Space Bar Gives a space and deletes a previously typed character Ent...

Page 14: ...f stopwatch function activated Comment Alphanumeric field 40 characters long Doctor s Name Alphanumeric field 12 characters long Facility Alphanumeric field 12 characters long Scope Name When video en...

Page 15: ...environment with explosive or flammable gases Do not block the venting louvres on the sides of the video processor WhenmovingtheEPK 700 donotholdtheendoscope locking lever CAUTION To prevent electric...

Page 16: ...the endoscope NOTE Do not press the water bottle too forcefully into the EPK 700 Mishandling may cause water to leak onto into the video processor NOTE Always disconnect the water bottle before moving...

Page 17: ...dioand TV receiver units this equipment may be subjected to radio interference To reduce electromagnetic interference switch off the unit when not in use and remove scopes from the processor To avoid...

Page 18: ...n doscope within 1 cm of the palm of your hand and move it to about 5 cm away from the palm Watch the image on the monitor to ensure the brightness at both distances is similar Lift the distal end of...

Page 19: ...in mind 13 If XLUM is intended to be used during the procedure operate the XLUM function Upon selecting the switch LED will light and maximize the brightness level 14 Turn ON the air pump The switch L...

Page 20: ...SS HH 24h notation AM hours are expressed as number e g 7 AM 07 PM hours are expressed as the hour 12 e g 7 PM 7 12 19 MM Minute SS Second 4 To change information type the correct information using t...

Page 21: ...ope is connected 2 The cursor will be positioned on the first character of the Patient Name field and will appear as a flashing underline 5 4 2 Entering screen information 1 After clearing the previou...

Page 22: ...pe Name 4 The Scope field will be automatically established when a video endoscope is connected to the EPK 700 The field can be overtyped 5 After pressing Enter in the Scope field the cursor and the I...

Page 23: ...ol buttons or the endoscope control buttons See section Endoscope control buttons AUTO Automatic brightness control where the video signal of the endoscope will automatically maintain the brightness l...

Page 24: ...r on the front panel To change the brightness level Press the Up button to increase the level Press the Down button to decrease the level The switches will beep when pressed and the brightness level i...

Page 25: ...At the same time AUTO MAN AVE CENT and Brightness go out and become invalid To turn the XLUM function OFF press the XLUM switch again When the switch is pressed the LED in the switch will go OUT 5 5...

Page 26: ...ton or processor front panel FREEZE button The main screen will be released from the still image the live image sub screen display will be removed and the LED on the FREEZE button on the front panel w...

Page 27: ...play The stopwatch display format is HH MM SS HH Hour MM Minute SS Second To active the stopwatch function press F5 When activated the stopwatch sub menu will be displayed The arrow to the left of the...

Page 28: ...ster can be recognized clearly 4 Hold down the Ctrl key and press F6 When activated the colour adjustment menu will be displayed 5 Press the Up Down arrow keys according to the menu screen and then EN...

Page 29: ...and Enter keys Refer to section 8 FUNCTION SUMMARY DIAGRAM for menu selections and paths Press both the F and C button on the endoscope control body at the same time Operation from Scope menu will be...

Page 30: ...r on the water bottle cap using a syringe The A W Drain lever should be in the A W position to ensure contact with all internal tubes NOTE Some peripheral devices may have to be turned off BEFORE the...

Page 31: ...been completed 6 2 2 1 Steam sterilization The OS H2 water bottle assembly can be easily identified by the black Air Water hose off white coloured plastic cap NOT transparent and the clear plastic bot...

Page 32: ...ure that no residual water is left inside the water bottle assembly Thoroughly dry all surfaces to reduce the potential for bacteria colonization during storage Compressed air and 70 alcohol should be...

Page 33: ...both buttons down until they click into the depressed positions 3 If operation stops during procedure first turn the processor OFF Wait 10 seconds or more and then press both circuit breaker buttons d...

Page 34: ...and white Lamp Ensure lamp is lit Unusual characters on screen and no response to any key on the keyboard Turn OFF the processor and contact your Pentax service center Endoscope control buttonsdonotc...

Page 35: ...ur Adjustment Blue 128 Red 128 White Balance Reload Esc Image Freeze Mode Field Frame Esc Endoscope buttons C Button Select none out1 out2 both Freeze Release On Off V Button Select non out1 out2 both...

Page 36: ...SION INSTRUMENT CORPORATION 30 Ramland Road Orangeburg NY 10962 2699 U S A Tel 914 365 0700Toll Free 800 431 5880 Fax 914 365 0822 PENTAX GMBH Julius Vosseler Strasse 104 22527 Hamburg Germany Tel 040...

Reviews: