background image

Installation and Operation Manual for 

Perenio®

 Joule Eco Smart Heater 


©Perenio IoT spol s r.o. All rights reserved


Document version: 1.1.0 


Page 

51 

of 

55


TO THE FACT THAT THE DEVICE WAS RECOGNIZED AS FAULTY, DEFECTIVE OR NOT 
ALLOWED FOR USAGE. 

The present limited warranty shall provide the Customer with certain legal rights. The 
Customer may also have other rights in accordance with the local consumer protection 
laws that vary from country to country and may not coincide with this limited warranty. 
For full understanding of 

the Customer’s

 rights, you shall read local acts. 

NOTE. 

The Manufacturer does not produce equipment for 

Vital Tasks

. Vital Task 

Products  shall  include  life  support  systems,  medical  equipment,  implantation-
related  medical  devices,  commercial  transportation,  nuclear  equipment  or 
systems,  and  any  other  fields  of  application  where  equipment  failures  may  do 

harm to a humans’ health or cause their deaths, as well as result in a property 

damage. 


Summary of Contents for Joule Eco Smart Heater

Page 1: ...Installation and Operation Manual for Perenio Joule Eco Smart Heater Article PEJPH01 PEJPH04 April 2021 ...

Page 2: ......

Page 3: ... accordance with international and local laws including Acts on Copyrights and related rights Any reproduction copying publication as well as further distribution or public display of material contained in the present document whether in full or in part shall not be allowed until an appropriate permission of the copyright owner is obtained Any unauthorized usage of materials contained herein may l...

Page 4: ...ny possible technical and or typographical errors either omitted or accidental or any related damage that may result from the document transfer or the use of the devices Perenio IoT shall make no guarantee with respect to any data contained herein including but not limited to the device merchantability and fitness for a particular purpose In case of any discrepancies between language versions of t...

Page 5: ...f Restriction of the Use of Certain Hazardous Substances RoHS in Electronic and Electrical Equipment 2011 65 EU Directive The device complies with requirements of the Technical Regulations of the Republic of Belarus TR 2018 024 BY Telecommunications Security The national conformity mark of the Ukraine indicating that the device meets requirements of all applicable technical regulations The device ...

Page 6: ... Perenio IoT spol s r o All rights reserved Page 6 of 55 Details on available Certificates are specified in Section 6 of the present document For copies of Certificates and Reports please visit a corresponding Section at perenio com BG CZ DE ES FR GR IT KZ LT LV NL NO PL RO RU SE SK TR UA UK ...

Page 7: ...o the source of power it will emit short beeps 6 Do not bend the device or otherwise use force for wall installation using screws 7 When moving the device you may only hold it by brackets on its back Do not move the device by the glass panel while it is switched on or hot 8 If the device is connected to the mains it is strongly recommended to ensure quick and easy way to disconnect it from the sou...

Page 8: ...o keep the device clean and free of dust accumulation 20 To clean the device use a water dampened cotton cloth followed by a dry streak free cloth cleaning Do not clean the device until it is switched off and de energized Do not use cleaning agents or detergents to clean the device 21 The device is not intended for use by children under 12 years or by persons of limited physical sensory or mental ...

Page 9: ... Child Lock Mode 17 1 6 Remote Control via Voice Assistants 18 2 Installation and Setup 19 2 1 First Installation and Configuration 20 2 1 1 Unpacking and Preparing for Installation 20 2 1 2 Floor Installation Option 1 21 2 1 3 Wall Installation Option 2 22 2 2 Initial Switching On 23 2 3 Manual Operation 23 2 4 Selection of the Mobile App for Control 24 2 5 Remote Control via Perenio Smart App 24...

Page 10: ... Changing Settings 44 2 6 8 Removing the Device from the Account 47 3 Maintenance and Repair 48 4 Warranty Obligations 49 5 Storage Transportation and Disposal of Devices 52 6 Other Information 53 7 Troubleshooting 54 8 Glossary 55 Figures and Tables Figure 1 Appearance 12 Figure 2 Buttons ports and indicators 13 Figure 3 Scope of Supply 17 Figure 4 Examples of installation 19 Figure 5 Mounting on...

Page 11: ...io Joule Eco Smart Heater are as follows Connection via Wi Fi 2 4GHz or manual operation Low power consumption of 0 8kW Automatic maintenance of desired room temperature Large heat radiating surface area Ability to be installed on a vertical or a horizontal surface Freshness effect where the air is not dried out This effect is created by increasing the temperature on surfaces of various objects fl...

Page 12: ...Installation and Operation Manual for Perenio Joule Eco Smart Heater Document version 1 1 0 Perenio IoT spol s r o All rights reserved Page 12 of 55 Figure 1 Appearance ...

Page 13: ...oss shaped holes in the mounting brackets for wall mounting of the device Control unit Electronic module for management of the heater which includes a signaling component piezo siren to audibly notify users of the device statuses Power button LED button for switch the heating mode on and off Power cord Cable to connect the heater to the mains socket Temperature sensor Sensor that measures the ambi...

Page 14: ...ock Mode Table 2 Power button LED indication Color State Description Blue On The device is connected to the mains and activated in the mobile app but the heating mode is switched off Flickering The device is connected to the mains but not activated in the mobile app and heating mode is switched off Green On The device is connected to the mains and activated in the mobile app and the heating mode i...

Page 15: ...D is on for 500 ms and then is off for 500 ms Blinking fast means that the LED is on for 100 ms and then is off for 100 ms Flickering means that the LED is on for 3 000 ms and then is off for 300 ms 1 2 Technical Specification Table 34 Basic Technical Specifications Parameter Value Article PEJPH01 White PEJPH02 Black PEJPH03 Silver PEJPH04 Gold Communication Technology Wi Fi IEEE 802 11b g n20 Ope...

Page 16: ...tive humidity non condensing Installation On a flat horizontal or vertical surface The device is intended for indoor installation Casing Material Heat radiant panel Tempered glass Control unit ABS plastic Color White black silver gold Dimensions L x W x H 1000mm 356mm 32mm without brackets Weight 7 4kg Warranty Period 1 year Service Life 2 years Certification CE EAC RoHS UA TR 1 3 Scope of Deliver...

Page 17: ... and marking of the device the list of accessories provided and basic technical specifications thereof as well as the date of manufacture and information about the Manufacturer of devices Weights of the carton package are as follows Net weight 7 2kg Gross weight 9 5kg 1 5 Child Lock Mode The Child Lock Mode means locking the device s control button via the Perenio Lite mobile app NOTE that this mo...

Page 18: ...Lock Mode may be deactivated in the two following ways 1 Remotely via the Perenio Lite mobile app 2 Manually by pressing the power button 5 times for 4 seconds 1 6 Remote Control via Voice Assistants To control the Eco Smart Heater via the Yandex Smart Home Alice or Amazon Alexa app you should first activate the device in the Perenio Smart or Perenio Lite app ...

Page 19: ... area of the Eco Smart Heater Correct location of the electrical socket See Limitations and Warnings Section for details WARNING It is strongly recommended that the Eco Smart Heater is installed out of the reach of children and pets as contact with the device in operation may result in burns Do not use the Eco Smart Heater on carpets or near curtains or upholstered furniture NOTE that it is not re...

Page 20: ... started In this case the notification will be displayed in the control panel of the device and in the Event History tab Do not disconnect the device from the mains until the update process is completed Also do not disconnect the device from the mains for 5 minutes after resetting it to factory settings 2 1 1 Unpacking and Preparing for Installation 1 Unpack the device carefully and remove the acc...

Page 21: ...hten the mounting brackets to the rear surface of the panel Skip this step if mounting brackets were pre installed by the manufacturer 3 Tighten the two metal legs to mounting brackets through the holes using screws See Figure above NOTE that for the floor installation version the Eco Smart Heater may only be oriented horizontally as shown in the Figure above During installation please ensure that...

Page 22: ...anel facing downwards and tighten the mounting brackets to the back of the panel Skip this step if mounting brackets were pre installed by the manufacturer 2 Choose the Eco Smart Heater orientation on the wall Horizontal or vertical installation 3 Drill 4 holes in the wall considering the distance between the cross shaped mounting holes on the brackets Figure 7 Spacing for drilling holes Wall moun...

Page 23: ...the Eco Smart Heater will be in the mode ready for activation in the mobile app for 3 minutes after it is first switched on After that the device will ve automatically switched to the standby mode Heating mode will be off Next you should select the way to manage the device namely 1 Manual operation 2 Remote control via the mobile app 3 Remote control via voice assistants 2 3 Manual Operation The E...

Page 24: ...ed via a free mobile application available for downloading in Google Play or App Store In order to log in to the User Account follow the steps below a Connect your smartphone to the Wi Fi Network and download the Perenio Smart Building Management System app from Google Play or App Store b Register a new User Account or sign in to an existing User Account as follows Registration o Fill in your e ma...

Page 25: ...fter login to the User Account click on the icon in the upper right corner of the Devices tab b Select the Eco Smart Heater from the list c Enter the password from the Wi Fi Network or select another network NOTE The device may be connected to Wi Fi Network of 2 4GHz only d Click on the CONNECT button NOTE Before connecting make sure that the Eco Smart Heater is powered on and that the smartphone ...

Page 26: ...ce the User may specify the following a Image b Device name c Room When the settings are complete press the DONE button NOTE All the specified data can be entered or changed later in the Eco Smart Heater settings The Eco Smart Heater is displayed in the Devices tab In this tab you can switch on off both the device and its climate control mode as well as view the current room temperature ...

Page 27: ...he Eco Smart Heater in the list of connected devices Change the name of the device Add the device to the Room or change the Room of installation Select the temperature scale C or F Remove the device from the mobile application View the device ID and the current firmware version of the device NOTE There are two ways to switch to the settings screen namely 1 Click on the icon with three dots in the ...

Page 28: ...nt room temperature View statistics on energy consumption Set timers View the history of events NOTE Currently Child Lock Mode can only be activated in the Perenio Lite mobile app 2 5 5 Setting Climate Mode The climate control mode means that the Eco Smart Heater will automatically maintain the room temperature set by the User By default this function is deactivated i e the device will continuous ...

Page 29: ...left to activate or deactivate the mode respectively c Set the temperature to be maintained 2 5 6 Viewing Energy Statistics To switch to the statistics screen click on the Total consumed power icon in the device control panel The data is displayed as a chart of the current power consumption in Wh versus yesterday s data Also the User may view energy consumption for other days by clicking the Right...

Page 30: ...you need to go to the Calendar in the upper left corner of the Statistics screen and select the required days for comparison 2 5 7 Setting Scheduled Timers Scheduled timers are used to automatically turn on and or off the Eco Smart Heater at a specified time on specified days of the week This timer is not preset by default for the device NOTE Available options to set timers depend on the selected ...

Page 31: ...ntrol panel and then on the icon in the right upper corner of the screen 2 In the Add Scheduled Event screen select the power type Turn on 3 Select the time to turn on the Eco Smart Heater 4 Activate and select the time to turn off the Eco Smart Heater if necessary NOTE The switch off time activation is optional 5 Select days of the week when the Eco Smart Heater shall be turned on 6 If required a...

Page 32: ... to the created timer by clicking on it in the Scheduled timer tab NOTE If the User shall try to change settings of an activated timer it will be automatically disabled A maximum of fifteen 15 weekly timers can be activated at a time How to set the scheduled timer to turn off the Eco Smart Heater 1 Click on the Scheduled timer button in the device control panel and then on the icon in the right up...

Page 33: ... 55 3 Select the time to turn off the Eco Smart Heater 4 Activate and select the time to turn on the Eco Smart Heater if necessary NOTE The switch on time activation is optional 5 Select the days of the week on which the Eco Smart Heater shall operate on a timer 6 If required activate the climate control mode and select a maintained temperature ...

Page 34: ...er to the right left 9 The User may make changes to the created timer by clicking on it in the Scheduled timer tab NOTE If the User shall try to change settings of an activated timer it will be automatically disabled A maximum of fifteen 15 weekly timers can be activated at a time How to delete the timer Swipe from left to right on the desired timer in the Scheduled timer tab and tap the bin icon ...

Page 35: ...l on and off o Start and completion of the firmware update ALARMS ONLY filter which displays device actuation events for the Armed Mode only Filter by date 2 5 9 Subscriptions Subscriptions allow the User to increase the storage period of the following information and data in the cloud Videos and images History of events Statistics By default all users of the Perenio Smart Building Management Syst...

Page 36: ...ion Information about the Subscriber Email address Information about data storage in the Cloud Information about the maximum number of devices that may be connected to the User Account To change the type of Subscription the User shall click on a corresponding button and select the desired tariff plan from the list Then confirm the choice Table 4 Available subscriptions Storage Perenio Basic Pereni...

Page 37: ... Smart Heater from the source of power and move it to another location room e Plug it into the source of power in a new room f In the User Account select the Location where you want to move the device g Initiate the Eco Smart Heater search through the Perenio Smart app 2 5 11 History and Push Notifications All notifications and other messages including changes in Perenio device statuses are displa...

Page 38: ...on Sensor when in the Disarmed mode 2 6 Remote Control via Perenio Lite App 2 6 1 Installation of the Application The device shall be managed via a free mobile application available for downloading in Google Play or App Store In order to log in to the User Account follow the steps below a Connect your smartphone to the Wi Fi Network and download the Perenio Lite app from Google Play or App Store b...

Page 39: ... logging into your account click on the icon in the Home tab b Select Heater Wi Fi in the Small Home Appliances c Enter the password from the Wi Fi Network or select another network NOTE The device may be connected to Wi Fi Network of 2 4GHz only d Click on the Next button NOTE Before connecting make sure that the Eco Smart Heater is powered on and that the smartphone is located at a distance of n...

Page 40: ...lick on the image of the smart plug in the Home tab then click on the edit icon in the right upper corner of the device control panel The Eco Smart Heater setting screen will be displayed After that click on the edit icon in the right upper corner of the screen once again The Eco Smart Heater will be displayed in the Home tab From this tab without opening the control panel you can switch the heate...

Page 41: ...ications Share rights for management of the device Create a group of several devices for easier management Remove the device from the mobile application NOTE that the User can switch to the settings screen by clicking on the Edit icon in the right upper corner of the Eco Smart Heater control panel 2 6 4 Control Panel The Eco Smart Heater control panel is displayed when you click on its image in th...

Page 42: ...switched on or off as required Manual Mode where the Eco Smart Heater is switched on and off according to the user s commands NOTE By default the Eco Smart Heater will be switched to the Manual Mode after the first activation In order to change the control mode you should click on the Mode icon in the device control panel and select the required setting The selected mode is considered activated wh...

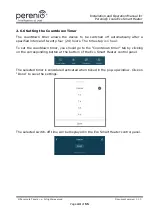
Page 43: ...utomatically after a specified interval of twenty four 24 hours The time step is 1 hour To set the countdown timer you should go to the Countdown timer tab by clicking on the corresponding button at the bottom of the Eco Smart Heater control panel The selected timer is considered activated when ticked in the pop up window Click on Done to save the settings The selected switch off time will be disp...

Page 44: ...When the Child Lock Mode is activated the Eco Smart Heater will not respond to pressing the power button on its control unit as all actions will be performed via the mobile app only View the current power data Select the temperature scale C or F Set the timer NOTE If the Eco Smart Heater is switched off the only available settings will be the timer setting Timer setting The timer is used to automa...

Page 45: ...nt version 1 1 0 Page 45 of 55 To create a new timer please follow the below steps 1 Press the Add button in the Timer tab screen The setting window will be displayed 2 Select the time to switch the device on or off 3 Press the Repeat button to select days of the week when the Eco Smart Heater shall operate on a timer ...

Page 46: ...ons for the timer if necessary NOTE Notes and push notification are optional 6 Select the action to be performed by timer i e switching the Eco Smart Heater on or off 7 Press the Save button 8 Activate the timer in the list 9 You can make changes to the created timer by clicking on it in the list of timers How to delete the timer Swipe from right to left on the desired timer in the Timer tab and p...

Page 47: ...7 of 55 2 6 8 Removing the Device from the Account To remove the Eco Smart Heater from the User account press and hold your finger on the name of the Eco Smart Heater in the Home tab for a few seconds A new window will be displayed with an option to delete the device Press the Delete device button to delete all device data from your account ...

Page 48: ...to time Follow rules of safe operation of the device Clean the device casing from dirt and dust from time to time Check for updates of the mobile app If auto update is not enabled Repair mechanical damages to devices in Service Centers The Perenio Joule Eco Smart Heater repairs shall be carried out in Service Centers In the case of warranty repairs or replacement the User shall provide the Seller ...

Page 49: ... start of the warranty period shall be the date of manufacture of the device The Manufacturer shall guarantee that all materials components and assemblies of Perenio devices are free from defects under normal operation within the warranty period The limited warranty shall be applied to the first End Customer of Perenio devices only and cannot be transferred to a subsequent customer For warranty re...

Page 50: ...any way removed erased affected altered or made illegible In the case of violation of operating procedures and conditions as well as the device installation instructions described in relevant Manuals Cracks scratches and other defects caused as a result of transportation and or operation of the device by the Customer or acts of negligence on their part Mechanical damages that occurred after transf...

Page 51: ...th the local consumer protection laws that vary from country to country and may not coincide with this limited warranty For full understanding of the Customer s rights you shall read local acts NOTE The Manufacturer does not produce equipment for Vital Tasks Vital Task Products shall include life support systems medical equipment implantation related medical devices commercial transportation nucle...

Page 52: ...ipal waste due to their potential to cause harm to the environment NOTE The User must comply with the temperature and humidity conditions of storage and transportation specified in the Table of technical specifications of the present Installation and Operation Manual The device may be shipped by any kind of covered vehicles by rail or road or in sealed heated airplane compartments etc in accordanc...

Page 53: ...BISc Enterprises PLC Address 43 Kolonakiou Street Diamond Court Ayios Athanasios 4103 Limassol Cyprus Czech Republic Name ASBIS CZ s r o Address Obchodní 103 Čestlice 25101 Info on Certificates and Declarations Certificates CE certificate of conformity 2008604723E E20 48071 as of 22 10 2020 CE certificate of conformity 2008604723E L20 48072 as of 22 10 2020 Certificate of conformity EEA RU No 0267...

Page 54: ... socket or it is defective damage of the power cable or plug Check the mains voltage or make sure the socket is in good operating condition inspect the power cable or plug for continuity 2 The Eco Smart Heater does not generate heat when turned on The desired temperature is set incorrectly Change the desired temperature above the current value 3 The Eco Smart Heater does not respond to commands fr...

Page 55: ...nly protected against occasional splashes Small amounts of moisture It allows the devices to be used primarily in rooms with a high level of humidity The device with IP44 is not intended for outdoor use as it is not protected against rain snow or large amounts of dust Perenio Lite Simplified software developed by Perenio IoT for remote device management Perenio Smart Software developed by Perenio ...

Reviews: