background image

3

SET uP PROCEDuRE FOR WARMING ThROW

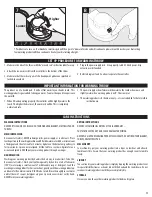
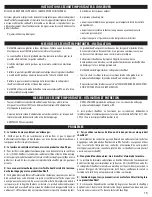
7. Push button to turn on. Your blanket or mattress pad will then go into “prewarm” mode and will continue to prewarm until it reaches your dial setting. 

Your warming product will then continue to heat at your dial setting all night.

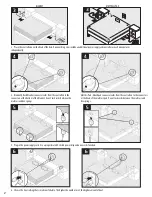
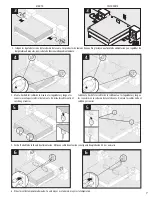
1.  Make sure the side of the throw with the “use and care” instruction label faces up.

2.  Attach the connector cord from the controller to the bottom of the throw.

3.  Make sure that the cords or parts of the heating wire grid are not pinched or  

  tucked-in anywhere.

4.  Plug in the power supply cord.  Use a properly-rated UL listed power-strip  

  extension cord if needed.

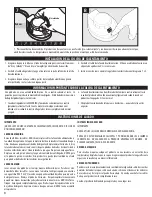
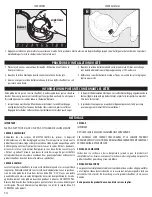
5.  Refer to diagram 7 and 8 on how to operate the controller.

This product is not a heated pad.  It will not feel warm to your hand’s touch.  This 

warming product is guaranteed to keep you warm.  You must sleep on it to experience 

the warmth.

1.  When ON and operating properly, the controller will be slightly warm to the  

  touch.  The higher the dial is set, the warmer it will be.  This is completely  

  normal and safe.  

2.  The power supply or transformer will be warm to the touch when in use and  

  slightly warm when warming product is off.  This is normal.

3.  This warming product is for home use only—it is not intended for hotel or other  


institution use.

IMPORTANT INFORMATION FOR WARMING ThROW

+LJKHU

/RZHU

&KRRVHKHDWVHWWLQJ7KHKLJKHUWKHQXPEHUWKHKLJKHU

WKHKHDW

7

8

CARE INSTRuCTIONS

WAShING INSTRuCTIONS

NEVER DRY CLEAN OR USE BLEACH ON YOUR WARMING BLANKET, MATTRESS PAD OR 

THROW!

MAChINE WAShING

Disconnect all cord(s). NEVER submerge cords, power supply, or control unit.  Place 

textile portion in the washing machine and fill with warm water. Add a small amount 

of detergent and then let soak for 5 minutes. Agitate on the delicate or gentle cycle 

for two minutes. Spin on normal speed. Fill the tub for a cool rinse. Agitate for one 

minute and spin dry. NEVER put your warming product through a wringer. 

hAND WAShING

Washing your warming product by hand is the best way to make it last. To do this, 

disconnect all cord(s). Wash your textile separately by hand in a tub of lukewarm 

(100°F) water using a small amount of mild laundry soap or detergent. Soak the 

warming warming product for 5 minutes. Next, gently work the warming product up 

and down for five more minutes. NEVER rub or scrub. Rinse thoroughly in cool water 

until all traces of soap or detergent are gone. Squeeze excess water out by hand. 

NEVER twist your warming product.

DRYING INSTRuCTIONS

NEVER USE COMMERCIAL DRYERS AT THE LAUNDROMAT –

THEY MAY BE EXTRA HOT AND COULD DAMAGE THE WIRING.

NEVER PLUG IN YOUR WARMING PRODUCT WHILE DAMP.  DO NOT IRON YOUR BLANKET, 

THROW, OR MATTRESS PAD.

MAChINE DRY

To machine dry, put your warming product into a dryer on low heat and allow to 

tumble until dry. Ensure that your warming product has enough room to tumble 

freely.

LINE DRY

You can line dry your warming product simply by draping the warming product over 

two parallel clotheslines or a shower rod with the head and foot ends down. Do not 

reconnect warming products until they are completely dry.

STORAGE

Store as you would any other warming product, folded in a dry place. 

Summary of Contents for Soft Heat

Page 1: ...e finest warming products ever made anywhere in the world 250206 TABLE OF CONTENTS Set up Procedure for Blanket and Mattress Pad 1 Place the blanket or mattress pad on the bed with the Use and Care instruction label facing up 2 Blanket Place the power supply under the bed on the floor Blanket connectors should hang off the edge of the mattress Do not tuck cords between the mattress and the box spr...

Page 2: ...t is most comfortable The higher the number is set the higher amount of heat 3 6 3ODFH SRZHU VXSSO XQGHU EHG RQ WKH IORRU R QRW WXFN FRUGV EHWZHHQ WKH PDWWUHVV DQG WKH ER VSULQJV H VXUH WR ORFDWH WKH SDG V KHDG HQG FRUQHUV SURSHUO 7KHUH VKRXOG EH DERXW RI WKH WRS IDEULF KDQJLQJ RYHU WKH PDWWUHVV HGJH VR WKDW WKH ODEHO DQG WKH FRQQHFWRU V DUH ORFDWHG RQ WKH YHUWLFDO VXUIDFH 7KLV ZLOO DOORZ WKH SDG ...

Page 3: ...RWARMING BLANKET MATTRESS PAD OR THROW MACHINEWASHING Disconnect all cord s NEVER submerge cords power supply or control unit Place textileportioninthewashingmachineandfillwithwarmwater Addasmallamount of detergent and then let soak for 5 minutes Agitate on the delicate or gentle cycle for two minutes Spin on normal speed Fill the tub for a cool rinse Agitate for one minute and spin dry NEVER put ...

Page 4: ...g product turned on and folded up for more than a few minutes Q I feel some warmth but not a lot How warm should this warming product get A This warming product will provide enough warmth to keep you quite comfortable even in an extremely cold room with only a light blanket on top Youshouldspendseveralnightsexperimentingwiththeheatsettingsuntilyou find your personal comfort level This warming prod...

Page 5: ... with a similar product ofequalorgreatervalue Thisisyourexclusivewarranty Thiswarrantyisvalidforthe originalretailpurchaserfromthedateofinitialretailpurchaseandisnottransferable Proofofpurchaseisrequiredtoobtainwarrantyperformance Keeptheoriginalsales receipt Dealers service centers or retail stores selling Safe andWarm products do not have the right to alter modify or any way change the terms and...

Page 6: ...able Los productos Safe and Warm son verdaderamente los mejores productos de calentamiento que se han fabricado nunca en cualquier parte del mundo ÍNDICE INSTALACIÓN DE LA MANTA Y LA COLCHONETA 1 Coloque la manta o la colchoneta sobre la cama con el lado de la etiqueta que tiene las instrucciones de Uso y Cuidado Use and Care en inglés mirando hacia arriba 2 Manta Coloque la fuente de alimentación...

Page 7: ... etiqueta de aprobación UL si es necesario 6 Elija el nivel de temperatura deseado Cuanto mayor es el número mayor es la temperatura 3 6 3ODFH SRZHU VXSSO XQGHU EHG RQ WKH IORRU R QRW WXFN FRUGV EHWZHHQ WKH PDWWUHVV DQG WKH ER VSULQJV H VXUH WR ORFDWH WKH SDG V KHDG HQG FRUQHUV SURSHUO 7KHUH VKRXOG EH DERXW RI WKH WRS IDEULF KDQJLQJ RYHU WKH PDWWUHVV HGJH VR WKDW WKH ODEHO DQG WKH FRQQHFWRU V DUH ...

Page 8: ...NUNCAsumerjaloscables lafuentedealimentación o la unidad de regulación Coloque la materia textil en la lavadora llenándola de agua tibia Añadaunapequeñacantidaddedetergenteydéjelaremojar5minutos Active la lavadora durante dos minutos en el ciclo para prendas delicadas Active el ciclo de lavado a velocidad normal Llene la lavadora con agua fría para un enjuague fresco Déjelaenesecicloporunminutoylu...

Page 9: ... si están expuestas a corrientes de aire como por ejemplo una ventana abierta ADVERTENCIASFUNDAMENTALESDESEGURIDAD CUIDADOYMANTENIMIENTO RESOLUCIÓN DE PROBLEMAS Siempre apague la corriente eléctrica cuando la manta no esté en funcionamiento apagando el regulador o desenchufando la fuente de alimentación del tomacorriente Envolver el cable alrededor de los reguladores puede dañarlo Dele unas vuelta...

Page 10: ...igro Ese calor es completamente normal y no es nada de qué preocuparse La energía consumida es aproximadamente 1 vatio mucho menos que una lamparita de noche P La fuente de alimentación chispeó en el tomacorriente cuando la enchufé R Es cierto muchos aparatos eléctricos con fuentes de poder a veces chasquean debido al torrente de electricidad cuando se enchufan Esto es completamente normal y no ha...

Page 11: ...Perfect Fit no se hace responsable de ningún daño fortuito o derivado del incumplimiento de cualquier garantía explícita o implícita Salvo en la medida en que la ley aplicable lo prohíba cualquier garantía implícita de comerciabilidad o idoneidad para un propósito determinado está limitada en su duración a la de la garantía antes mencionada En algunos estados provincias o jurisdicciones no se perm...

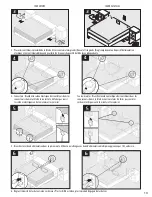
Page 12: ... sans contredit les meilleurs offerts sur le marché mondial TABLE DES MATIÈRES PROCÉDURE D INSTALLATION DE LA COUVERTURE ET DU COUVRE MATELAS 1 Placez votre produit chauffant en vous assurant que l étiquette Utilisation et entretien se trouve à la tête du lit 2 Couverture Placez le dispositif d alimentation électrique sous le lit directement sur le plancher Les connecteurs doivent être situés à la...

Page 13: ...llonge avec barre d alimentation multiprise approuvée par l UL au besoin 6 Réglez l intensité de la chaleur selon vos besoins Plus le chiffre est élevé plus le produit dégagera de la chaleur 3 6 3ODFH SRZHU VXSSO XQGHU EHG RQ WKH IORRU R QRW WXFN FRUGV EHWZHHQ WKH PDWWUHVV DQG WKH ER VSULQJV H VXUH WR ORFDWH WKH SDG V KHDG HQG FRUQHUV SURSHUO 7KHUH VKRXOG EH DERXW RI WKH WRS IDEULF KDQJLQJ RYHU WK...

Page 14: ...cordons NE METTEZ JAMAIS les cordons le dispositif d alimentation ou le bloc de réglage dans l eau Placez la partie en tissu de votre produitdansvotrelave lingeetremplissez led eautiède Ajoutezunepetitequantité de détergent puis laissez tremper 5 minutes Lancez le cycle Délicat pendant 2 minutes Essorez au cycle normal Remplissez la cuve d eau froide Lancez le cycle Délicat pendant 1 minute puis l...

Page 15: ...it l abîmer Enrouler lâchement le cordon lors de l entreposage NE REPASSEZ PAS votre produit NE PAS UTILISER de produits de nettoyage à sec Les solvants de nettoyage pourraient endommager l isolant des fils Si votre produit chauffant ne fonctionne pas correctement débranchez le immédiatement et communiquez avec le service à la clientèle de Perfect Fit 1 800 299 1378 ou custserv perfectfitindustrie...

Page 16: ...ommages indirects ou consécutifs ou les limites concernant la durée de la garantie tacite par conséquent ces limitations ou exclusions pourraient ne pas s appliquer La présente garantie accorde des droits juridiques aux consommateurs auxquels peuvent s ajouter d autres droits qui varient d un état ou d une province à l autre PFI ne pourra en aucun cas être condamné à des dommages indirects consécu...

Reviews: