background image

SLG2006CN 

Owner’s Manual 


WARNING


Improper installation, adjustment, 

alteration, service or maintenance 

can cause injury or property 

damage.


Read the assembly, operation 

and maintenance instructions 

thoroughly before assembing 

or servicing this equipment.


DANGER


Failure to follow these 

instructions could result in fire 

or explosion that could cause 

property damage, personal 

injury or death.


DANGER


DO NOT use gas grill for indoor 

cooking or heating. TOXIC fumes 

can accumulate and cause 

asphyxiation. DO NOT use in or 

on boats or recreational vehicles.


PROP 65 WARNING 

Chemicals known to the state of 

California to cause cancer, birth 

defects or other reproductive 

harm are created by the 

combustion of natural gas. 


WARNING  


      FOR YOUR SAFETY:  


For Outdoor Use Only. 

(outside any enclosure) 


SAVE THESE INSTRUCTIONS FOR FUTURE 

REFERENCE. IF YOU ARE ASSEMBLING THIS UNIT 

FOR SOMEONE ELSE, GIVE THIS MANUAL TO HIM 

OR HER TO SAVE FOR FUTURE REFERENCE. 

FOR  CUSTOMER  SERVICE,  EMAIL  TO 

SERVICE@PYROMAGICBBQ.COM

  OR 

CALL 1-877-885-8227 (TOLL-FREE),


6 A.M. – 5 P.M.(PST),MONDAY-FRIDAY.


Printed in China

ITEM # 225198


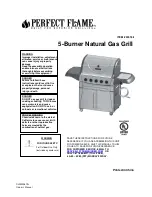
5-Burner Natural Gas Grill


Summary of Contents for 225198

Page 1: ...umes can accumulate and cause asphyxiation DO NOT use in or on boats or recreational vehicles PROP 65 WARNING Chemicals known to the state of California to cause cancer birth defects or other reproduc...

Page 2: ...sing lid Step 3 Clean up grease build up and cover your grill Please refer to the owner s manual for details SPECIAL WARNINGS 1 DO NOT store or use gasoline or other flammable vapors and liquids withi...

Page 3: ...ist 5 Hardware List 6 Assembly Instructions 7 Operating Your Grill 15 Natural Gas Connection 15 Checking for Leaks 16 Lighting Your Grill 16 Excess Flow Safety Valve Reset Procedure 18 Care and Mainte...

Page 4: ...away from the grill at all times 7 This is not a tabletop grill Do not place this grill on any type of tabletop surface 8 Do not use the grill in high winds 9 This grill must be used with natural gas...

Page 5: ...or while it is still hot to prevent possible personal injury Never store or use gasoline or other flammable or volatile substances in the vicinity of this grill or in the vicinity of any other heat g...

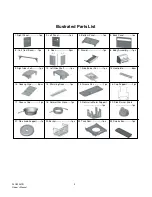
Page 6: ...r 1pc 8 Body Assembly 1pc 9 Right side shelf 1pc 10 Left Side Shelf 1pc 11 Side Burner Set 1pc 12 Heat plate 5pcs 13 Cooking Grid 3pcs 14 Warming Rack 1pc 15 Grease Pan 1pc 16 Cup Support 1pc 17 Greas...

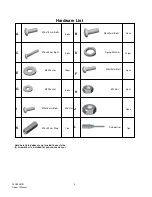
Page 7: ...s C M6 x45 mm Bolts 4pcs D Spring Washer 14pcs E M6 Washer 14pcs F M4x12mm Bolt 4pcs G M4 Washer 6pcs H M4 Nut 3pcs I M4x16 mm Bolts M6 Nut J 2pcs K M4 x29 mm Stud 1pc L Screwdriver 1pc Hardware liste...

Page 8: ...fore beginning assembly make certain the wheels of the cart assembly are locked Align the holes at the bottom of the right side panel 1 with the holes on the right side of the bottom panel 3 Insert a...

Page 9: ...E into each hole Tighten by hand until secure Repeat the procedure for left side of the cart front beam Go back to tighten all the bolts with the screwdriver provided Step 4 Slide the basket 22 onto t...

Page 10: ...of the cart Note Make certain the pre drilled holes on the left sides of the body assembly are properly aligned Insert a M6x20mm bolt B a spring washer D and a M6 washer E into each hole on left sides...

Page 11: ...e Tighten bolt connections by hand until secure Repeat the same procedure for the left side shelf 10 Go back to tighten all the bolts with the screwdriver provided Step 8 Align the holes on side knob...

Page 12: ...nsert a M4x12mm bolt F and a M4 washer G from under side into the most left front pre drilled hole and screw in the M4 x 30 stud K by hand Insert three M4x12mm bolts F from top side into the other thr...

Page 13: ...tes Insert the four ends of warming rack 14 into the hole on top of grill body Step 12 Align the holes on the rotisserie motor support 19 with the holes on the right side of the grill body Insert a M6...

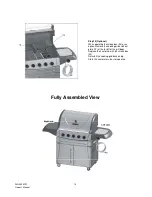
Page 14: ...the cart assembly Hook the cup support 16 into the grooves beneath the grease pan Place the grease cup 17 on the cup support Step 14 Connect the natural gas hose 18 to the side burner valve by screwin...

Page 15: ...ing the smoke box 24 as an option Remove the cooking grid and heat plate 12 at the far left of the grill body Replace the heat plate with the smoke box 24 Reinstall the cooking grid back on top Store...

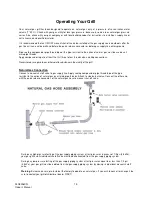
Page 16: ...aking connections Never store or use gasoline or other volatile substance in the vicinity of this grill Natural Gas Connection Connect a manual shutoff valve to gas supply line Apply sealing compound...

Page 17: ...secure 8 Retest with solution 9 If you continue to see bubbles contact the customer service center Lighting Your Grill Danger Failure to open lid while igniting the barbecue s burners or not waiting...

Page 18: ...eat clean the internal parts and dissipate odor from the manufacturing process and painted finish 4 Clean the grill after each use DO NOT use abrasive or flammable cleaners This may damage parts of th...

Page 19: ...ank valve rapidly or if one or more of the burner control knobs is in an open position when opening the LP tank valve This procedure is effective with all LP Tank sizes as well as Natural Gas When per...

Page 20: ...residue using brush scraper and or cleaning pad Wash with a dishwashing detergent and hot water solution Rinse with water and let dry Cooking Grids The porcelain grates have a glass like composition...

Page 21: ...om marinade and grill over very high heat to desired doneness Hardcore Grilled Trout Ingredients cup Lemon or lime juice 2 tablespoons Melted butter 2 tablespoons Vegetable oil 2 tablespoons Chopped p...

Page 22: ...d ONLY do not use tools Obstruction of gas flow Clear burner tubes Check for bent or kinked hose Disengagement of burner to valve Reengage burner and valve Spider webs or insect nest in venturi Clean...

Page 23: ...out After grill cools remove and clean all parts Flashback fire in burner tubes Burner and or burner tubes are blocked Clean burner and or burner tube s Inside of lid is peeling like pant peeling The...

Page 24: ...n or maintenance This warranty is for replacement of defective parts only We are not responsible for incidental or consequential damages or labor costs This warranty does not cover chips and scratches...

Reviews: