background image

9

5

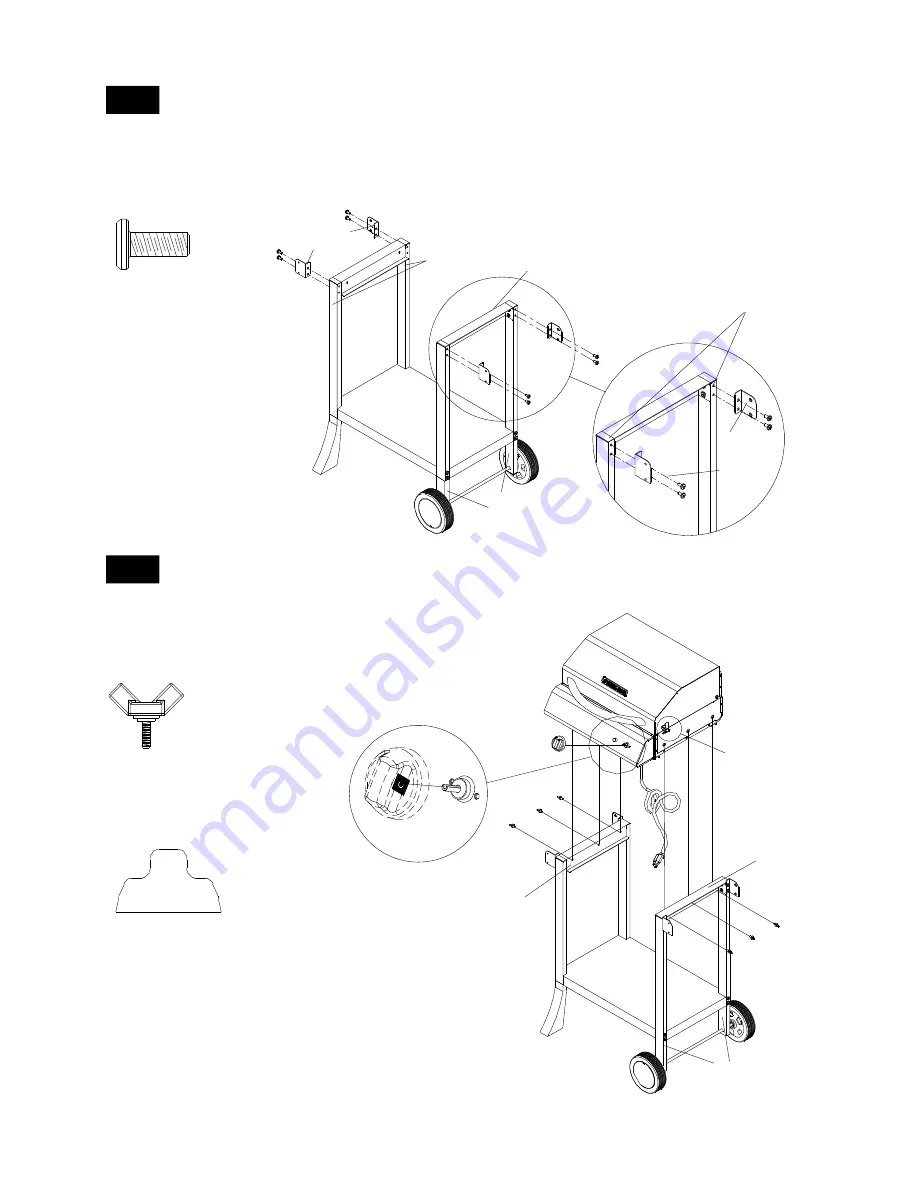
Instale los soportes de las repisas laterales

 (

Fig.  5

)

Tornillo con cabeza Phillips
1/4 in. x 1/2 in.
Cantidad 8
Parte # S112G04084

1.

2.

3.

Perno mariposa
1/4 in. x 5/8 in.
Cantidad 6
Parte # S233G04104

Perilla de control del
fogón eléctrico
Cantidad 1
Parte # PD13010050
Escala 1:2

Instalando el cabezal de la parrilla y la perilla de control

(

Fig. 6

)

6

1.

2.

3.

IP

IF

Fig. 5

Soportes de las
repisas laterales

Pata Inferior
derecha de
la carreta

Repisa Inferior
de la carreta

Pata inferior
izquierda
de la
carreta

DP

DF

Soportes
de las
repisas
laterales

Pata superior
izquierda

de

la carreta

Pata superior
derecha de
la carreta

Soporte
derecho
del tazón

Fig. 6

Soporte
izquierdo
del tazón

Soporte
derecho
del tazón

Cabezal de la
parrilla

Cierre superior
y cierre inferior
de la tapa

Pata Inferior
derecha de
la carreta

Repisa Inferior
de la carreta

Pata inferior
izquierda
de la
carreta

Perilla de
control

Coloque el cabezal de la parrilla sobre el soporte del
tazón.
Aprételo con seguridad usando 6 pernos mariposa 1/4 in.
x 5/8 in. por debajo de los soportes zquierdo y derecho
del tazón.
Fije la perilla de control como se muestra.

Fije el soporte de la repisa latral derecha, (DF/DP) a la parte
superior de la pata derecha de la carreta.
Inserte 4 Tornillos con cabeza Phillips 1/4 in. x 1/2 in. y
aprételos con seguridad.
Repita estos pasos para fijar el soporte de la repisa lateral
izquierda a la parte superior izquierda de la pata superior
izquierda de la carreta.

Summary of Contents for 246563

Page 1: ...ure to comply with these instructions could result in a fire or electric shock that could cause serious bodily injury death or property damage FOR OUTDOOR USE ONLY DO NOT USE INDOORS OR FOR COMMERCIAL COOKING Whetherthisgrill wasassembledbyyouor some one else you must read this entire manual before using your grill to ensure the grill is properly assembled installedandmaintained Yourgrill will get...

Page 2: ...TANT SAFEGUARD Read all Instructions Do not touch hot surfaces Use handles or knobs To protect against electrical shock do not immerse cord plugs or this grill in water or other liquid Close supervision is necessary when any appliance is used near children Unplug from outlet when not in use and before cleaning Allow to cool before putting on or taking off parts Do not operate any appliance with a ...

Page 3: ...g into water do not use grill within 10 feet of pool spa pond water faucet or any body of water Make sure the control knob is set to OFF before plugging OR unplugging your grill Unplug your grill when not in use or before moving the grill Do not unplug your grill by pulling the cord Keep cord away from hot grill surfaces Never operate your grill if the cord or plug appears damaged Never remove the...

Page 4: ...Cart Legs S112G04084 Phillips Head Screw 1 4 in x1 2 in 8 Attaches Bowl Brackets to Upper Cart Legs S112G04084 Phillips Head Screw 1 4 in x1 2 in 8 Attaches Side Shelf Bracket to Cart Legs S233G04104 Wing Bolt 1 4 in x5 8 in 6 Attaches Grill Head onto Bowl Bracket PD13010050 Control Knob for Electric Burner 1 Attaches to Control Panel S138G04104 Pattern Head Screw 1 4 in x5 8 in 8 P05515020B L Scr...

Page 5: ...5 Parts Diagram for Model LE1808CA 1 5 3 4 10 13 9 8 11 7 21 20 17 18 14 15 16 6 27 28 34 33 31 30 32 24 23 25 26 18 17 24 23 29 19 2 22 12 21 22 35 ...

Page 6: ... 7 Bowl Outer PD04010015 1 8 Bowl Inner PD04020012 1 9 Burner Electric PD05010010 1 10 Cooking Grid PD07010013 1 11 Thermostat Bracket PD08010025 1 12 Thermostat Protector PD08010042 1 13 Burner Bracket PD16010025 1 14 Control Panel Heat Shield PD08010015 1 15 Control Panel Assembly PD09010015 1 16 Control Knob PD13010050 1 17 Leg Foldable PD17030015 4 18 Leg Grip PD17040015 4 19 Grease Draining T...

Page 7: ...ht Cart Legs Lower Right Cart Legs Double holes face inward Thread Wheel Axle on the Lower Front Left Cart Legs Insert 1 Wheel and 1 Washer 7 16 in to the left side of Wheel Axle and secure Cotter Pin as shown Snap the Wheel Hub Caps onto the Wheels Repeat steps for the rear right side of Wheel Axle Align the 2 holes on the Lower Right Cart Legs with the threaded holes on the Upper Right Cart Legs...

Page 8: ...eft Cart Legs Left Bowl Bracket Right Bowl Bracket Cart Bottom Shelf Lower Right Cart Legs Flat plate faces inward Right Bowl Bracket 4 Attach the Cart Bottom Shelf between the Cart Legs as shown Note Ensure double holes face inward on 4 Cart Legs Insert 2 Phillips Head Screws 1 4 in x 2 in per Cart Leg and tighten securely Attach a Right Bowl Bracket between the Upper Right Cart Legs Note Ensure ...

Page 9: ...Bracket 3 Fig 5 Phillips Head Screw 1 4 in x 1 2 in Qty 8 Part S112G04084 Lower Right Cart Legs Right Bowl Bracket Grill Head Upper Lower Lid Latches Cart Bottom Shelf Lower Left Cart Legs Left Bowl Bracket Control Knob Attach the Side Shelf Brackets RF RR to the Upper Right Cart Legs Insert 4 Phillips Head Screws 1 4 in x 1 2 in and tighten securely Repeat steps for Left Side Shelf Brackets to Up...

Page 10: ...o Pattern Head Screws 1 4 in x 5 8 in to the lower holes of the Right Side Shelf Brackets and tighten securely See Fig A Align the slot B of the Right Side Shelf to the installed Pattern Head Screws and secure the side shelf into position From the underside of the Side Shelf insert one Pattern Head Screw 1 4 in x 5 8 in into the front Side Shelf Bracket see Fig B Then tighten securely using a L Sc...

Page 11: ... SIDE SHELF DOWN 4 SLIDE SIDE SHELF ALONG THE SLOT With both hands grab both sides of Left Side Shelf and lift to dislodge it from the fixed position B slots Pull Left Side Shelf away from the grill head and release for Fold Away option Then allow the Side Shelf to slide down along the slot C until it comes to a stop Repeat for Right Side Shelf Slide the Grease Tray side tabs over Grease Tray Brac...

Page 12: ...Control Knob Temperature Light Option Portable Grill Use Fig 11 9 Install Cooking Grid Fig 10 1 Cooking Grid Left Side Shelf Right Side Shelf Lower Left Cart Legs Upper Lid Latch Lower Lid Latch 1 3 2 Fig 10 Cart Bottom Shelf Lower Right Cart Legs Direction Cooking Grid Foot Facing down Final Grill Assembly Step When you have finished assembling your grill be sure that all screws are tightened for...

Page 13: ...heat distribution Because these conditions vary and no two back yards are alike we offer this guide as aconvenience Werecommend youmonitoryour grill closely and rotate foods as needed to prevent over cooking and ensure the most delicious resultseverytime An Important Note About Cooking Temperatures 1 2 3 4 5 6 Make sure the Control Knob is set to OFF Disconnect other appliances from the circuit be...

Page 14: ...marked with letters W A and with a tag stating Suitable for Use with Outdoor Appliances 3 4 a b Always preheat the grill 15 20 minutes with the Lid closed Keep grill Lid closed as much as possible during the cooking process to minimize heat loss Reposition grill to reduce affect of wind 1 2 a If the grill fails to produce any heat Be sure there is power to the grill Turn the Control Knob OFF and t...

Page 15: ...Steel Surfaces Routine care and maintenance is required to preserve the appearance and corrosion resistance of stainless steel The fact is stainless steel can corrode rust and discolor under certain conditions Rust is caused when regular steel particles in the atmosphere become attached to the stainless steel surface Steel particles can also become attached to your grill if you use steel wool or s...

Page 16: ...ling times will vary according to meat thickness GrillingFish Preheat the grill using the highest setting for 15 20 minutes with the Lid closed Open Lid and place fish skin down on the Cooking Grid Cook the poultry on both sides until seared Reduce heat and use cook ing time as a guide or until fish is opaque but still moist Vegetables and Fruit Preheat the grill using the highest setting for 15 2...

Page 17: ...eaners pool or spa chemicals or any tools used in the assembly or installation of this unit This warranty does not cover paint loss surface rust or stainless steel discoloration which is considered normal wear This warranty does not cover the cost of any inconvenience personal injury or property damage due to improper use or product failure This Warranty does not cover any failures or operating di...

Page 18: ... ensamblada instalada y mantenida Lasuperficiedesuparrillaestarámuycaliente Siempre use guantes retardantes de calor para barbacoa cuando cocina en su parrilla Nunca se incline sobre las superficies de cocinar mientras está usando la parrilla No toque la superficie de cocinar tapa armazón uotraspartes mientrasla parrilla está en operación espérese hastaque se enfríeporcompleto Use su parrilla a NO...

Page 19: ...ponga los controles en OFF y luego desenchúfe del tomacorriente Este aparato no se debe usar en ninguna otra manera que la intentada por el fabricante En esta parrilla no se deben usar combus tibles como gas carbón o leña Enchúfela a un tomacorriente propiamente puesto a tierra Se le ha proporcionado una cuerda eléctrica corta y desprendible para reducir la posibilidad de que se enrede en algo o q...

Page 20: ...que una persona sola pueda ensamblar esta parrilla obtenga la ayuda de otra per sona cuando necesite manejar las partes grandes y más pesadas No ensamble u opere la parrilla si aparenta tener daños Si hay piezas dañadas o faltantes cuando usted desempaca la caja de envío o usted tiene preguntas durante el proceso del ensamblalje llame PRE ENSAMBLAJE Lea y ejecute las siguientes instrucciones de pr...

Page 21: ...Blanco AWG14 200 C Negro AWG14 200 C Elemento de calor 120VAC 1 700Vatios Indicador 120VAC Módulo de control de tiempo Termostato 120 F 570 F PART DESCRIPCIÓN DE LAS PARTES UNIDADES USO DE LAS PARTES P06027002A Paquete de ferretería 1 Para uso en el ensamblaje del Modelo LE1808CA P05501106B Pasador hendido Cotter 2 S411G07012 Arandela 7 16 in 2 S112G04324 Tornillo con cabeza Phillips 1 4 in x 2 in...

Page 22: ...Diagrama de partes para el Modelo LE1808CA 5 1 5 3 4 10 13 9 8 11 7 21 20 17 18 14 15 16 6 27 28 34 33 31 30 32 24 23 25 26 18 17 24 23 29 19 2 22 12 21 22 35 ...

Page 23: ...erdo PD19010022 1 26 Repisa lateral derecho PD19020022 1 27 Pata de la carreta superior PD17010032 4 28 Repisa Inferior de la carreta PD20010012 1 29 Pata de la carreta inferior izquierda PD17020012 2 30 Pata de la carreta inferior derecha PD17020032 2 31 Tapa del extremo de la pata PD21010010 2 32 Eje de la rueda PD18010015 1 33 Rueda P05101001A 2 34 Tapa de la rueda P05116001B 2 35 Material prot...

Page 24: ...ra forzar a que entren y queden unidas las dos partes Repita estos pasos en la parte superior izquierda de las patas de la carreta y la pata inferior izquierda de la carreta Instalando las ruedas Fig 1 Fig 1 Fig 2 1 2 3 4 1 2 Tapa de la rueda Eje de la rueda Rueda Eje de la rueda Pasador hendido Cotter Pata inferior izquierda de la carreta Arandela Enrrosque el eje de las ruedas a través del frent...

Page 25: ...g 3 Instale el soporte del tazón Fig 4 Tornillo con cabeza Phillips 1 4 in x 1 2 in Cantidad 8 Parte S112G04084 Fig 3 1 2 1 2 3 Fig 4 Que el único agujero de cara hacia fuera Fije el soporte derecho del tazón entre las patas superior derechas de la carreta Nota Asegúrese que la placa plana de cara hacia adentro Inserte 4 tornillos con cabeza Phillips 1 4 in x 1 2 in y aprételos con seguridad Repit...

Page 26: ...erecho del tazón Fig 6 Soporte izquierdo del tazón Soporte derecho del tazón Cabezal de la parrilla Cierre superior y cierre inferior de la tapa Pata Inferior derecha de la carreta Repisa Inferior de la carreta Pata inferior izquierda de la carreta Perilla de control Coloque el cabezal de la parrilla sobre el soporte del tazón Aprételo con seguridad usando 6 pernos mariposa 1 4 in x 5 8 in por deb...

Page 27: ...na dos tornillos de cabeza estriada de 1 4 in x 5 8 in a los agujeros inferiores de los soportes de estante del lado derecho y apriételos con firmeza Vea la Fig A Alinee la ranura B del estante del lado derecho en los tornillos de cabezal estriado instalados y coloque el estante lateral en su lugar Desde la parte interior del estante lateral introduzca un tornillo de cabezal estriado de X 5 8 en e...

Page 28: ...Afloje los tornillos mariposa con reborde 1 A B C ALCE LA REPISA LATERAL 2 A C B 3 Deslice las lengüetas laterales de la bandeja por encima de los carriles que están debajo del tazón de la parrilla Segura tornillo especial con cabeza plana 1 4 in x 7 16 in al soporte de la bandeja para la grasa Para su seguridad la bandeja para la grasa se requiere esté presente y centrada Deslice el receptáculo p...

Page 29: ...ara cocinar Repisa lateral izquierda Repisa lateral derecha Cierre superior de la tapa Cierre inferior de la tapa 1 3 2 Fig 10 Pata inferior izquierda de la carreta Repisa Inferior de la carreta Dirección El pie del cuadriculo para cocinar puesto cara hacia abajo Desenchufe la cuerda eléctrica Remueva el cuadrículo del tazón de la parrilla y el receptáculo para la grasa ANTES de remover el cabezal...

Page 30: ...fluya al receptáculo para la grasa Antes de cada uso de la parrilla Saque el receptáculo para la grasa y remueva toda la grasa y restos de comida para prevenir fuegos de grasa Use su parrilla a no menos de 2 pies de distancia de una pared o supérficie Use su parrilla a no menos de 2 pies de distancia de objetos combustibles que se pueden derretir o quemar como vinilo revestimiento de madera o llam...

Page 31: ...pueda durante el proceso de cocinar para minimizar la pérdidadecalor Reposicione la parrilla para reducir el efecto del aire Gire la perilla de control y fíjela en el calor más alto El uso de una cuerda de extensión puede reducir laefectividaddesuparrilla Conecte la parrilla a un tomacorriente sin usar la cuerda de extensión Si usted debe usar una cuerda de extensión use una cuerda para uso al air...

Page 32: ...arrillas al 1 877 550 8041 entre las 8 00 am y 4 30 pm CST de lunes a viernes 1 3 2 Limpiando el exterior del acero inoxidable Cuidado rutinario y mantenimiento es requerido para mantener la aparencia y la resistencia a la corrosión del acero inoxidable El hecho es que el acero inoxidable puede corroerse oxidación y pérdida de color pueden ser causadas bajo ciertas condiciones El óxido es causado ...

Page 33: ... que esté cocinada El tiempo de asar varía de acuerdo con el grueso de la presa GrillingFish Precaliente la parrilla usando la temperatura más alta entre 15 20 minutos con la tapa cerrada Abra la tapa y coloque la carne en las rejas Cocine la presa en ambos lados hasta que esté dorada Reduzca el calor y use la tabla de tiempo como una guía hasta que el pescado esté opaco pero todavía húmedo Vegeta...

Page 34: ...dores químicos agentes químicos para albercas o spas o cualquier herramienta usada en el ensamblaje o instalación de esta unidad Esta garantía no cubre pérdida de pintura herrumbre en la superficie o descoloración del acero inoxidable lo cual se considera que ocurre en su uso normal Esta garantía no cubre el costo de cualquier inconveniencia lesiones personales o daños a la propiedad debido a uso ...

Reviews: