background image

FORD BRONCO

BODY LIFT KIT

INSTALLATION INSTRUCTIONS

1992-1996                        2” KIT #842

1992-1996                       3” KIT #843

 WARNING

Installation of a Performance Automotive Group body

lift kit will change the vehicle’s center of gravity and

handling characteristics both on- and off-road. You

must drive the vehicle safely! Extreme care must be

taken to prevent vehicle rollover or loss of control,

which could result in serious injury or death. Avoid sud-

den sharp turns or abrupt maneuvers and always make

sure all vehicle occupants have their seat belts fas-

tened.

 WARNING

Before you install this kit, read and understand all

instructions, warnings, cautions, and notes in this

instruction sheet and in the vehicle owner’s manual.

 CAUTION

Proper installation of this kit requires knowledge of the

factory recommended procedures for removal and

installation of original equipment components. We rec-

ommend that the factory shop manual and any special

tools needed to service your vehicle be on hand during

the installation. Installation of this kit without proper

knowledge of the factory recommended procedures

may affect the performance of these components and

the safety of the vehicle. We strongly recommend that

a certified mechanic familiar with the installation of sim-

ilar components install this kit.

 WARNING

This kit should only be installed on a vehicle that is in

good working condition. Before you install the kit, thor-

oughly inspect the vehicle for corrosion or deformation

of the sheet metal around the factory body mounts. If

the vehicle is suspected to have been in a collision or

misused, do not install this kit. Off-road use of your

vehicle with this kit installed may increase the stress

applied to the factory body mounts. We do not recom-

mend that any vehicle with a body lift kit installed be

involved in any extreme off-road maneuvers such as

jumping. Failure to observe this warning may result in

serious personal injury and/or severe damage to your

vehicle.

 WARNING

Many states and municipalities have laws restricting

bumper heights and vehicle lifts. Consult state and

local laws to determine if the changes you intend to

make to the vehicle comply with the law. Before com-

bining a body lift with a suspension lift, consult an

installation professional to see how this will affect the

vehicle.

 WARNING

The installation of larger tires may reduce the effective-

ness of the Braking System.

 WARNING

Always wear eye protection when operating power

tools.

 WARNING

Before you install this kit, block the vehicle tires to pre-

vent the vehicle from rolling.

 WARNING

Accidental deployment of the air bag can result in seri-

ous personal injury or death. To avoid accidental

deployment during installation of the kit, the Supple-

mental Restraint System (SRS, or airbag) must remain

deactivated. Do not allow anyone near the airbag dur-

ing installation. Refer to the factory service manual or

owner's manual for the recommended procedure to

disable the SRS. After you install the kit, reactivate the

SRS before driving the vehicle.

 NOTE

Performance Automotive Group recommends using

the Loctite® supplied in the kit on the threads of all kit

nuts and bolts unless specified otherwise in these

instructions.

1

92-95 Ford Bronco 2”/3” Body Lift Kit

Summary of Contents for 842

Page 1: ... the vehicle is suspected to have been in a collision or misused do not install this kit Off road use of your vehicle with this kit installed may increase the stress applied to the factory body mounts We do not recom mend that any vehicle with a body lift kit installed be involved in any extreme off road maneuvers such as jumping Failure to observe this warning may result in serious personal injur...

Page 2: ...ables Disconnect negative cable first then positive cable NOTE This kit does not fit vehicles with 6 cylinder engine The lower radiator hose can make contact with the belt pul ley resulting in possible damage to the engine NOTE This kit does not include rear bumper brackets and they are NOT available from Performance Automotive Group NOTE Kit parts are prefaced by the word kit and appear in bold p...

Page 3: ...g the vehicle CAUTION If the following step is not performed the airbag clock spring could be damaged Do not turn the steering wheel while the steering shaft is disconnected c Remove factory bolt securing main steering shaft to universal joint under dash d Slide steering shaft out of universal joint Install male end of kit steering extension into univer sal joint e Apply kit Loctite to threads ins...

Page 4: ...up spilled fuel immediately A spark could cause an explosion or fire resulting in seri ous personal injury and property damage Loosen Bolts e Remove body mounting bolts from passenger side only 2 Lift passenger side of body a Using a hydraulic jack and a wooden block slowly raise passenger side of body just high enough to remove front body mount bushing near radiator WARNING Use extreme caution wh...

Page 5: ...Fuel filler 1 Check fuel filler hose for ample slack If additional slack is required loosen hose clamps at either end Adjust hose by sliding at either end until ample slack is obtained Tighten both hose clamps securely Steering shaft 1 Install steering shaft into kit steering extension Ensure shaft is in kit steering extension entirely 2 Apply kit Loctite to threads and install kit bolt 3 8 24 x 1...

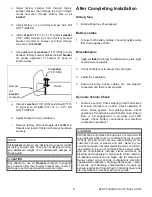
Page 6: ...or using factory bolts and two 2 kit washers 1 4 SAE on each kit bracket to space away from radiator DO NOT TIGHTEN b Mount fan shroud to studs on kit brackets Install kit washer 1 4 SAE and kit bolt 1 4 20 Nylock on each stud DO NOT TIGHTEN c Adjust fan to fan shroud clearance ensuring equal distance from side to side d Remove factory bolts and apply kit Loctite to threads and install Tighten all...

Page 7: ... ample slack in hose running between smog pump and smog canister b Mount smog canister in original position if possi ble c If smog canister can not be mounted in original position drill two 2 new mounting holes closer to engine d Mount smog canister to new holes Tighten mounting nuts securely Front bumper 1 Install front bumper a Install front bumper in stock location if desired 2 Raise and instal...

Page 8: ... if equipped Battery cables 1 Connect both battery cables Connect positive cable first then negative cable Miscellaneous 1 Apply kit label warning to dashboard in plain sight of all vehicle occupants 2 Check all fasteners to ensure they are tight 3 Adjust the headlights 4 Ensure all wires hoses cables etc are properly connected and there is ample slack Dynamic Vehicle Check 1 Test drive vehicle Ch...

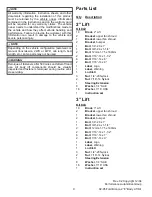
Page 9: ...ll body lift components should be visually inspected and fasteners retorqued during routine vehi cle servicing Parts List Qty Description 2 Lift Kit 842 10 Block 2 Lift 2 Bracket upper fan shroud 1 Bracket lower fan shroud 2 Bracket bumper 1 Bolt 1 4 20 x 1 1 Bolt 3 8 24 x 1 1 4 2 Bolt 12mm 1 75 x 160mm 2 Bolt 7 16 14 x 1 1 2 6 Bolt 7 16 14 x 6 2 Bolt 7 16 14 x 8 1 Label Logo 1 Label Warning 1 Loc...

Reviews: