


3
Step 3: Spray Pattern Controls
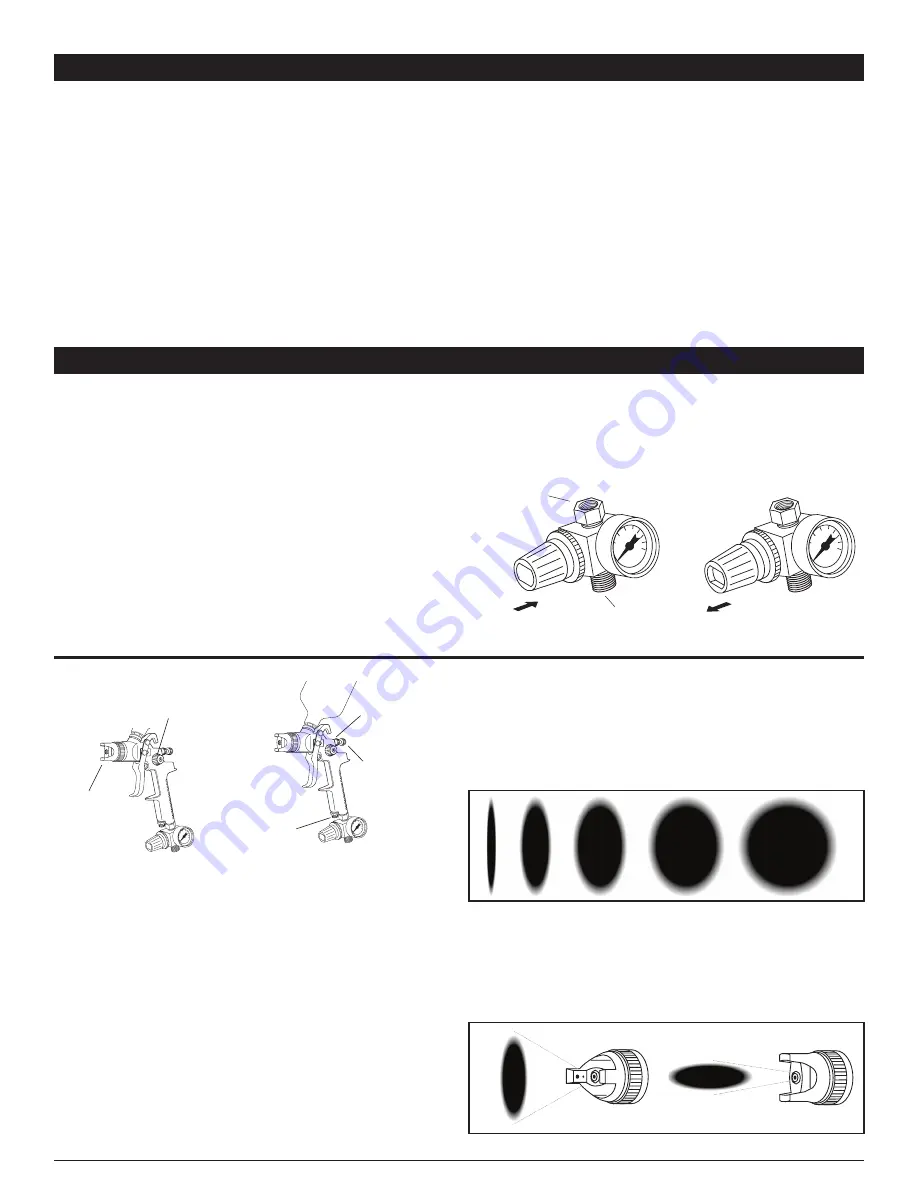
Pattern Shape - The shape of the spray can be adjusted
from a round pattern to a flat pattern by turning the Pattern
Control Knob. Turning knob in rounds the pattern, turning
knob out flattens the pattern.
Pattern Orientation - A flat or semi-round spray pattern
can be adjusted to any angle from horizontal to vertical by
turning the Air Nozzle. Pattern is perpendicular to “ears”
on nozzle. That is, when the ears are horizontal, the spray
pattern will be vertical and when the ears are vertical the
spray pattern will be horizontal.
Step 2: Air and Fluid Volume Controls
These two controls are used in conjunction with each other
to accurately adjust air/fluid (Paint) ratio and will vary for
different paints. Changing one control Fluid Volume affects
the other so alternating back and forth between them to
fine tune your adjustment will yield optimum results.
Air Volume Control - Air volume is adjusted by turning the
Air Fluid Volume Control Knob. Turning knob in reduces
volume, turning knob out Control Knob increases volume.
Fluid Volume Control - Fluid volume is adjusted by turn-
ing the Fluid Volume Control Knob. Turning knob in de-
creases volume, turning knob out increases volume. Once
a satisfactory volume is set, you can lock the adjustment
by turning the lock nut in tight.
OPERATION
Step 1: Inlet Air Pressure Regulation
Assemble components of spray gun and connect to clean
air source as described above. Clean air source is impera-
tive to ensure peak performance. The use of an in-line air
filter is highly recommended to keep any contaminants
from entering the spray gun. Set inlet air pressure to
between 40 and 45 P.S.I. to begin adjustments.
(This is a good operating inlet pressure suitable for most applica-
tions, however, depending on materials being sprayed and other
external factors such as temperature, humidity, etc., you may
need to come back to this step and increase or decrease pres-
sure as needed after attempting adjustments in step 2.)
Inlet pressure is adjusted by turning the Pressure Regula-
tor Control Knob. Knob must first be pulled out to unlock.
Turning knob clockwise increases pressure, turning knob
counter-clockwise decreases pressure. Once desired
pressure is reached, push the knob back in to lock the
adjustment.
CARE & MAINTENANCE
Warning! Clean gun before and after each use.
To protect the precision machined internal parts and fit-
tings in this gun from corrosion during shipping, some oils
or other corrosion resistant agents may have been applied.
It is important to remove any such residue before attempt-
ing to use the gun. To clean, place a small amount of
appropriate thinner into paint cup and spray through gun
while pulling and releasing trigger repeatedly. Wipe exterior
of gun, nozzles and paint cup. In some cases, if the gun
becomes clogged, disassemble completely and soak all
parts in thinner. After soaking, use wire and cleaning brush
to clear small internal passages. Check and clean paint
cup filter. Replace if worn.
A clean air source is imperative to ensure peak perfor-
mance. The use of an in-line air filter is highly recommend-
ed to keep any contaminants from entering the spray gun.
Inspect all fittings and hardware to ensure proper seating.
Be sure air line fittings are tight with no leaks. Replace any
worn parts as necessary.
Check needle and nozzles for nicks, scratches or burrs.
Any such conditions will seriously impair performance.
Replace as necessary.
Regulated air out
to Spray Gun
Unregulated
air Inlet
Pressure Regulator
Control Knob Locked
Pressure Regulator
Control Knob Unlocked
Air
Nozzle
Spray Pattern
Control Knob
Fluid Volume
Control Knob
Fluid Volume
Lock Nut
Air Volume
Control Knob


