4
1. Before each use, inspect the general condi-
tion of the jack. Check for broken, cracked,
or bent parts, loose or missing parts, and
any condition that may affect the proper
operation of the product. Any jack that ap-
pears damaged in anyway must be removed
from service. Have the problem corrected
before further use. DO NOT use damaged
equipment.
2. Replace worn or damaged parts with Perfor-
mance Tool replacement parts. Be sure that
only qualified personnel perform repairs.
3. Before each use, thoroughly test the jack
for proper operation prior to its actual use. If
the jack appears not to be working properly,
follow bleeding instructions on page 3.
4. When jack is not in use, ram and pump pis-
ton should be in fully down position to keep
their machined surfaces free from corrosion.
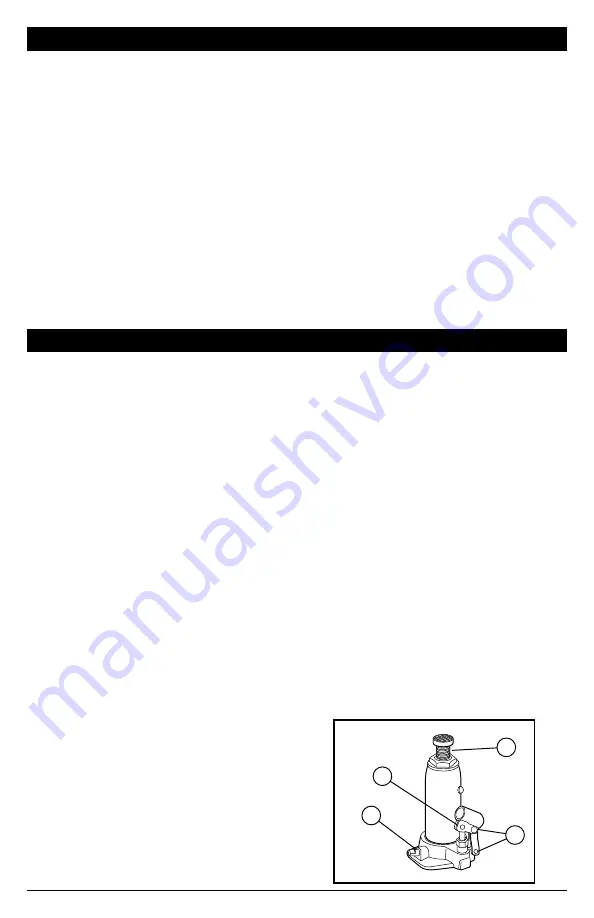
5. Keep jack clean and well lubricated at points
illustrated in figure 3.
6. For best results, use only hydraulic fluid with
a rating of SAE 20 for refills. Check fluid level
with jack in fully down position. Fluid level
should be up to bottom of oil fill port. (See
figure 5)
7. Change the hydraulic oil at least once every
three years:
a. With the jack fully lowered, remove the oil
filler plug on the side of the Housing.
b. Tip the jack to allow the old hydraulic oil
to drain out of the Housing completely, and
dispose of the old hydraulic oil in accordance
with local regulations.
c. With the jack upright, completely fill the
housing with a high quality hydraulic oil (not
included) until the oil just begins to run out
of the oil fill hole. Be VERY CAREFUL not to
allow dirt or foreign matter into the system.
d. Then, reinstall the oil filler plug.
e. Clean with a clean cloth using a detergent
or mild solvent. Then, store the jack in a safe,
dry location with the ram and pump piston
in fully down position. Keep out of reach of
children and other non-authorized people.
1
2
3
4
Figure 3
OPERATION
CARE & MAINTENANCE
stands of appropriate capacity (not included)
beneath the vehicle at locations recommend-
ed by the vehicle manufacturer. DO NOT Get
under the vehicle without jack stands. jacks
are not designed to maintain heavy loads for
long periods of time. DO NOT attempt to put
jack stands simultaneously under both ends
of vehicle or under one side of vehicle. NOTE:
When using two jack stands, they must be at
the same height.
10. SLOWLY turn the release valve counterclock-
wise to lower vehicle onto jack stands and
remove jack.
IMPORTANT:
NEVER MOVE JACK WHEN THE
HANDLE IS IN OPERATING LEVER OR THE
VALVE SLEEVE. DAMAGE TO THE PUMPING
UNIT MAY OCCUR.
To lower:
1. Remove all tools, parts, etc. from under the vehicle.
2. Position the saddle under the lifting point. Turn
the Handle firmly clockwise to close the valve
release screw, and pump the upper/lower
handle to raise the vehicle slightly above the
saddle(s) of the jack stands. Then, collapse
and remove jack stand(s).
3. SLOWLY turn the release valve counterclock-
wise with the handle just enough to allow
controlled descent of the vehicle onto the
ground. (Never more than two full turns).
4. Lower the jack completely. Then, store in a
safe, dry location out of reach of children.
Monthly maintenance is recommended. Lubrication is critical to jacks as they support
heavy loads. Any restriction due to dirt, rust, etc. can cause either slow movement or
cause extremely rapid jerks, damaging the internal components. The following steps are
designed to keep the jack maintained and operational.


