background image

1

1

1

2

3

4

5

4

7

7

4

4

8

8

9

9

10

10

11

12

13

14

6

15

16

17

18

19

20

21

21

22

23

24

25

26

27

27

28

29

30

30

31

31

32

32

33

33

34

34

35

35

36

37

38

39

40

41

42

43

44

45

46

47

48

49

50

51

52

53

54

8

9

10

10

9

8

1

1

1

6

11

14

15

16

17

18

19

20

21

21

22

17

16

15

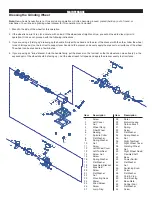
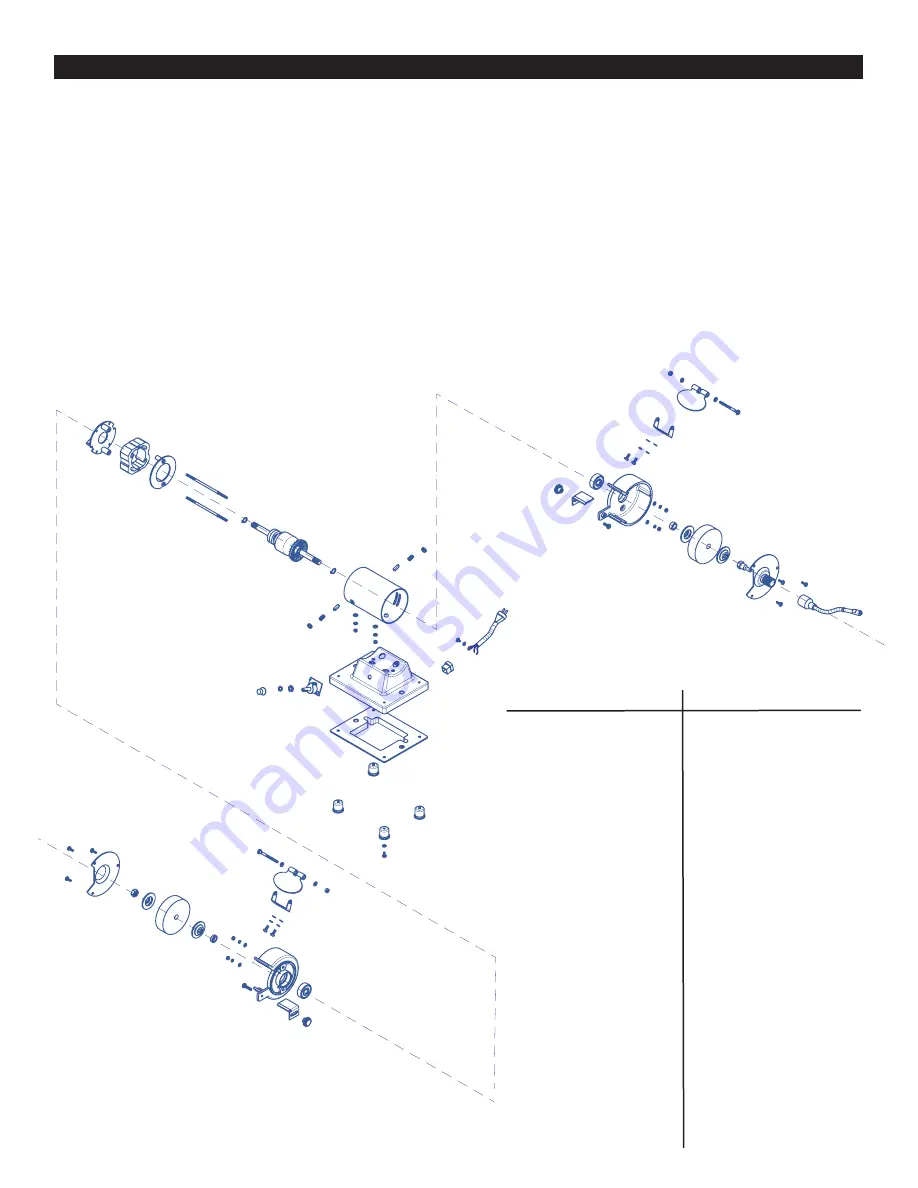
Item 

Description

  1 

Screw    

  2 

Left Cocer  

  3 

Nut

  4 

Wheel Flang  

  5 

Fiber Wheel  

  6 

Bearing

  7 

Spindle Coller  

  8 

Flat Washer

  9 

Spring Washer

 10 

Nut 


 11 

Screw

 12 

Left Wheel Cover   

 13 

Left Tool Rest

 14 

Screw Nut 


 15 

Screw  

 16 

Spring Washer  

 17 

Flat Washer  

 18 

Eyeshield Bracket  

 19 

Eyeshield

 20 

Screw  

 21 

Flat Washer 

 22 

Nut

 23 

Mounting Deck 

 24 

Stater

 25 

Wind Screen  

 26 

Screw  

 27 

Jump Ring  

Item 

Description

 28 

Roter

 29 

Motor Housing  

 30 

Carbon Brush  

 31 

Spring

 32 

Screw

 33 

Flat Washer  

 34 

Spring Washer  

 35 

Nut  

 36 

Right Tool Rest 

 37 

Right Wheel Cover  

 38 

Grinding Wheel  

 39 

Nut

 40 

Right Wheel Guard

 41 

Flexible Shaft  

 42 

Base

 43 

Power Switch

 44 

Flat Washer

 45 

Nut  

 46 

Switching Knob  

 47 

Screw

 48 

Flat Washer

 49 

Cord & Plug

 50 

Cord Bushing

 51 

Base Plate  

 52 

Rubber Foot

 53 

Flat Washer

 54 

Screw  

MAINTENANCE

Dressing the Grinding Wheel

Note: New wheels frequently are not true and during operation will often become grooved, glazed (build up), out of round, or 

misshapen. You will need a grinding wheel dresser for this operation (not included).

1.  Stand to the side of the wheel for this operation.

2.  If the wheel is new let it run for a minute with no load. If the wheel runs straight and true, you will not need to dress it prior to 

  operation. If it does not, proceed with the following instructions.

3.  If you are using a "pistol grip" dresser,grip the handle firmly with one hand and the arm of the dresser with the other. Allow the wheel 

  to reach full speed. Use the tool rest to support your hand and the dresser, and evenly apply the dresser to all surfaces of the wheel.

  The wheel can be dressed in a few minutes.

4.  If you are using an "inline"dresser, hold the handle firmly, put the dresser on the tool rest so that its wheels can move freely (i.e.,the 

  exposed part of the wheel should be facing up ). Let the wheel reach full speed and apply the dresser evenly to all surfaces.

Summary of Contents for W50003

Page 1: ...tem Number W50003 WARNING READ UNDERSTAND AND FOLLOW ALL INSTRUCTIONS AND WARNINGS BEFORE OPERATING THIS TOOL FAILURE TO DO SO MAY RESULT IN PERSONAL INJURY AND OR PROPERTY DAMAGE AND WILL VOID WARRANTY Some dust created by power sanding contains chemicals known to the State of California to cause cancer birth defects or other reproductive harm An example of this type of chemical is lead from lead...

Page 2: ...rking condition Keeping the tool clean dry free of grime will add to its life and performance EXTENSION CORD GUIDELINES Use only 3 wire extension cords that have 3 prong grounding type plugs and 3 prong receptacles that accept the tool s plug Only UL listed extension cords should be used with this product Improper use of extension cords may cause inefficient operation of your tool which can result...

Page 3: ...ways make sure the safety shields and wheel guards are in place at all time MAKE SURE the grinding wheels are of the proper speed RPM rating for the grinder FREQUENTLY QUENCH THE WORKPIECE in water to prevent overheating be careful not to get water on the bench grinder USE THE TOOL REST to steady the work piece If the tool rest is not used the torque of the spinning grinding wheel may pull the wor...

Page 4: ...eel 4 For small workpieces such as drill bits or chisels avoid applying pressure to the wheel at a high angle that could cause the workpiece to become lodged between the tool rest and the wheel Grinding with the Flex Shaft 1 Secure the Flex Shaft into the right side Wheel Cover Align and insert exposed shaft into wheel cover 2 Tighten the Flex Shaft connector nut onto the Wheel Cover making sure n...

Page 5: ... Cord Plug 50 Cord Bushing 51 Base Plate 52 Rubber Foot 53 Flat Washer 54 Screw MAINTENANCE Dressing the Grinding Wheel Note New wheels frequently are not true and during operation will often become grooved glazed build up out of round or misshapen You will need a grinding wheel dresser for this operation not included 1 Stand to the side of the wheel for this operation 2 If the wheel is new let it...

Page 6: ...erformance or reliability nor shall these warranties apply to any product or part which has been subject to misuse neglect accident or wear and tear incident to normal use and service PERFORMANCE TOOL does not authorize any other person to make any warranty or to assume any liability in connection with its products Except for warranties of title and the limited express warranties set forth above P...

Reviews: