24
FINISH NAIL GUN
REMOVING THE NAILS
1) Disconnect air supply.
2) Push magazine latch and pull magazine to open
position (Fig. 13).
3) Grasp the head of the nail strip and remove from
magazine.
METHODS OF OPERATION
This tool is equipped with the safety (A) and does not
operate unless the safety is depressed.
– Single actuation:
1) Position the nail outlet on the workpiece with finger
off the trigger.
2) Depress the safety firmly until it is completely
depressed.
3) Pull the trigger to drive a nail.
After fastening once, fastening will not be possible again
until the trigger is released and pressed again.
– Full sequential actuation:
1) Position the nail outlet on the workpiece with finger
off the trigger.
2) Depress the safety firmly until it is completely
depressed.
3) Pull the trigger to drive a nail.
4) Remove finger from the trigger.
To continue nailing a separate location, move the tool along
the wood, repeating steps (2-4) as required.
NOTE:
●
Always handle nails and package carefully. If nails are
dropped, collating bent may be broken, which will cause
mis-feeding and jamming.
●
After nailing:
1) Disconnect the air hose from the tool.
2) Remove all nails from the tool.
3) Supply 5-10 drops of pneumatic tool lubricant into
the air plug on the tool.
4) Open the drain valve on the air compressor tank to
drain any moisture.
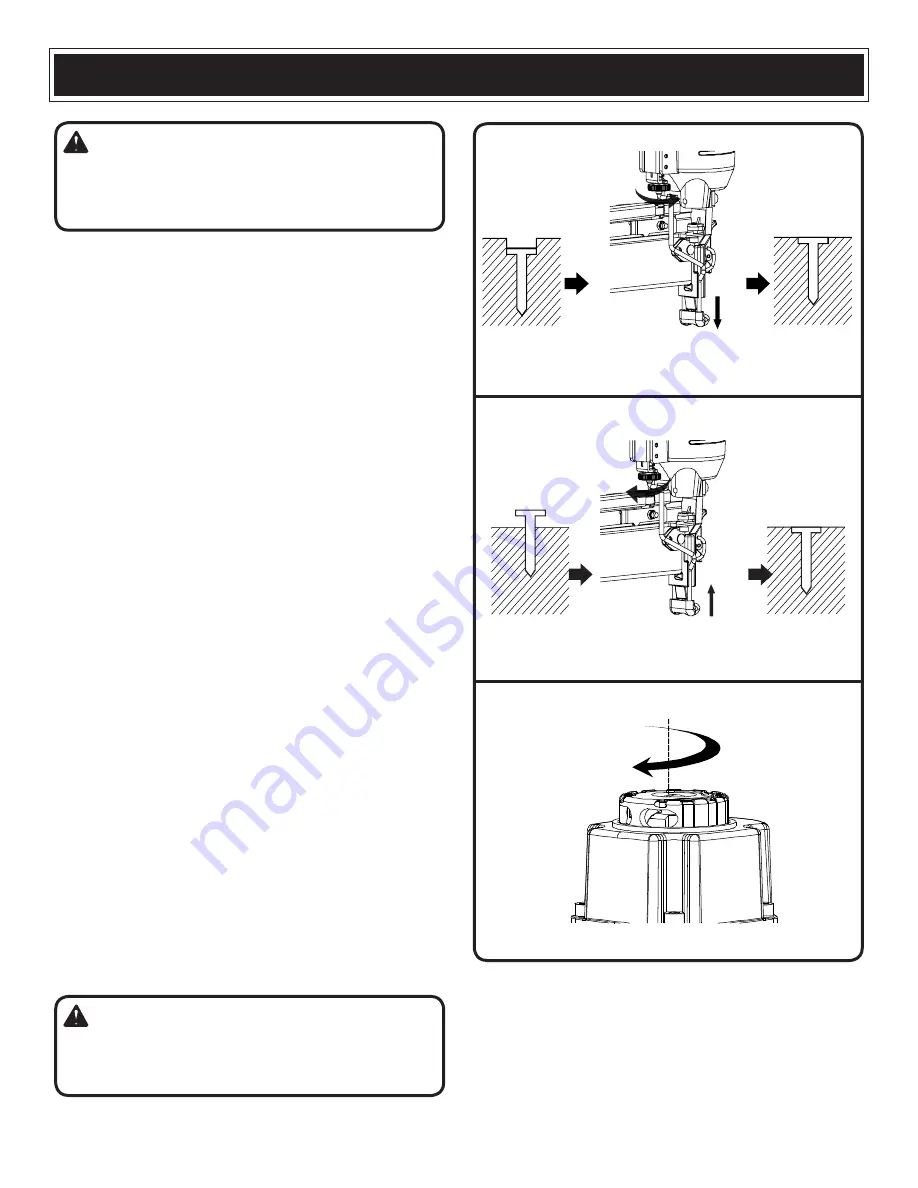
ADJUSTING THE NAILING DEPTH
1) Disconnect the tool from air supply.
2) Remove nails from the tool.
Turn the adjustment knob counterclockwise
Turn the adjustment knob clockwise
WARNING:
Disconnect the tool from the air source before making
adjustments. Such precautionary safety measures
reduce the risk or unintentional tool operation.
Fig.15
Fig.14
Fig. 16
Too Deep
Too Shallow
Flush
Flush
WARNING:
Never load fasteners with the workpiece contact or
trigger activated. Doing so could result in possible
serious personal injury.
3) Adjust tool driving depth:
●
To reduce the nail depth, turn the adjustment knob
counterclockwise (Fig. 14).
●
To drive the nail deeper, turn the adjustment knob
clockwise (Fig. 15).
4) Reload nails as described at chapter “Nail Loading” of
this manual.
5) Reconnect the air supply.
Summary of Contents for 207-9002
Page 17: ...17 REPLACEMENT PARTS LIST PARTS DIAGRAM AIR COMPRESSOR...
Page 27: ...27...


