background image


Specific safety rules for belt/disc sanders (continued) 


13.


Do not sand with the workpiece unsupported. Support the workpiece with the backstop or table. 
The only exception is curved work performed on the outer sanding drum.  

 
14.


Always remove scrap pieces and other objects from the table, backstop, or belt before turning 
the sander ON.  

 
15.


Never perform layout, assembly or set-up work on the table while the sander is operating.  

 
16.


Never use solvents to clean plastic parts. Solvents could dissolve or otherwise damage the 
material. Use only a soft damp cloth to clean plastic parts.  

 
17.


Should any part of your sander be missing, damaged, or fail in any way, or any electrical 
components fail to perform properly, shut off switch and remove plug from power supply outlet. 
Replace missing, damaged, or failed parts before resuming operation.  

 
18.


Never pull the power cord out of the receptacle. Keep cords away from heat, oil, and sharp 
edges.  

 
19.


Have an electrician replace or repair damaged or worn cords immediately.  


Summary of Contents for 240-2973

Page 1: ...4 x 36 Belt 6 Disc Sander Questions Problems Please call our customer help line 888 315 3080 M F 8 5 CST or by email partsandservice greatlakestec com SKU 240 2973 Operation and Safety Instructions ...

Page 2: ...tion 17 Maintenance 20 Troubleshooting 21 Exploded view and parts list 23 Warranty 25 Technical data 4 x 36 Belt 6 Disc Sander SKU 240 2973 Motor 120 V 60 Hz 4 3 A 1 2 HP Motor speed 3450 RPM no load Disc diameter 6 Disc Specifications A80 psa type Pressure Sensitive Adhesive Belt size 4 x 36 Belt speed 1900 SFM Belt bed tilt 0 90 Belt grit A80 Dust port size 2 1 4 Diameter Net weight 41 lb ...

Page 3: ...dren or pets near the tool 6 DO NOT FORCE THE TOOL to do a job for which it was not designed 7 DRESS FOR SAFETY Do not wear loose clothing gloves neckties or jewelry rings watches etc when operating the tool Inappropriate clothing and items can get caught in moving parts and draw you in ALWAYS wear non slip footwear and tie back long hair 8 WEAR A FACE MASK OR DUST MASK as the sanding operation pr...

Page 4: ...ng accessories 17 CHECK FOR DAMAGED PARTS Check for alignment of moving parts jamming breakage improper mounting or any other conditions that may affect the tool s operation Any part that is damaged should be properly repaired or replaced before use 18 MAKE THE WORKSHOP CHILDPROOF Use padlocks and master switches and ALWAYS remove starter keys 19 DO NOT operate the tool if you are under the influe...

Page 5: ... have the tracking adjusted properly so the belt does not run off the pulleys 6 Do not use sanding belts or discs that are damaged torn or loose Use only correct size sanding belt and disc 7 Always hold the workpiece firmly when sanding Keep hands away from sanding belt or disc Sand only one workpiece at a time 8 Always hold the workpiece firmly on the table when using the disc sander and when usi...

Page 6: ... the sander is operating 16 Never use solvents to clean plastic parts Solvents could dissolve or otherwise damage the material Use only a soft damp cloth to clean plastic parts 17 Should any part of your sander be missing damaged or fail in any way or any electrical components fail to perform properly shut off switch and remove plug from power supply outlet Replace missing damaged or failed parts ...

Page 7: ...nt grounding conductor can result in electric shock The conductor with the green insulation with or without yellow stripes is the equipment grounding conductor If repair or replacement of the electric cord or plug is necessary DO NOT connect the equipment grounding conductor to a live terminal CHECK with a licensed electrician or service personnel if you do not completely understand the grounding ...

Page 8: ...ating Total Length of Cord in feet More Than Not More Than 25 50 100 150 0 6 18 16 16 14 6 10 18 16 14 12 10 12 16 16 14 12 12 16 14 12 Not Recommended Be sure your extension cord is properly wired and in good condition Always replace a damaged extension cord or have it repaired by a qualified person before using it Protect your extension cords from sharp objects excessive heat and damp or wet are...

Page 9: ...9 Know your belt disc sander ...

Page 10: ...ting turn switch OFF and remove plug from power source outlet before making any adjustments Carefully unpack the belt disc sander and all its parts and compare against the list below Do not discard the carton or any packaging until the belt disc sander is completely assembled 1 Socket Head Screws 2 2 Sanding Disc 1 3 Miter Gauge 1 4 Washers 2 5 Work Support 1 6 Hex Key 15 64 1 7 Worktable 1 8 Adju...

Page 11: ...on plate leaving no loose edges 3 Position disc guard against lower 1 3 of disc aligning holes as shown And use a screwdriver to fasten the provided screws and washers securely Mount the disc sander table 1 With the table in a horizontal position line up and insert the pivot indexing pin with the pivot hole on the frame Hold in place 2 Insert the handle into the threaded hole and tighten ...

Page 12: ... when tilted WARNING To avoid trapping the workpiece or fingers between the table and the sanding disc the table edge should be adjusted to a maximum of 1 16 inch from the sanding disc Mount the work support 1 Align the Work Support with the hole 2 Install a Lock Washer and a Flat Washer on the Hex Screw 3 Insert the Hex Screw into the Work Support hole and tighten 4 Adjust the Work Support height...

Page 13: ...own not supplied secure the sander to the workbench Note All bolts should be inserted from the top Washers and hex nuts should be fastened from the underside of the workbench Install the sanding belt 1 Loosen the bed locking screw with the hex key Raise the sanding bed about 45 tighten the bed locking screw 2 Release the tension lever 3 Locate the directional arrow on the smooth side of the sandin...

Page 14: ...orizontal or vertical positions or any angle in between To use in the vertical position do the following 1 Loosen the bed locking screw with hex key move the bed to the desired vertical position 2 Tighten the locking screw when at desired position Dust Port Operation The dust port can be easily connected to a large diameter shop vacuum hose Sanding operations are inherently dusty To help minimize ...

Page 15: ...om the sanding disc guard and remove the guard 2 Remove the used sanding disc 3 Wipe the sanding disc plate clean 4 Peel the backing from the new sanding disc align the disc with the plate and press the sanding disc firmly on to the plate 5 Reinstall the disc guard and tighten the screws ...

Page 16: ...able is not 90 to the sanding surface loosen the handle 4 adjust the table tighten the handle and recheck with the square Square the work support The work support 2 must be square to the sanding belt when using the belt sander in a horizontal position To keep the workpiece from being carried along the belt 1 Make sure the sanding belt is tight also check that the tension lever is fully tightened 2...

Page 17: ...rface sanding on sanding belt Hold the workpiece firmly with both hands Keep fingers away from sanding belt Keep the workpiece end against the backstop and move it slowly across the sanding belt Apply enough pressure to remove material excessive pressure will reduce sanding efficiency Sanding inside curves When sanding inside curves on the belt sander always sand on the idler drum end of the work ...

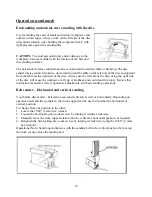
Page 18: ...ght side of the disc will cause the workpiece to fly up or kickback and could result in injury Review this instruction manual for correct operation adjustments and basic sanding operations Belt sander Horizontal and vertical sanding Your belt disc sander belt station can sand vertically as well as horizontally Depending on operator needs and the workpiece the work support can be used with either t...

Page 19: ...afety turn the switch OFF and remove the plug from the electrical outlet before adjusting or performing maintenance or lubrication work on the belt disc sander Before using check to make sure parts are not damaged missing or worn check for alignment of moving parts binding of moving parts improper mounting or any other conditions that may affect the sander operation Should any of these conditions ...

Page 20: ...g slot 4 Pushing up on the screwdriver will tighten the tension of the belt between the pulleys 4 Tighten all 3 screws 2 5 Test belt tension by squeezing both sides of the belt If properly adjusted the belt should give between 1 8 1 4 inch 3 6 mm Make sure that the belt teeth are properly seated in the pulley gears 6 Carefully reinstall the drive belt housing cover 1 insert and tighten screw Note ...

Page 21: ...le sanding on the sanding accessory Sanding surface clogs quickly 1 Too much pressure against belt disc 2 Sanding softwood 1 Reduce pressure on workpiece while sanding 2 Use different stock different sanding accessories or accept that this will happen and plan on cleaning or replacing belts discs frequently Burns on workpiece 1 Using a sanding grit that is too fine 2 Using too much pressure 3 Work...

Page 22: ...ion cord 1 Reduce the rate at which the workpiece is fed into the working area of the tool 2 Ensure circuit wires or extension cords are proper gauge or eliminate use of extension cords Machine vibrates excessively 1 Incorrect motor mounting 2 Incorrect sanding belt tension 3 Weak or broken tension spring 4 Idler roller is too loose 5 Broken defective sanding accessories 1 Have motor mountings ins...

Page 23: ...23 Exploded view and parts list ...

Page 24: ...ut 22 90228 022 Wire Connection Box 68 90228 068 Driving Pulley 23 90228 023 Screw M5x10 69 90228 069 Pin Roll 5x8 24 90228 024 Power Switch 70 90228 070 Rod 25 90228 025 Screw M6x8 71 90228 071 Motor Assembly 26 90228 026 Spring Washer 6 72 90228 072 Power Cord 27 90228 027 Hex Nut M5 73 90228 073 Dust Collection Port 28 90228 028 Capacitor 74 90228 074 Pin Roll 5x10 29 90228 029 Capacitor Suppor...

Page 25: ...rts including but not limited to blades brushes belts bits light bulbs and or batteries 2 shall be void if this tool is used for commercial and or rental purposes and 3 does not cover any losses injuries to persons property or costs This warranty does give you specific legal rights and you may have other rights which vary from state to state Be careful tools are dangerous if improperly used or mai...

Reviews: