13
SANDING
– cont’d
Upon completion of the sanding operation, turn
sander OFF by squeezing and releasing the
switch trigger. Wait until the sanding disc comes
to a complete stop before removing it from the
workpiece.
WARNING:
Your sander should only be
turned ON when the entire surface of the
sanding pad is in contact with the workpiece.
Failure to follow this sanding procedure
could result in loose sandpaper which could
result in possible injury.
NOTE: Hold the sander with two hands,
using both the front and main handles.
Be
careful NOT to cover the motor cooling vents
with your hands. Covering the cooling vents
could cause the motor to be damaged by
overheating.
DO NOT FORCE THE SANDER.
The weight of
the sander usually provides adequate pressure.
Let the sander and sandpaper do the work.
Applying added pressure will slow the motor,
increase the wear on the sandpaper and greatly
reduce sander speed. Excessive pressure will
overload the motor causing possible damage
from the motor overheating. It will also create an
inferior finish on sanded work. Any finish or
resin on wood will soften from the frictional heat,
causing sandpaper to become clogged quickly.
Do not sand in one spot too long as the sander’s
rapid action may remove too much material,
making the surface uneven.
Extended periods of sanding may tend to
overheat the motor. If this occurs, turn sander
OFF, wait until the sanding pad comes to a
complete stop and remove it from the
workpiece. Check to make sure your hands
have not been covering the cooling vents. Let
the motor cool before continuing sanding
operation.
CLEANING THE DUST BOX
The dust box will collect much of the sanding
dust that is generated during sanding
operations. As a result, it must be cleaned out
periodically so the dust collection will be
efficient.
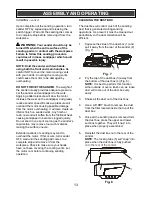
1.
Squeeze the sides of the dust box (1) and
pull it away from the rear of the sander (2)
(Fig. 7).
2.
Pry the top of the dust box (3) away from
the bottom of the dust box (4) (Fig. 8).
NOTE:
It is best to perform this function
either outside or over a trash can, as loose
dust will come out of the dust box very
easily.
3.
Shake all the dust out of the dust box.
4.
Use a soft DRY brush to remove the dust
from the filter located inside the top of the
dust box.
5.
Once all the sanding dust is removed form
the dust box, press the upper and lower
sections together. They will “snap” into
place when properly assembled.
6.
Reinstall the dust box onto the rear of the
sander.
NOTE:
The locking tabs (5
) will “snap” into
place when the dust box is fully pushed
onto the rear of the sander.
ASSEMBLY AND OPERATING
!
Fig. 8
Fig. 7
Summary of Contents for 241-0971
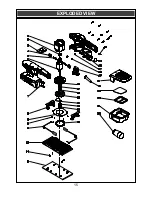
Page 15: ...15 EXPLODED VIEW...


