10
ASSEMBLY AND ADJUSTMENTS
Remove the random orbit sander from the carton and examine it carefully. Do not
discard the carton or any packaging material until all parts are examined.
NOTE: If any part of the random orbit sander is missing or damaged, do not
plug the sander in until the damaged part is repaired or replaced.
WARNING: To avoid injury, ALWAYS turn the switch OFF and disconnect
the sander from the power outlet before installing or changing the abrasive
discs or dust bag attachment.
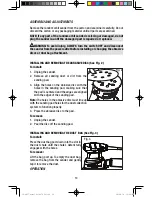
INSTALLING AND REMOVING THE ABRASIVE DISC (See Fig. 2)
To install:
1. Unplug the sander.
2. Remove all sanding dust or dirt from the
sanding pad.
3. Align the holes on the abrasive disc with the
holes in the sanding pad, making sure that
the pad is centered and the edges are aligned
with the edges of the sanding pad.
Note:
The holes in the abrasive disc must line up
with the sanding pad holes for the dust collection
system to function properly.
4. Press the abrasive disc to the pad.
To remove
1. Unplug the sander.
2. Peel the disc off the sanding pad.
INSTALLING AND REMOVING THE DUST BAG (See Fig. 3)
To install:
Press the dust bag port down into the slot in
the dust chute until the chute’s detent fully
engages with the holes.
To remove:
Lift the bag port up. To empty the dust bag,
remove the bag from the sander, and gently
tap it to remove the dust.
OPERATION
Fig. 2
Fig. 3
10-06-17 manual 241-0972 En.indd 10
2010-6-18 12:00:05


