11
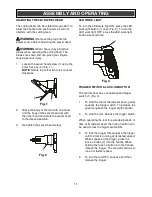
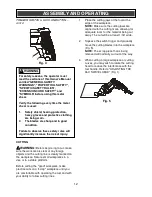
ADJUSTING THE 360° SWIVEL HEAD
The cutting head can be rotated through 360° to
allow the handle to be positioned so it will not
interfere with the cutting area.
WARNING:
Remove the plug from the
power source before adjusting the swivel head.
WARNING:
Wear heavy duty protective
gloves when adjusting the cutting head. The
blades are sharp and can pinch your fingers,
causing serious injury.
1.
Loosen the swivel head screw (1) using the
4 mm hex key (2) (Fig. 1).
NOTE:
Rotate the screw two turns counter
clockwise.
2.
Grasp the body of the tool with one hand
and the body of the swivel head (3) with
the other hand and rotate the swivel head
to the desired position.
3.
Re-tighten the swivel head screw.
LED WORK LIGHT
To turn the LED work light ON, press the LED
work light button (1) once (Fig. 3). To turn the
LED work light OFF, press the LED work light
button a second time.
TRIGGER SWITCH & LOCK-ON BUTTON
The metal shear has a variable speed trigger
switch (1) (Fig. 4).
1.
To start the tool at the lowest speed, gently
squeeze the trigger switch. To increase the
speed, squeeze the trigger switch harder.
2.
To stop the tool. Release the trigger switch.
When operating the tool for extended periods of
time at its fastest speed, the lock-on button can
be used to lock the trigger switch ON.
3.
To lock the trigger ON, squeeze the trigger
until the tool is running at its fastest speed.
While squeezing the trigger, press the
lock-on button (2) into the handle. While
holding the lock-on button into the handle,
release the trigger. The tool will continue to
run at its fastest speed.
4.
To turn the tool OFF, squeeze and then
release the trigger.
ASSEMBLY AND OPERATING
!
!
Fig. 2
Fig. 1
Fig. 3
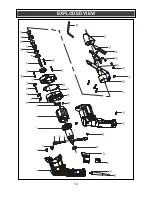
Summary of Contents for 241-0994
Page 14: ...14 EXPLODED VIEW...


