4
Power Connection
4.1
Power Source
The device is equipped with a 12~24 V DC input. Supply power other than
12~24 VDC ± 15% will severely damage the unit. Thus, check the power
supply supporting the DC power regularly.
4.2
Remove the terminal block
1.
Loosen the two screws that secure the terminal block.
2.
Gently pull the terminal block away from the connector
4.3
Connect the terminal block
1.
Verify that the terminal block is not connected to a power source.
2.
Secure the DC power wires to the terminal block. Follow the markings
on terminal blocks and power connector for proper connections.
4.4
Install the terminal block
1.
Reattach the terminal block to the connector until seated.
2.
Tighten the two screws that secure the terminal block to the power
connector
4.5
Power on the device
1.
Long press the “Power Button” on the back for at least 3 seconds
2.
The Android logo screen will be displayed and the system will be
started
3.
Once Android system is ready, the Android desktop will be displayed
4.6
Power off the device
To power off the device, press the “Power Button” on the back of the device
or press the “Power Off” icon on the navigation of the screen
5
General Navigation of Android Device
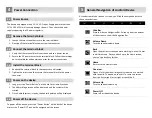
At the bottom of your device’s screen, you’ll find the navigation bar with
these seven buttons:
Hide Bar
Press to hide the Navigation Bar. Swipe up from the bottom
of the screen to show the Navigation Bar.
Volume Down
Turn the speaker volume down
Back
Open the previous screen you were working in, even if it was
in a different app. Once you back up to the Home screen,
you can’t go back any further.
Home
Returns to the Home screen.
Overview
Opens a list of thumbnail images of screens you’ve worked
with recently. To open one, touch it. To remove a screen
from the list, swipe it left or right or touch the X.
Volume Up
Turn the speaker volume up
Power Off
Power off or reboot the device


