background image

Aux2Car

Interface

Instruction Manual

Peripheral Electronics®, 

a division of AAMP of America™

13160 56th Court Clearwater, Florida 33760

727-572-9255 or interface@peripheral-aamp.com

©2005 AAMP™ of Florida, Inc.

rm11.16.04

Summary of Contents for Aux2Car

Page 1: ...r Interface Instruction Manual Peripheral Electronics a division of AAMP of America 13160 56th Court Clearwater Florida 33760 727 572 9255 or interface peripheral aamp com 2005 AAMP of Florida Inc rm11 16 04 ...

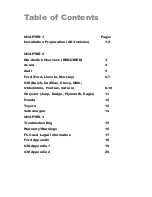
Page 2: ...IRED 3 Acura 4 Audi 5 Ford Ford Lincoln Mercury 6 7 GM Buick Cadillac Chevy GMC Oldsmobile Pontiac Saturn 8 10 Chrysler Jeep Dodge Plymouth Eagle 11 Honda 12 Toyota 13 Volkswagen 14 CHAPTER 3 Troubleshooting 15 Warranty Warnings 16 FCC and Legal Information 17 Ford Appendix 18 GM Appendix 1 19 GM Appendix 2 20 ...

Page 3: ...how to enter it prior to removing the battery cable The radio will require this code to operate when the battery terminal is reconnected 1 Do not install the unit in the following locations A Locations exposed to direct sunlight B Locations where hot air flows from the car s heater First Step For All Vehicles The first and most important step in using the First Step For All Vehicles The first and mos...

Page 4: ...2 ...

Page 5: ... Switches are in the ON position when they are switched DOWN Aux2Car settings for each vehicle can be Aux2Car settings for each vehicle can be Aux2Car found on the vehicles installation page Refer to the index to find the page number that covers your vehicle 1 2 3 4 5 6 7 8 Acura on off off on off off off on Audi VW on off off off off off off on Ford off on off off off off off on Ford Focus on on o...

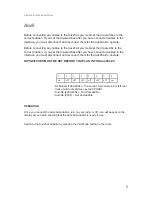
Page 6: ... ACURAS 1 2 3 4 5 6 7 8 on off off on off off off on All Models 1992 2002 Connector behind the radio use the PX HCH2 cable and the Aux2Car settings above Aux2Car settings above Aux2Car TL 1999 to 2002 use Honda cable behind the radio Acura NSX SLX and MDX 1996 and Up Not Compatible Acura s with navigation are not compatible OPERATION Switch to the Aux2Car adaptor by pressing the CD button on the r...

Page 7: ...XHAD1 Audi A8 2003 2004 Not Compatible Audi A6 2004 Not Compatible Audi Before connecting any cables to the Aux2Car you must set the dip switches to the Aux2Car you must set the dip switches to the Aux2Car correct position If you set the dip switches after you have connected cables to the interface you must disconnect and reconnect them for the Aux2Car to operate Aux2Car to operate Aux2Car Before ...

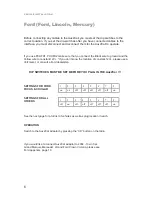
Page 8: ...location of constant 12V please use a Volt meter or consult a Ford dealership DIP SWITCHES MUST BE SET BEFORE YOU PLUG IN THE Aux2Car Aux2Car Aux2Car 1 2 3 4 5 6 7 8 on on off off off off off on 1 2 3 4 5 6 7 8 off on off off off off off on SETTINGS FOR FORD FOCUS COUGAR SETTINGS FOR ALL OTHERS See the next page for a full list of vehicles as well as plug location in each OPERATION Switch to the A...

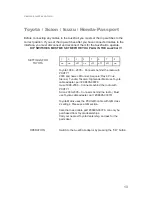
Page 9: ...trol Unit in the trunk Thunderbird 2000 2004 PXHFD3 connector behind Radio Windstar 1999 2004 PXHFD3 connector behind Radio Model Year s IPOD Location and notes Lincoln Aviator 2002 2004 PXHFD3 connector behind Radio Continental 1995 1997 PXHFD2 connector behind Radio Premium Audio System Continental 1995 1997 PXHFD1 Rear Control Unit in the trunk JBL Luxury System Continental 1998 2004 PXHFD3 con...

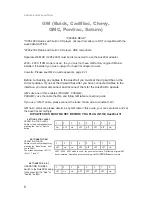
Page 10: ...1 PXHGM2 PXHGM3 use the cable that fits and follow GM table connection guide If you use GM C cable please connect the loose Yellow wire to constant 12V GM has 3 protocols please determine by GM table in this guide your car s protocol and set the Aux2Car accordingly Aux2Car accordingly Aux2Car DIP SWITCHES MUST BE SET BEFORE YOU PLUG IN THE Aux2Car Aux2Car Aux2Car SETTINGS FOR CLASS 2 SETTINGS FOR X...

Page 11: ...e behind HeadunitPro tocol E C Avalanche 2003 2005 PXHGM3 Cable behind HeadunitPro tocol Class 2 Avalanche 2002 PXHGM1Cable behind HeadunitPro tocol E C Blazer 1998 2002 PXHGM1 Cable behind HeadunitPro tocol E C Camaro 1997 2002 PXHGM1Cable behind HeadunitPro tocol E C AM FM Cassette with TAPE AUX button Cavalier 2003 2005 PXHGM3 Cable behind HeadunitPro tocol XM Cavalier 1996 1999 PXHGM1 Cable be...

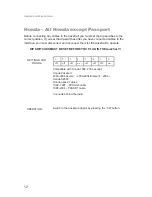
Page 12: ...ehind Headunit Protocol E C Sonoma 1998 2002 PXHGM1 Cable behind Headunit Protocol E C Safari 1996 2005 PXHGM1 Cable behind Headunit Protocol E C Sierra 1995 2002 PXHGM1 Cable behind Headunit Protocol E C Sierra 2003 2005 PXHGM3 Cable behind Headunit Protocol Class 2 Suburban 1995 2002 PXHGM1 Cable behind Headunit Protocol E C Yukon Yukon Denali Yukon XL 1995 2002 PXHGM1 Cable behind Headunit Prot...

Page 13: ...t and reconnect them for the Aux2Car to operate Aux2Car to operate Aux2Car Remove the radio to see which cable fits your vehicle and then refer to settings below Do not force cables in DIP SWITCHES MUST BE SET BEFORE YOU PLUG IN THE Aux2Car Aux2Car Aux2Car VEHICLE INSTALLATION 1 2 3 4 5 6 7 8 on off off on off off off on SETTINGS FOR CHRYSLER OLD DIN CABLE 1 2 3 4 5 6 7 8 off off off on off off off...

Page 14: ...t disconnect and reconnect them for the Aux2Car to operate Aux2Car to operate Aux2Car DIP SWITCHES MUST BE SET BEFORE YOU PLUG IN THE Aux2Car Aux2Car Aux2Car 1 2 3 4 5 6 7 8 off off off on off off off on SETTINGS FOR HONDA Compatible with Honda 1992 2004 except Honda Passport 2003 2004 Accord 2003 2004 Element 2004 Honda S2000 Honda uses 2 cables 1992 1997 PXHCH2 cable 1998 2004 PXHHD1 cable Conne...

Page 15: ...on SETTINGS FOR TOYOTA Toyota 1998 2005 Connects behind the radio with PXHTY1 2003 and newer 4Runner Sequoia Rav4 Prius Sienna Tundra Tacoma Highlander Must use Toyota cable adapter part 08695 00370 Isuzu 1998 2003 Connects behind the radio with PXHTY1 Scion 2003 2005 Connects behind the radio Must use Toyota cable adapter part 08695 00370 Toyota Matrix uses the PXHGM3 cable with GM class 2 settin...

Page 16: ... 5 6 7 8 on off off off off off off on SETTINGS FOR ALL VW S There are two different cables for Volkswagen vehicles The PXHVW1 cable is for pre wired vehicles with the CD Changer connection in the trunk The PXHVW2 is for direct connection behind the radio If you use the PXHVW2 cable make sure you connect the black and white cable to ground If Aux2Car is not being recognized sound is noisy and or A...

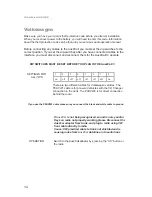
Page 17: ...io can t recognize Aux2car adaptor Bad cables or cables are not connected properly between converter box and car radio Check connection and cables push in firmly Aux2car adaptor suddenly is not recognized any more Bad connection or loss of power to interface Unplug the black converter box from Radio and plug again Radio can t recognize Aux2car adaptor Wrong selection on dip switch in the converter ...

Page 18: ...Y VOID Unless otherwise prescribed by law Peripheral Electronics shall not be liable for any per sonal injury property damage and or any incidental or consequential damages of any kind including water damage resulting from malfunctions defects misuse improper installation or alteration of this product All parts of this Peripheral Electronics product are guaranteed for a period of 1 year as follows...

Page 19: ...sion reception which can be determined by turning the equipment off and on the user is encourages to try to correct the interference by one or more of the following measures 1 Reorient or relocate the receiving antenna 2 Increase the separation between the equipment and receiver 3 Connect the equipment into an outlet on a circuit different from that to which the receiver is connected 4 Consult the...

Page 20: ...Yellow to 16pin connectors Light Blue Pink cable Pin 7 White to 16pin connectors Tan cable Pin 8 Brown to 16pin connectors Light Green Black cable Pin 6 24pin Connector Gray to 24pin connectors Violet Light Blue cable Pin 1 Orange to 24pin connectors Black Light Green cable Pin 24 Important Note Some vehicle production runs do not have a cable plugged into the 16pin pin connector on the back of th...

Page 21: ... Aux2Car 2 Connection to the Vehicle There are two connectors located behind the radio one is black and the other is grey We will first work with the grey connector Grey Connector Blue to Connector Brown White Pin 11 the 1st pin Red to Connector Green White Pin 12 the 2nd pin Black to Connector Black White Pin 13 the 3rd pin Yellow to Connector Dark Green Pin 15 pin 14 is empty Black Connector Oran...

Page 22: ...o 32 pin connector Pin E9 Black White cable Audio GND Blue to 32 pin connector Pin E10 Brown White cable Left Audio Red to 32 pin connector Pin E11 DK Green White cable Right Audio Orange to 32 pin connector Pin F1 Orange cable 12V Brown to 32 pin connector Pin E16 Black White cable Ground 3 Technical Support If you have any questions or need any support please feel free to call 800 477 2267 from ...

Page 23: ...21 ...

Page 24: ...ater Florida 33760 727 572 9255 or interface peripheral aamp com 2005 AAMP of Florida Inc Please check out our other products including iPod2car Interface that connects an iPod to most factory radios NeoChanger Complete universal CD changer that connects to most factory stereos ...

Reviews: