80 .
RamanMicro 300 Getting Started Guide
SOP-7: Defining Scan Parameters and Starting Data
Collection
NOTE: If you are using a Triggered Fiber Optic Probe, refer to the
Raman Triggered Fiber
Optic Probe
leaflet (L1321887) supplied with the probe for configuration and usage
details.
1.
Ensure the instrument is switched on, if not follow SOP-1.
2.
Setup the experimental parameters by following SOP-6.
3.
If appropriate, position your sample.
For more information see SOP-4 or SOP-5.
4.
On the Scan and Instrument Setup dialog, click Scan.
NOTE: The Scan button is not available if you are using a Triggered Fiber Optic Probe. To
define your probe scan parameters, click on the Setup Scan Parameters button,
on the Set-up tab, to go to the Scan Parameters dialog.
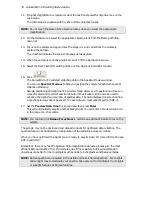
The Scan Parameters dialog is displayed.
This dialog displays a summary of the experimental configuration. It also allows you to
add a comment; specify a file prefix to be used on files containing spectrum data; and
specify the folder in which the scan data will be stored.
NOTE: If you choose to save spectra to a folder other than the default one specified for your
instrument, the data will not be displayed automatically. To view the spectrum you
will need to open the data file manually, using the Open option from the File menu,
after the scan has completed.
5.
Click Scan.
NOTE: If you have come to this screen via the Setup Scan Parameters button on the
Scan and Instrument Setup screen Experiment page, the Scan button is replaced
with an OK button, which you should use to save your scan parameters.
Spectra are always background corrected. If there is not a valid background in memory, a
background will be acquired at this point. You will see a progress bar within the message
with, for example,
Collecting Background x of y
, where
x
is the current scan and
y
is the total
number of backgrounds. You can enter the number of backgrounds on the Scan and
Instrument Setup dialog (SOP-6). When the collection of backgrounds is complete, the
software will automatically begin collecting spectra. The
Collecting data x of y
, progress bar
is displayed, where
x
is the current scan and
y
is the total number of scans.
Summary of Contents for RamanMicro 300 Series
Page 1: ...RamanMicro 300 Series Getting Started Guide MOLECULAR SPECTROSCOPY...
Page 5: ...Introduction...
Page 10: ...10 RamanMicro 300 Getting Started Guide...
Page 11: ...Safety Practices...
Page 21: ...Raman History Theory and Instrumentation...
Page 29: ...Preparing Your Facility...
Page 35: ...Installing Your RamanMicro 300...
Page 68: ...68 RamanMicro 300 Getting Started Guide...
Page 69: ...Using the RamanMicro 300...
Page 90: ...90 RamanMicro 300 Getting Started Guide...


