84 .
RamanMicro 300 Getting Started Guide
SOP-10: Wavelength Calibration of the
RamanMicro 300
Wavelength calibration should only be performed if the instrument has failed a wavelength
calibration verification.
1.
Ensure the RamanMicro 300 is switched on.
If not follow SOP-1.
2.
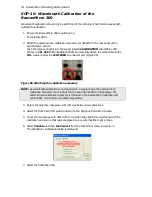
Attach the external neon calibration accessory (L1320220) to the rear panel of the
spectrometer module.
Push the large connector into the socket labeled CALIBRATION (RamanFlex 400
Series) or CAL ACCY (RamanStation 400F) and carefully attach the small cable to the
COL coupler below the LED FIBER 1 connector port (Figure 28).
Figure 28 Attaching the calibration accessory
NOTE: As wavelength calibration is not required on a regular basis, the external neon
calibration accessory is not included in the basic RamanMicro 300 package. The
external neon calibration accessory is included in the RamanMicro Calibration Kit
(L1320266), which can be purchased separately.
3.
Rotate the objective nosepiece until mid-way between two objectives.
4.
Select the Dark Field (DF) switch position on the Olympus illuminator module.
5.
Cover the microscope with dark cloth to minimize stray light from interfering with the
calibration and ensure that caps are placed on any external fiber optic probes.
6.
Select Validate
and then Instrument from the Instrument menu in Spectrum.
The Validation / Calibration dialog is displayed.
7.
Select the Calibration tab.
Summary of Contents for RamanMicro 300 Series
Page 1: ...RamanMicro 300 Series Getting Started Guide MOLECULAR SPECTROSCOPY...
Page 5: ...Introduction...
Page 10: ...10 RamanMicro 300 Getting Started Guide...
Page 11: ...Safety Practices...
Page 21: ...Raman History Theory and Instrumentation...
Page 29: ...Preparing Your Facility...
Page 35: ...Installing Your RamanMicro 300...
Page 68: ...68 RamanMicro 300 Getting Started Guide...
Page 69: ...Using the RamanMicro 300...
Page 90: ...90 RamanMicro 300 Getting Started Guide...

