background image

9-2

Saving and Restoring Configuration Parameters

9.2.  Restoring Saved Parameters

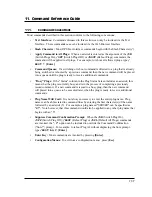
This section describes the procedure for using your terminal emulation program to send saved 

parameters to the RPS.

1.  Start your terminal emulation program and access the RPS’s Text Interface command mode 

using an account that permits Administrator level commands.

2.  Configure your terminal emulation program to upload an ASCII text file.
3.  Upload the ASCII text file with the saved RPS parameters.  If necessary, key in the file 

name and directory path.

4.  Your terminal emulation program will send the ASCII text file to the RPS.  When the 

terminal program is finished with the upload, make certain to terminate the Upload mode.

Note:

  If the RPS detects an error in the file, it will respond with the "Invalid 

Parameter" message.  If an error message is received, carefully check the contents of 

the parameters file, correct the problem, and then repeat the Upload procedure.

5.  If the parameter upload is successful, the RPS will send a confirmation message, and then 

return to the command prompt.  Type 

/S

 and press 

[Enter]

, the Status Screen will be 

displayed.  Check the Status Screen to make certain the unit has been configured with the 

saved parameters.

Summary of Contents for RPS1620H

Page 1: ...5500193 12 RPS Series RemotePowerSwitches Models Covered RPS820 RPS830 RPS1620H RPS1630H User s Guide ...

Page 2: ...able earthing of this equipment must be maintained Particular attention should be given to supply connections when connecting to power strips rather than direct connections to the branch circuit No Serviceable Parts Inside Authorized Service Personnel Only Do not attempt to repair or service this device yourself Internal components must be serviced by authorized personnel only Shock Hazard Do Not ...

Page 3: ...e following two conditions 1 This device may not cause harmful interference and 2 this device must accept any interference received including interference that may cause undesired operation WARNING Changes or modifications to this unit not expressly approved by the party responsible for compliance could void the user s authority to operate the equipment EMC Safety and R TTE Directive Compliance Th...

Page 4: ... Connecting an External Modem 4 2 4 4 Connecting the Network Cable 4 3 5 Basic Configuration 5 1 5 1 Communicating with the RPS Unit 5 1 5 1 1 The Text Interface 5 1 5 1 2 The Web Browser Interface 5 2 5 2 Configuration Menus 5 3 5 3 Defining System Parameters 5 4 5 3 1 The Real Time Clock and Calendar 5 6 5 3 2 The Invalid Access Lockout Feature 5 7 5 3 3 Log Configuration 5 9 5 3 3 1 Audit Log C...

Page 5: ...4 5 10 Save User Selected Parameters 5 35 5 10 1 Restore Configuration 5 35 6 The Status Screens 6 1 6 1 Product Status 6 1 6 2 The Network Status Screen 6 2 6 3 The Plug Status Screen 6 3 6 4 The Plug Group Status Screen 6 4 7 Operation 7 1 7 1 Operation via the Web Browser Interface 7 1 7 1 1 The Plug Control Screen Web Browser Interface 7 1 7 1 2 The Plug Group Control Screen Web Browser Interf...

Page 6: ...2 Command Summary 11 2 11 3 Command Set 11 3 11 3 1 Display Commands 11 3 11 3 2 Control Commands 11 5 11 3 3 Configuration Commands 11 9 Appendices A Specifications Apx 1 B Interface Descriptions Apx 2 B 1 SetUp Port Apx 2 C Customer Service Apx 3 C 1 Contacting Technical Support Apx 3 ...

Page 7: ...nts vi List of Figures 2 1 Front Panel RPS16 Series Shown 2 1 2 2 Back Panel Model RPS1630H Shown 2 2 5 1 Boot Priority Example 1 5 23 5 2 Boot Priority Example 2 5 24 B 1 SetUp Port Interface RJ45 Cisco Pinout Apx 2 ...

Page 8: ...communicate over any TCP IP network using standard Telnet or out of band using an external modem and basic VT100 type terminal emulation Security Features and Co Location Features To ensure security web browser access requires the user to enter an assigned user name and password The RPS provides two levels of operational passwords the System Administrator Level which allows access to all configura...

Page 9: ...zontal mount Eight 8 switched 100 to 120 VAC NEMA 5 15R outlets 32 Amps maximum total load de rated One 1 Rack Unit RPS1620H Horizontal mount Sixteen 16 switched 208 to 240 VAC IEC 320 C20 outlets 32 Amps maximum total load de rated Two 2 Rack Units RPS1630H Horizontal mount Sixteen 16 switched 100 to 120 VAC NEMA 5 15R outlets 32 Amps maximum total load de rated Two 2 Rack Units Typographic Conve...

Page 10: ...bed in Section 2 3 5 Reset Button Reboots and or resets the RPS to factory defaults as described in Section 2 3 Note All Front Panel Button functions can also be disabled via the System Parameters menu as described in Section 5 3 6 Output Status Indicators LEDs light when corresponding outlet is switched On 7 Branch A Circuit Breakers Two circuit breakers which protect Branch A One circuit breaker...

Page 11: ...switched On Off rebooted or set to default state in response to user commands 4 Power Circuit B Switched Outlets Same as Item 3 above 5 Alarm Indicator Lights For future use 6 Network Port An RJ45 Ethernet port for connection to your 10 100Base T TCP IP network Note that the RPS features a default IP address 192 168 168 168 This allows you to connect to the unit without first assigning an IP addre...

Page 12: ...s and then release it b The RPS will reboot it s operating system all plugs will be left in their current On Off state 2 Set Parameters to Factory Defaults a Simultaneously press both the Default button and the Reset button hold them for five seconds and then release them b All RPS parameters will be reset to their original factory default settings and the unit will then reboot All plugs will be l...

Page 13: ...rds with IEC power connectors RPS830 and RPS1630H Models Only Quick Start Guide CDROM containing the RPS User s Guide and Quick Start Guide Rack Mount Brackets One CAT5 Cable RJ45M to RJ45F Adapter for use with IOLAN models Part No 1100219 10 RJ45M to RJ45F Adapter for use with IOLAN C and CM models Part No 1100320 10 RJ45F to DB 9F for connecting the RPS SetUp port to the PC COM port Part No 1100...

Page 14: ...maximum per power circuit for a total load of 32 Amps de rated The ON LED should light and the RDY LED should begin to flash This indicates that the RPS is ready to receive commands 3 4 Connecting the Device Server to the RPS To securely manage the RPS configure the Device Server as follows 1 Set the Line Service Profile to Power Management for the line that is connected to the RPS serial port 2 P...

Page 15: ... manage the RPS through a PC COM port configure as follows NOTE The default serial port parameters are set as folows 9600 RTS CTS handshaking 8 data bits one stop bit and no parity 1 Plug the RJ45F to DB9F Part No 1100300 10 into the COM port on the PC 2 Connect the CAT5 cable to this adapter and the RJ45 SetUp port on the RPS 3 Start your communication program on your PC set serial port parameter...

Page 16: ...pers The RPS includes cable keepers which are designed to prevent the power supply cables from being accidentally disconnected from the unit RPS1620H and RPS1630H Sixteen plug units include pre installed cable keepers When attaching the power supply cables to the unit first swing the cable keepers out of the way then plug the power cables securely into the power inputs When the cables are in place...

Page 17: ...ort is configured for 9600 bps no parity 8 data bits 1 stop bit The SetUp Port can be connected to either an external modem or a local PC but not both items at the same time Appendix B 1 describes the SetUp Port interface 4 3 1 Connecting a Local PC When connecting the SetUp Port to a Local PC note that the port uses a DTE configuration After the Local PC has been connected make certain to set the...

Page 18: ...etwork Port Note that the RPS includes a default IP address 192 168 168 168 and a default subnet mask 255 255 255 0 When installing the RPS in a working network environment it is recommended to define network parameters as described in Section 5 9 This completes the RPS installation instructions Please proceed to the next Section for instructions regarding unit configuration ...

Page 19: ...nd define parameters by entering the number for the desired option using your keyboard and then typing in the value for that option You can to use the Text Interface to communicate with the RPS via local PC or Telnet connection You can also use the Text Interface to access command mode via an external modem installed at the RPS serial Setup Port In order to use the Text Interface your installation...

Page 20: ...lient and then Telnet to the RPS IP Address c Via Modem Use your communications program to dial the number for the external modem which you have connected to the RPS Setup Port 2 If a valid username and password are entered the RPS will display a welcome screen 5 1 2 The Web Browser Interface The Web Browser Interface consists of a series of web forms which can be used to select configuration para...

Page 21: ...lect a value from the pull down menu To apply newly selected parameters click on the Change Parameters button at the bottom of the menu or the Set button next to the field The following sections describe options and parameters that can be accessed via each of the configuration menus Please note that essentially the same set of parameters and options are available to both the Web Browser Interface ...

Page 22: ...le and configure the NTP Network Time Protocol feature as described in Section 5 3 1 Note The Real Time Clock option does not appear in the Web Browser Interface s System Parameters menu and is instead accessed via the Real Time Clock link in the General Parameters fly out menu Invalid Access Lockout If desired this feature can be used to temporarily disable SetUp Port access Telnet access and or ...

Page 23: ...ack Security link in the General Parameters fly out menu Front Panel Buttons This item can be used to disable all front panel button functions Default On Modem Phone Number When an optional external modem is connected to the RPS Setup Port the Modem Phone Number parameter can be used to denote the phone number for the external modem Default undefined Scripting Options Provides access to a submenu ...

Page 24: ...Clock value but will not apply the correction factor to the displayed Real Time Clock value NTP Enable When enabled the RPS will contact an NTP server defined via the NTP Address prompts once a day and update its clock based on the NTP server time and selected Time Zone Default Off Notes The RPS will also contact the NTP server and update the time whenever you change NTP parameters To cause RPS to...

Page 25: ...fied by the Lockout Duration parameter When Invalid Access Attempt monitoring is enabled for the serial SetUp Port the RPS will count invalid access attempts at the serial SetUp Port If the number of invalid access attempts exceeds the defined Lockout Attempts trigger value the RPS will lock the serial SetUp Port for the defined Lockout Duration period When Invalid Access Attempt monitoring for Te...

Page 26: ...essive Invalid Access Attempts via Telnet are detected then the RPS will lock out the offending MAC address for the user defined Telnet Lockout Duration Period or until the UL command is issued Note that for Telnet protection the lockout trigger is a function of the Telnet Hit Count parameter and the Telnet Lockout Duration Parameter Lockout Enable Enables Disables Invalid Access Lockout protectio...

Page 27: ...ut Duration This option selects both the length of time that a Web Lockout will remain in effect and also the time period over which invalid access attempts will be counted When a Web Lockout occurs the offending MAC address will be prevented from establishing a Web connection to the RPS for the defined Telnet Lockout Duration period Default 60 Seconds 5 3 3 Log Configuration This feature allows y...

Page 28: ... 3 2 Reading Downloading and Erasing Logs To read or download the status logs proceed as follows Text Interface Type L and press Enter to access the Display Log menu Select the desired option key in the appropriate number press Enter and then follow the instructions in the Display Logs submenu In the text interface The Display Logs menu is used to download or display the Audit Log and Temperature ...

Page 29: ...This prompt offers five different configuration options for the Callback Security feature Default On Callback Without Password Prompt Off All Callback Security is disabled On Callback Without Password Prompt Callbacks will be performed for user accounts that include a Callback Number and the login prompt will not be displayed when the user s modem answers If the account does not include a Callback...

Page 30: ...o access the Scripting Options parameters via the Web Browser Interface place the cursor over the General Parameters link wait for the flyout menu to appear then click on the Scripting Options link The Scripting Options menu allows the following parameters to be defined Command Confirmation Enables Disables the Command Confirmation feature When enabled a Sure prompt will be displayed before power ...

Page 31: ...gging into the unit via Text Interface Default On The RPS command prompt will be displayed in the Text Mode Providing that no Administrator level user accounts have been defined the RPS will not display the username or password prompts upon login to command mode If one or more Administrator level user accounts have been defined then the RPS will only display the password prompt upon login to comma...

Page 32: ...ut entering a password If you need to enable the Automated Mode but want to restrict network access to configuration menus it is strongly recommended to enable and configure the IP Security Function as described in Section 5 9 3 To enable disable the Automated Mode go to the System Parameters menu see Section 5 3 access the Scripting Options submenu and then set the Automated Mode option to On Whe...

Page 33: ...Add User or Modify User menus Each access level grants permission to use a different selection of commands lower access levels are restricted from invoking configuration commands while Administrators are granted access to all commands The four different access levels are listed below Administrator Administrators are allowed to invoke all configuration and power switching commands can view all stat...

Page 34: ...lug groups Plug access cannot be disabled for Administrator level accounts SuperUser SuperUser accounts allow access to all plugs and plug groups Port access cannot be disabled for SuperUser accounts User User level accounts are only allowed to issue switching commands to the plugs and plug groups that have been specifically permitted via the Plug Access parameter in the Add User and Modify User m...

Page 35: ...before proceeding In the Web Browser Interface click on the Add User button to save parameters in the Text Interface press the Esc key several times until the RPS displays the Saving Configuration message and the cursor returns to the command prompt 5 5 1 Viewing User Accounts The View User Directory option allows you to view details about each account The View User option will not display actual ...

Page 36: ...o the plugs specified by the account ViewOnly accounts are not allowed to invoke switching and reboot commands Plug Group Access Determines which plug groups this account will be allowed to control For more information on Plug Groups please refer to Section 5 6 Defaults Administrator and SuperUser All Plug Groups On User All Plug Groups Off ViewOnly All Plug Groups Off Notes In order to use this f...

Page 37: ...isplays the Saving Configuration message and the cursor returns to the command prompt 5 5 3 Modifying User Accounts The Edit User Directory function allows you to edit existing accounts in order to change parameters plug access rights or Administrator Command capability Note that the Edit Modify User function is only available when you have accessed command mode using a password that permits Admin...

Page 38: ...mand line via the Text Interface or by using the Plug Group Control menu in the Web Browser Interface The Plug Group Directory function is only available when you have logged into command mode using an account that permits Administrator commands In both the Text Interface and the Web Browser Interface the Plug Group Directory menu offers the following functions View Plug Group Directory Displays c...

Page 39: ... the command prompt 5 6 3 Modifying Plug Groups The Modify Plug Group function allows you to edit existing Plug Groups in order to change plug access rights Note that this function is only available when you have accessed command mode using a password that permits Administrator Level commands Once you have accessed the Modify Plug Group menu use the menu options to redefine parameters in the same ...

Page 40: ...again pausing for the user defined Boot Sequence Delay before switching On the next plug For example if the Boot Sequence Delay for Plug 3 is ten seconds then the RPS will pause for ten seconds before proceeding to the next plug On Sequence Delay When two or more plugs are switched On the RPS will pause for the user defined Boot Sequence Delay before switching the next plug Power Up Default Determ...

Page 41: ...meters to ensure that they are switched on in the desired order Notes No two plugs can be assigned the same Boot Priority number When a higher Boot Priority is assigned to any given plug all subsequent plugs will have their boot priorities lowered by a factor of 1 The Boot Priority is also displayed on the Plug Status Screen 5 7 1 1 Example 1 Change Plug A3 to Priority 1 In the Example shown in Fi...

Page 42: ...ns that Plug A3 will continue to be switched on first after a reboot but now Plug A5 will be switched on second Plug A3 will be third Plug A2 will be fourth Plug A4 will be fifth and Plug A6 will still be sixth Once again note that when the Boot Priority for Plug A5 is set to 2 the Boot Priorities for all plugs that were previously Booted before plug A5 are now lowered by a factor of one Plug No P...

Page 43: ...mit Administrator and SuperUser level commands will not be allowed to access command mode via this port Default Permit Logoff Character The Logoff Character determines the command s or character s that must be issued at this port in order to disconnect this port from another port Note that the Logoff Character does not apply to Direct Connections Default X Sequence Disconnect Enables Disables and ...

Page 44: ...se Modem Mode Permits access to command mode and simplifies connection to an external modem Modem Mode ports can perform all functions normally available in Normal Mode but Modem Mode also allows definition of the following additional parameters Reset String Redefines the modem reset string The Reset String can be sent prior to the Initialization string Default ATZ Initialization String Defines a ...

Page 45: ...work Ports The IP Address Subnet Address and Gateway Address cannot be changed via the Web Browser Interface In order to change these parameters you must access the unit via the Text Interface When a new IP Address is selected or the status of the DHCP feature is changed the unit will disconnect and reconfigure itself with the new values when you exit the Network Parameters Menu When configuring t...

Page 46: ... Default One Character Notes The One Character Disconnect is intended for situations where the destination port should not receive the disconnect command When the Three Character format is selected the disconnect sequence will pass through to the destination port prior to breaking the connection When Three Character format is selected the Resident Disconnect uses the format Enter LLL Enter where L...

Page 47: ...Default Off Note Before configuring this feature make certain your DHCP server is set up to assign a known fixed IP address You will need this new IP address in order to reestablish a network connection with the RPS unit Telnet Access Enables disables Telnet access When Telnet Access is Off users will not be allowed to establish a Telnet connection to the unit Note that in the Text Interface this ...

Page 48: ...ork and or firewall must be configured to allow ping commands Ping Access Enables Disables response to the ping command When Disabled the RPS will not respond to Ping commands Default On Raw Socket Access Enables disables Raw Socket Protocol access to the Network Port via Direct Connect and selects the port number for Raw Socket Access This item can be used to enable or disable Raw Socket Protocol...

Page 49: ...eny list Since Linux operators wild cards and net mask pairs are allowed these lists can indicate specific addresses or a range of addresses to be allowed or denied When the IP Security feature is properly enabled and a client attempts to connect the RPS will perform the following checks 1 If the client s IP address is found in the hosts allow list the client will be granted immediate access Once ...

Page 50: ...ect 5 9 3 2 Linux Operators and Wild Cards In addition to entering a specific IP address or partial IP address in the Allow or Deny list you may also use standard Linux operators or wild cards In most cases the only operator used is EXCEPT and the only wild card used is ALL but more experienced Linux users may note that other operators and wild cards may also be used EXCEPT This operator creates a...

Page 51: ...in the Deny list To allow access to all clients except 192 255 255 192 and 168 112 112 05 the IP Security would be defined as follows Allow List 1 ALL EXCEPT 192 255 255 192 168 112 112 05 Deny List 1 192 255 255 192 168 112 112 05 Notes When defining a line in the Allow or Deny list that includes several IP addresses each individual address is separated by either a space a comma or a comma and a ...

Page 52: ...s for Domain Name Servers When web and network addresses are entered the Domain Name Server interprets domain names e g www yourcompanyname123 com and translates them into IP addresses Note that if you don t define at least one DNS then IP addresses must be used rather than domain names When accessed via the Text Interface the Domain Name Server menu includes a Ping Test feature that allows you to...

Page 53: ... you have changed parameters and saved them Notes The RPS will automatically backup saved parameters once a day shortly after Midnight This configuration backup file will contain only the most recently saved RPS parameters and will be overwritten by the next night s daily backup When the I command is invoked a submenu will be displayed which offers several Reboot options Option 5 is used to restor...

Page 54: ...e make model number of the RPS unit Serial Number Displays the serial number for the RPS unit providing that the serial number has been previously defined via the Systems Parameters menu as described in Section 5 3 Rating The current rating in Amps Line Count The number of power line inputs included on the RPS unit Branch Count The number of power branches present on the RPS unit Line Frequency Th...

Page 55: ...lowing items Port The virtual network port for each connection TCP Port The number of the TCP Port for each connection Status This column will read Free if no users are currently connected to the corresponding port or Active if a user has currently accessed command mode via this port User Name The user name for the account that has currently accessed command mode via this port Note that when the N...

Page 56: ...esired outlet S s s Displays On Off status for two or more specific outlets where s is the number or name of each desired outlet A plus sign is entered between each outlet number or name S s s Displays On Off status for a range of outlets where s is the number or name of the outlet at the beginning and end of the range of desired outlets A colon is entered between the two outlet numbers or names t...

Page 57: ...click on the Plug Group Status link and then select the desired Plug Group from the resulting subment and click on the Get Plug Group Status button The Plug Group Status Screen can list the following parameters for each user defined Plug Group Group Name The user defined name for each Plug Group Plug The alphanumeric number of each switched outlet in the Plug Group Plug Name Web Interface Only The...

Page 58: ...ick on the Confirm Plug Actions button When the Confirm Plug Actions button is pressed the RPS will display a screen which lists the selected action s and asks for confirmation before proceeding To proceed click on the Execute Plug Actions button The RPS will display a screen which indicates that a switching operation is in progress then display the Plug Status screen when the command is complete ...

Page 59: ...d the RPS will display a screen which lists the selected action s and asks for confirmation before proceeding To proceed click on the Execute Plug Group Actions button The RPS will display a screen which indicates that a switching operation is in progress then display the Plug Status screen when the command is complete At that time the Status Screen will list the updated On Off status of each plug...

Page 60: ...til the plug is ready to receive additional commands If an asterisk appears in the Status column for any given plug this indicates that the plug is currently busy processing a previously issued command Commands are not case sensitive All commands are invoked by pressing Enter When the Plug Control Screen is displayed by an account that permits Administrator level command access all switched outlet...

Page 61: ...the alphanumeric number or name of the desired plug or Plug Group Note that the BOOT command can also be entered as BO For example BOOT B3 Enter or BO ATMSWTCH Enter 4 Set All Plugs to Power Up Defaults Type DPL and press Enter All plugs permitted by your account will be set to their default On Off status which is defined via the Plug Parameters Menu as described in Section 5 7 Notes When you have...

Page 62: ... commands OFF A1 A3 A4 Enter or OFF A1 A3 A4 Enter Note In order for the or operators to function there cannot be any blank spaces between the plug name or number and the plus sign or comma 2 Switch a Series of Plugs To apply a command to a series of plugs enter the numbers for the plugs that mark the beginning and end of the series separated by a colon For example to switch On plugs A1 through A4...

Page 63: ...need to enable the Automated Mode but want to restrict network access to RPS configuration menus it is recommended to enable and configure the IP Security Function as described in Section 5 9 3 To enable disable Automated Mode access the System Parameters menu see Section 5 3 then set the Automated Mode option to On When Automated Mode is enabled RPS functions will change as follows 1 All Password...

Page 64: ...unicating with the RPS it is important to always disconnect using either the LogOut link Web Browser Interface or the X command Text Interface rather than by simply closing your browser window or communications program When communicating via a PDA use the PDA s Close function to disconnect and logout When you disconnect using the LogOut link or X command this ensures that the RPS has completely ex...

Page 65: ...figure and enable the NTP server feature 3 Network Parameters Menu Access the Network Parameters Menu as described in Section 5 9 then set the following parameters a Syslog IPAddress Determine the IP address for the device that will run the Syslog Daemon then use the Network Port Configuration menu to define the IP Address for the Syslog Daemon Note The Syslog Address submenu in the Text Interface...

Page 66: ...rt your terminal emulation program and access the Text Interface command mode using an account that permits Administrator level commands 2 When the command prompt appears type U and press Enter The RPS will prompt you to configure your terminal emulation program to receive an ASCII download a Set your terminal emulation program to receive an ASCII download and the specify a name for a file that wi...

Page 67: ... name and directory path 4 Your terminal emulation program will send the ASCII text file to the RPS When the terminal program is finished with the upload make certain to terminate the Upload mode Note If the RPS detects an error in the file it will respond with the Invalid Parameter message If an error message is received carefully check the contents of the parameters file correct the problem and ...

Page 68: ...e configuration backup file The date shown next to options 5 indicates the date that you last changed and saved unit parameters If the daily automatic configuration backup has been triggered since the configuration error was made and the previously saved configuration has been overwritten by newer incorrect parameters then this function will not be able to restore the previously saved correct para...

Page 69: ...rd and port that permit Administrator level commands 3 When the command prompt appears type UF and then press Enter The RPS will display a screen which offers the following options a Start FTP Servers Only Do NOT default parameters To proceed with the upgrade while retaining user defined parameters type 1 and press Enter All existing parameter settings will be restored when the upgrade is complete...

Page 70: ...fter it indicates that the file has been successfully transferred b When the upgrade process is complete the RPS will send a message to all currently connected network sessions indicating that the RPS is going down for a reboot Note Do not power down the RPS unit while it is in the process of installing the upgrade file This can damage the unit s operating system 8 If you have accessed the RPS via...

Page 71: ... the Plug Status Screen includes an asterisk this means that the plug is currently busy and is in the process of completing a previously issued command If a new command is issued to a busy plug then the new command will placed into a queue to be executed later when the plug is ready to receive additional commands Plug Name Wild Card It is not always necessary to enter the entire plug name Plug nam...

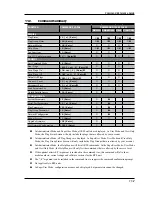
Page 72: ... X X Upgrade Firmware UF Enter X Test Network Configuration TEST Enter X In Administrator Mode and SuperUser Mode all RPS outlets are displayed In User Mode and ViewOnly Mode the Plug Status Screen will only include the plugs that are allowed by your account In Administrator Mode all Plug Groups are displayed In SuperUser Mode User Mode and ViewOnly Mode the Plug Group Status Screen will only incl...

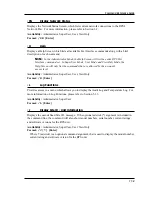
Page 73: ...e of outlets where s is the number or name of the outlet at the beginning and end of the range of desired outlets A colon is entered between the two outlet numbers or names that mark the beginning of the range and the end of the range Notes In Administrator Mode and SuperUser Mode all outlets are displayed In User Mode and ViewOnly Mode the Plug Status Screen will only include the outlets allowed ...

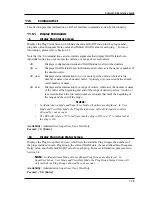
Page 74: ... are allowed by the account s access level Availability Administrator SuperUser User ViewOnly Format H Enter L Log Functions Provides access to a menu which allows you to display the Audit Log and Temperature Log For more information on Log Functions please refer to Section 5 3 3 Availability Administrator SuperUser Format L Enter J Display Site ID Unit Information Displays the user defined Site I...

Page 75: ...mand can also be entered as BO Note When this command is invoked in Administrator Mode or SuperUser Mode it can be applied to all RPS plugs and Plug Groups When this command is invoked in User Mode it can only be applied to the plugs and or Plug Groups that have been enabled for the account Availability Administrator SuperUser User Format BOOT s Y Enter or BO s Enter Where s The number or name of ...

Page 76: ...nt Availability Administrator SuperUser User Format ON s Y Enter Where s The number or name of the plug s or Plug Group s that you intend to Switch On To apply the command to several plugs enter a plus sign between each plug number To apply the command to a range of plugs enter the numbers for the first and last plugs in the range separated by a colon character To apply the command to all plugs al...

Page 77: ...he numbers for the first and last plugs in the range separated by a colon character To apply the command to all plugs allowed by your account enter an asterisk character Y Optional Suppresses the command confirmation prompt Example Assume that your account allows access to Plug A2 and Plug A3 To switch Plugs A2 and A3 on your local RPS unit Off without displaying the optional command confirmation ...

Page 78: ...o disconnect another vitural network port from the serial SetUp port Note The D command cannot disconnect your resident port Availability Administrator SuperUser Format D Y x Enter Where Y Optional suppresses the Sure prompt x Is the number of the virtual port or SetUp port Port 1 to be disconnected Example If you are communicating with the RPS via virtual network port N1 and you wish to disconnec...

Page 79: ...For more information please refer to Section 5 3 Availability Administrator Format F Enter P Set Serial Port Parameters Displays a menu that is used to select options and parameters for the RPS s serial Setup Port Note that all functions provided by the P command are also available via the Web Browser Interface Section 5 8 describes the procedure for defining serial SetUp Port parameters Availabil...

Page 80: ...arameters As described in Section 5 10 1 the I command can also be used to restore the unit to previously saved parameters When the I command is invoked the unit will offer the following reboot options Unit to Reboot Reboot Only Do NOT default parameters Reboot Default Keep IP Parameters Reboot Default Default ALL parameters Reboot Restore Last Known Working Configuration Availability Administrato...

Page 81: ...ke a Ping Command For more information please refer to Section 8 Notes In order for the ping command to function with domain names Domain Name Server parameters must be defined as described in Section 5 9 5 The Test Menu s Ping command is not effected by the status of the Network Parameters Menu s Ping Access function Availability Administrator Format TEST Enter ...

Page 82: ... De rated Circuit Breakers 2 16 Amps De rated RPS1630H Outlets 16 NEMA 5 15R AC Voltage 85 125V 50 60 Hz Input Feeds 2 16 Amps De rated Circuit Breakers 2 16 Amps De rated Physical Environmental Models RPS820 and RPS830 8 Plug Models Width 19 48 3 cm Including Rack Brackets Depth 8 7 22 1 cm Height 1 75 4 5 cm One Rack U Models RPS1620 and RPS1630 16 Plug Models Width 19 48 3 cm Including Rack Bra...

Page 83: ... is set for Modem Mode the DTR output at either port reflects the DCD input at the other end b If neither port is set for Modem Mode DTR output is held high active 2 When not connected a If the port is set for Modem Mode upon disconnect DTR output is pulsed for 0 5 seconds and then held high b If the port is not set for Modem Mode DTR output is controlled by the DTR Output option Serial Port Param...

Page 84: ...1 Contacting Technical Support Contact information for the Perle Technical Assistance Center PTAC can be found at the link below A Technical Support Query can be made via this web page www perle com support_services support_request shtml ...

Page 85: ...iability function or design Microsoft and Internet Explorer are trademarks of Microsoft Corporation Netscape is a trademark of Netscape Communications Corporation ProComm is a registered trademark of DATASTORM TECHNOLOGIES INC Crosstalk is a registered trademark of Digital Communications Associates Inc VT100 is a trademark of Digital Equipment Corporation AT is a registered trademark of Internatio...

Reviews: