background image


Perle SMI Media Converter Guide


13 

9.  Type reboot[Enter] 

10. When prompted “Confirm reboot unit y/n – type y or yes 

[Enter] 

11. When the MCR-MGT module reboots, the IP address 

you entered will be active.  You can now use your 
favourite browser to configure the unit.  Simply enter the 
IP address in the browsers address field and press 
enter. 

12. You could also use Telnet, SSH or SNMP to configure 

the module at this point. 

Resetting the MCR-MGT Management Module to 
factory default 

  If it becomes necessary to return the module to the 

factory default settings, press and hold the “RESET” 
button on the front of the module for 3 seconds (you can 
use a paper clip to do this).  This will return the 
configuration to the factory default settings and will force 
the module to re-boot. 

Summary of Contents for SMI Media Converter

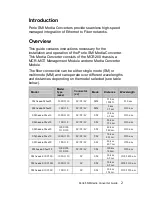
Page 1: ...P N 5500316 10 Perle SMI Media Converter Installation Guide ...

Page 2: ... see table below Model Model Type xxxx Connector cc Mode Distance Wavelength SMI xxxx M2cc05 1000 1110 SC ST LC MM 550 m 1804 ft 850 nm SMI xxxx M2cc02 100 110 SC ST LC MM 2 km 1 2 mi 1310 nm SMI xxxx S2cc10 1000 1110 SC ST LC SM 10 km 6 2 mi 1310 nm SMI xxxx S2cc20 100 110 SC ST LC SM 20 km 12 4 mi 1310 nm SMI xxxx S2cc40 1000 100 1110 110 SC ST LC SM 40 km 24 9 mi 1310 nm SMI xxxx S2cc70 1000 11...

Page 3: ... web site for the most up to date Installation guides models and specifications http www perle com Getting to know your SMI Media Converter Unpacking your SMI Media Converter Your SMI Media Converter consists of the following items A MCR MGT Management card See section in this guide for Setting up your MCR MGT Mangement Module Media Converter module See enclosed Media Converter Installation guide ...

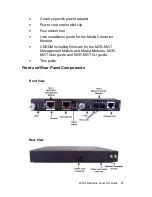
Page 4: ...rd strain relief clip Four rubber feet User installation guide for the Media Converter Module CDROM including firmware for the MCR MGT Management Module and Media Modules MCR MGT User guide and MCR MGT CLI guide This guide Front and Rear Panel Components Front View Rear View ...

Page 5: ...hassis should always be grounded for safe and proper operation See Grounding the SMI Chassis 1 Using the Perle supplied power adapter plug the power cord into the power cord connector at the rear of the chassis 2 Plug the other end of the power adapter into an appropriate power outlet See the media converter module guide that came with your SMI Media Converter to access media converter modules fea...

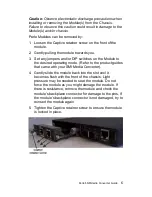
Page 6: ...IP switches on the Module to the desired operating mode Refer to the product guides that came with your SMI Media Converter 4 Gently slide the module back into the slot until it becomes flush with the front of the chassis Light pressure may be needed to seat the module Do not force the module as you might damage the module If there is resistance remove the module and check the module s backplane c...

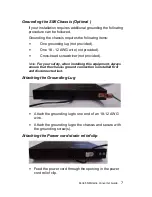
Page 7: ... provided Cross head screwdriver not provided Note For your safety when installing this equipment always ensure that the chassis ground connection is installed first and disconnected last Attaching the Grounding Lug Attach the grounding lug to one end of an 18 12 AWG wire Attach the grounding lug to the chassis and secure with the grounding screw s Attaching the Power cord strain relief clip Feed ...

Page 8: ...e 8 Attach the power cord relief clip to the chassis and secure with the provided screw Plug the power cord into the AC power connector at the rear of the chassis Plug the other end of the power cord into an appropriate power outlet ...

Page 9: ...agement module access via Browser Telnet or SSH over 10 100 1000 Mbps Ethernet Cisco pin compatible RJ45 console port on Management module for easy cabling connections Local Event logging and SYSLOG Quickly restore manufacturing configuration settings Making Connections to the Management Module Connecting To The LAN Depending on the speed at which you plan to operate your Ethernet connection locat...

Page 10: ... PC with terminal emulation software to the console port of the MCR MGT module The following is the cable pinout required to connect the console port to a DB 9 port on the PC PC MCR MGT DB9 serial RJ45 Console Port 8 CTS 1 RTS 6 DSR 2 DTR 2 RxD 3 TxD 5 GND 5 GND 3 TxD 6 RxD 4 DTR 7 DSR 7 RTS 8 CTS Alternately you can purchase the following two parts from Perle System Limited 3ft RJ45 straight thro...

Page 11: ...he PC that you are using does not reside on this subnet you will need to modify the IP address of the MCR MGT module The following are two methods in which to set the IP address of the MCR MGT management Module Perle SetIP Utility On the CD provided with the MCR MGT module you will find an executable called Perle SetIP You can run it directly from the CD or copy it to your local PC drive and execu...

Page 12: ...P address of the module in the browsers address field 4 You could also use Telnet SSH or SNMP to configure the module at this point Serial Console Port 1 Using the proper cable connector connect the MCR MGT module to the serial port on your PC Perle Systems has available for purchase an RJ 45 to DB9F DTE console adapter part 04007040 which can be used in conjunction with an RJ45 patch cable part 0...

Page 13: ...ress in the browsers address field and press enter 12 You could also use Telnet SSH or SNMP to configure the module at this point Resetting the MCR MGT Management Module to factory default If it becomes necessary to return the module to the factory default settings press and hold the RESET button on the front of the module for 3 seconds you can use a paper clip to do this This will return the conf...

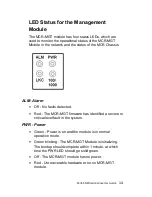
Page 14: ...Chassis ALM Alarm Off No faults detected Red The MCR MGT firmware has identified a severe or critical level fault in the system PWR Power Green Power is on and the module is in normal operation mode Green blinking The MCR MGT Module is initializing The bootup should complete within 1 minute at which time the PWR LED should go solid green Off The MCR MGT module has no power Red Unrecoverable hardwa...

Page 15: ... Blinking quickly Copper link is up and is sending or receiving data 100 1000 Green The Ethernet speed on the management module is detected at 1000 Mbps Gigabit Yellow The Ethernet speed on the management module is detected at 100 Mbps OFF The Ethernet speed on the management module is detected at 10 Mbps ...

Page 16: ...edia Converter Ensure all cabling is of the correct type and is in good working order For duplex fiber connections ensure the RX and TX has been reversed between the two Media Converters No connectivity Refer to the media converter guide that came with your SMI Media Converter Loopback Mode The fiber connection can also be verified by configuring the SMI Media Converter for loopback mode Refer to ...

Page 17: ...he serial port may have been changed from the original 9600 baud Configure your terminal emulation to match configured speed If you don t know what the speed is you could reset the module to factory default by pressing and holding the reset switch 3 seconds on the front of the MCR MGT module NOTE this will erase all of the configuration back to a factory default state Cannot connect to MCR MGT Mod...

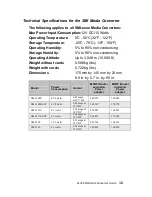
Page 18: ...m 10 000 ft Weight without cards 0 566 kg lbs Weight with cards 0 722 kg lbs Dimensions 175 mm by 145 mm by 23 mm 6 9 in by 5 7 in by 90 in Model Power Consumption Current MTBF Hours excluding Power adapter MTBF Hours including Power adapter SMI 1000 4 98 watts 0 42 amps at 12 V DC 248 259 169 698 SMI 1000 SFP 4 98 watts 0 42 amps at 12 V DC 268 167 178 770 SMI 1110 4 1 watts 0 34 amps at 12 VDC 2...

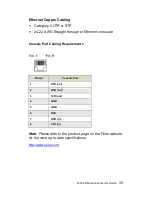
Page 19: ...4 22 AWG Straight through or Ethernet crossover Console Port Cabling Requirements Pinout Console Port 1 RTS out 2 DTR out 3 TxD out 4 GND 5 GND 6 RxD 7 DSR in 8 CTS in Note Please refer to the product page on the Perle website for the most up to date specifications http www perle com ...

Page 20: ...the user will be required to correct the interference at his her own expense EN 55022 Class A WARNING This is a Class A product In a domestic environment this product may cause radio interference in which case the user may be required to take adequate measures EN 55024 Class A Laser Safety IEC 60825 1 2007 This product meets Class I Laser safety requirements per IEC 60825 1 2007 standard and compl...

Page 21: ...at fail under the conditions of the warranty coverage Details can be found at http www perle com support_services warranty shtml Contacting Technical Support Contact information for the Perle Technical Assistance Center PTAC can be found at the link below A Technical Support Query may be made via this web page www perle com support_services support_request shtml ...

Page 22: ...Perle SMI Media Converter Guide 22 Copyright 2011 Perle Systems Limited All rights reserved No part of this document may be reproduced or used in any form without written permission from Perle Systems ...

Reviews: