background image

7

Hinweis: 


Die in diesem Paket enthaltenen Befestigungskomponenten und -hardware sind 

nicht für die Installation an Wänden mit Stahlbolzen oder an Betonsteinwände. Wenn die für Ihre 
Installation benötigte Hardware fehlen, wenden Sie sich bitte an Ihren örtlichen Baumarkt.

Bitte den Karton vorsichtig öffnen, entfernen Sie den Inhalt und legen Sie ihn auf Karton oder 
andere Schutzfläche, um Schäden zu vermeiden.

Überprüfen Sie den Paketinhalt anhand der Liste der mitgelieferten Teile auf der nächsten 
Seite, stellen Sie sich sicher, dass alle Komponenten unbeschädigt empfangen wurden. 
Verwenden Sie nicht beschädigt oder defekte Teile.
Lesen Sie alle Anweisungen sorgfältig durch, bevor Sie mit der Installation beginnen.

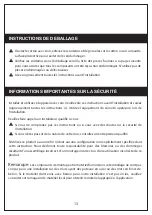
AUSPACKEN ANWEISUNGEN

Wenn Sie diese Anweisungen nicht verstehen oder irgendwelche Zweifel an der Sicherheit 
der Installation haben.

Installieren und bedienen Sie dieses Gerät sorgfältig. Bitte lesen Sie diese Anleitung vor der 
Installation sorgfältig durch. Benutzen geeignete Sicherheitsausrüstung während der Installation.

Verwenden Sie dieses Produkt nicht für irgendeinen Zweck oder in einer Konfiguration, die nicht 
ausdrücklich in dieser Anleitung angegeben ist. Wir lehnen jegliche Haftung für Verletzungen 
oder Schäden ab, aufgrund von falscher Montage oder falscher Verwendung dieses Produkts.

Wenn Sie sich hinsichtlich der Beschaffenheit Ihrer Wand unsicher sind.

Bitte wenden Sie sich an einen qualifizierten Techniker, falls Sie:

WICHTIGE SICHERHEITSHINWEISE

Summary of Contents for PSTVS05

Page 1: ...Installation Instruction PSTVS05 40KG V1 0 ...

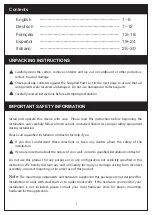
Page 2: ...efective parts Carefully read all instructions before attempting installation UNPACKING INSTRUCTIONS If you don t understand these directions or have any doubts about the safety of the installation Install and operate this device with care Please read this instruction before beginning the installation and carefully follow all instructions contained herein Use proper safety equipment during install...

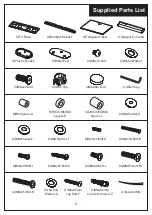
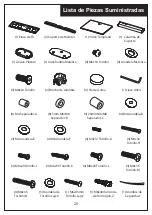
Page 3: ... 20mm M6 M8 Spacer C 4 Rubber Foot 4 M6x10 Bolt 1 Secuity Wire 1 Support Column 4 M4x30 Bolt H 4 M8x35 Bolt M 4 M4 Washer D 1 Allen Key 4 Metal Washer 4 M6x20 Bolt J 4 M8x45 Bolt N 4 M6 Washer E 4 M4 Spacer A 1 TV Plate 3 M8x22 Bolt 1 Plastic Socket 4 M6x35 Bolt K 4 M8 Washer F 8 5mm M6 M8 Spacer B 2 Monitor Bracket 2 Wire Clip 1 Metal Pad ...

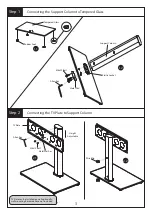
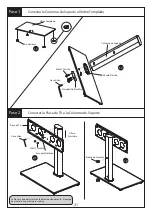
Page 4: ...o Support Column Step 2 Tempered Glass Rubber Foot Support Column Plastic Socket M8x22 Bolt Metal Pad TV Plate Allen Key Allen Key M6x10 Bolt Metal Washer Wire Clip 1 1 1 2 2 1 2 2 Height Adjustable TV Plate can be installed on wall optionally wall mounting hardware have not included ...

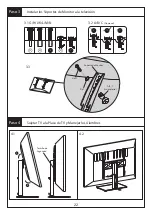
Page 5: ...ing the Monitor Brackets to a TV Step 3 Attaching TV to TV Plate and Managing the Wires Step 4 4 1 4 2 Safety Bolt 3 1 G H J K L M N 3 2 A B C Optional 3 3 A B C if necessary G to N D to F Monitor Bracket 1 2 ...

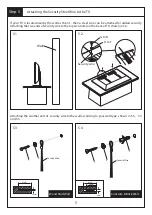
Page 6: ...re can be attached for added security Attaching the two ends of security wire to the top two holes on the back of TV shown in 5 2 Attaching the another end of security wire to the wall according to your wall type shown in 5 3 5 4 and 5 5 Wood Stud Wall Concrete Brick Wall Y X Y X Z Secuity Wire Secuity Wire 40mm 45mm 8mm G to N D to F Security wire ...

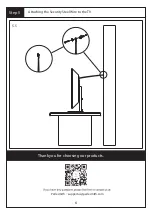
Page 7: ...6 5 5 Attaching the Security Steel Wire to the TV Step 5 Thank you for choosing our products Perlesmith supportus perlesmith com ...

Page 8: ...e alle Anweisungen sorgfältig durch bevor Sie mit der Installation beginnen AUSPACKEN ANWEISUNGEN Wenn Sie diese Anweisungen nicht verstehen oder irgendwelche Zweifel an der Sicherheit der Installation haben Installieren und bedienen Sie dieses Gerät sorgfältig Bitte lesen Sie diese Anleitung vor der Installation sorgfältig durch Benutzen geeignete Sicherheitsausrüstung während der Installation Ve...

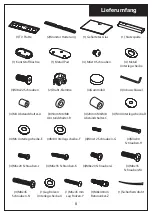
Page 9: ...Schrauben 1 Sicherheitsdraht 1 Stützspalte 4 M4x30 Schrauben H 4 M8x35 Schrauben M 4 M4 Unterlegscheibe D 1 Inbusschlüssel 4 Metall Unterlegscheibe 4 M6x20 Schrauben J 4 M8x45 Schrauben N 4 M6 Unterlegscheibe E 4 M4 Abstandshalter A 1 TV Platte 3 M8x22 Schrauben 1 Kunststoffbuchse 4 M6x35 Schranben K 4 M8 Unterlegscheibe F 8 5mm M6 M8 Abstandshalter B 2 Monitor Halterung 2 Draht Klemme 1 Metall Pa...

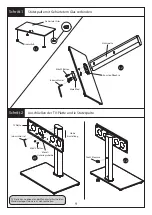
Page 10: ...hritt 2 Gehärtetes Glas Gummifuß Stützspalte Kunststoffbuchse M8x22 Bolzen Metall Pad TV Platte Inbusschlüssel Inbusschlüssel M6x10 Bolzen Metall Unterlegscheibe Draht Klemme 1 1 1 2 2 1 2 2 Höhe Einstellung TV Platte kann optional an der Wand installiert werden Wandmontage Hardware ist nicht enthalten ...

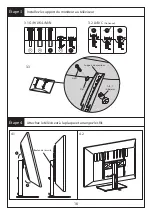
Page 11: ...n an einem Fernsehgerät Schritt 3 Anschließen des Fernsehgeräts an die TV Platte und der Kabel verwalten Schritt 4 4 1 4 2 Sicherheitsschraube 3 1 G H J K L M N 3 2 A B C Wahl 3 3 A B C Falls benötigt G zu N D zu F Monitor Halterung 1 2 ...

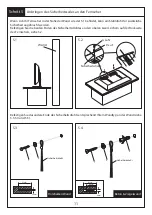
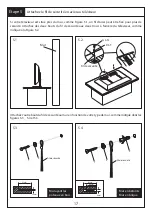
Page 12: ...che Sicherheit angebracht werden Befestigen Sie die beiden Enden des Sicherheitsdrahtes an den oberen zwei Löchern auf der Rückseite des Fernsehers siehe 5 2 Befestigen Sie das andere Ende des Sicherheitsdrahts entsprechend Ihrem Wandtyp an der Wand siehe 5 3 5 4 und 5 5 Holzbalken Wand Beton Ziegelwand Y X Y X Z Sicherheitsdraht Sicherheitsdraht 40mm 45mm 8mm G zu N D zu F Sicherheitsdraht ...

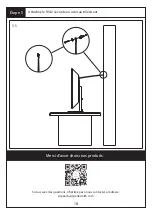
Page 13: ...12 5 5 Anbringen des Sicherheitsseiles an den Fernseher Schritt 5 Vielen Dank für Ihre Unterstützung Noch Fragen Bitte nehmen Sie Kontakt mit uns unter Perlesmith supportus perlesmith com ...

Page 14: ...dommagées ou défectueuses Lisez soigneusement toutes les instructions avant l installation INSTRUCTIONS DE DEBALLAGE Si vous ne comprenez pas ces instructions ou si vous avez des doutes sur la sécurité de l installation Installez et utilisez cet appareil avec soin Veuillez lire ces instructions avant l installation et suivez soigneusement toutes les instructions ici Utilisez l équipement de sécuri...

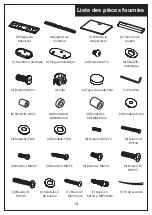
Page 15: ...pis de caoutchouc 4 Boulon M6 10 1 Fil de sécurité 1 Colonne de soutien 4 Boulon H M4 30 4 Boulon M M8 35 4 Rondelle D M4 1 Clé Allen 4 Rondelle métallique 4 Boulon J M6 20 4 Boulon N M8 45 4 Rondelle E M6 4 Rondelle A M4 1 Plaque du téléviseur 3 Boulon M8 22 1 Douille en plastique 4 Boulon K M6 35 4 Rondelle F M8 8 Rondelle B M6 M8 5mm 2 Support du moniteur 2 Clips 1 Plaque métallique ...

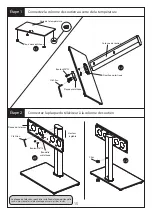
Page 16: ...de la température Tapis de caoutchouc Colonne de soutien Douille en plastique Boulon M8 22 Plaque métallique Plaque du téléviseur Clé Allen Clé Allen Boulon M6 10 Rondelle métallique Clips 1 1 1 2 2 1 2 2 Hauteur réglable La plaque du téléviseur peut être installée de façon optionnelle sur un mur le matériel de montage mural n est pas inclus ...

Page 17: ...ort du moniteur au téléviseur Étape 3 Attachez le téléviseur à la plaque et arrangez les fils Étape 4 4 1 4 2 Boulon de sécurité 3 1 G H J K L M N 3 2 A B C Optionnel 3 3 A B C Si besoin G à N D à F Support du moniteur 1 2 ...

Page 18: ...de sécurité Attachez des deux bouts du fil de sécurité aux deux trous à l arrière du téléviseur comme indiqué à la Figure 5 2 Attachez l autre bout du fil de sécurité au mur en fonction de votre type de mur comme indiqué dans les figures 5 3 5 4 et 5 5 Mur ayant les poteaux en bois Mur en béton Mur en brique Y X Y X Z Fil de sécurité Fil de sécurité 40mm 45mm 8mm G à N D à F Fil de sécurité ...

Page 19: ...18 5 5 Attachez le fil de sécurité en acier au téléviseur Étape 5 Merci d avoir choisi nos produits Si vous avez des questions n hésitez pas à nous contacter à l adresse supportus perlesmith com ...

Page 20: ...ente todas las instrucciones antes de intentar la instalación INSTRUCCIONES DE DESEMBALAJE usted no entiende estas instrucciones o tiene cualquier duda sobre la seguridad de la instalación Instale y opere este dispositivo con cuidado Por favor lea esta instrucción antes de intentar la instalación y cuidadosamente siga todas las instrucciones contenidas en este documento Utilice el equipo de seguri...

Page 21: ...ie de Goma 4 M6x10 Tornillo 1 Alambre de Seguridad 1 Columna de Soporte 4 M4x30 Tornillo H 4 M8x35 Tornillo M 4 M4 Arandela D 1 Llave Allen 4 Arandela Metálica 4 M6x20 Tornillo J 4 M8x45 Tornillo N 4 M6 Arandela E 4 M4 Separador A 1 Placa de TV 3 M8x22 Tornillo 1 Zócalo Plástico 4 M6x35 Tornillo K 4 M8 Arandela F 8 5mm M6 M8 Separador B 2 Soporte de Monitor 2 Broche de Alambre 1 Almohadilla Metáli...

Page 22: ... Vidrio Templado Pie de Goma Columna de Soporte Zócalo Plástico M8x22 Tornillo Almohadilla Metálica Placa de TV Llave Allen Llave Allen M6x10 Tornillo Arandela Metálica Broche de Alambre 1 1 1 2 2 1 2 2 Altura Ajustable La Placa se puede instalar en la pared opcionalmente El equipo de montaje en pared no se incluye ...

Page 23: ...rtes de Monitor a la televisión Paso 3 Sujetar TV a la Placa de TV y Manejar los Alambres Paso 4 4 1 4 2 Tornillo de Seguridad 3 1 G H J K L M N 3 2 A B C Opcional 3 3 A B C si necesario G a N D a F Soporte de Monitor 1 2 ...

Page 24: ...dicional Conecte los dos extremos del alambre de seguridad a los dos orificios superiores en la espalda de la televisión que se muestra en 5 2 Conectar el otro extremo del alambre de seguridad a la pared de acuerdo con su tipo de pared que se muestra en 5 3 5 4 y 5 5 Pared de Poste de Madera Pared de Hormigón y Ladrillo Y X Y X Z Alambre de Seguridad Alambre de Seguridad 40mm 45mm 8mm G a N D a F ...

Page 25: ...ar el Alambre de Acero de Seguridad a la Televisión Paso 5 Gracias por elegir nuestros productos Si tiene cualquier pregunta por favor no deje de ponerse en contacto con nosotros Perlesmith supportus perlesmith com ...

Page 26: ...a di eseguire l installazione ISTRUZIONI PER IL DISIMBALLO Se non si capiscono queste indicazioni o avere qualsiasi dubbio sulla sicurezza dell installazione Installare e utilizzare questo dispositivo con cautela Si prega di leggere questo manuale prima dell installazione e seguire con attenzione tutte le istruzioni qui contenute Utilizzare adeguati strumenti di sicurezza durante l installazione N...

Page 27: ...M6 M8 4 Piedini di gomma 4 Bulloni M6X10 1 Cavo di sicurezza 1 Pilastro da supporto 4 Bulloni H M4X30 4 Bulloni M M8X35 4 Rondelle D M4 1 Chiave a brugola 4 Rondelle metalliche 4 Bulloni J M6X20 4 Bulloni N M8X45 4 Rondelle E M6 4 Distanziatori A M4 1 Piastra TV 3 Bulloni M8X22 1 Incavo plastico 4 Bulloni K M6X35 4 Rondelle F M8 8 Distanziatori B M6 M8 2 Staffe support TV 2 Clip fissacavi 1 Piastr...

Page 28: ...edino di gomma Pilastro da support Incavo plastico Bullone M8x22 Piastrina metallica Piastra TV Chiave a brugola Chiave a brugola Bullone M6x10 Rondella metallica Clip fissacavi 1 1 1 2 2 1 2 2 Altezza regolabile La piastra TV può essere opzionalmente installata su parete però i hardware per il montaggio a parete non sono inclusi nella confezione ...

Page 29: ...o Monitor al TV Passaggio 3 Attaccare il TV alla piastra supporto e gestire i cavi Passaggio 4 4 1 4 2 Bullone di sicurezza 3 1 G H J K L M N 3 2 A B C Opzionale 3 3 A B C Se sono necessari G a N D a F Staffe supporto monitor 1 2 ...

Page 30: ...ezza attaccando le due estremità del cavo rispettivamente ai primi due fori nella parte superiore del retro del TV come illustrato in 5 2 Attaccare l altra estremità del cavo di sicurezza alla parete in maniera giusta per la tua parete come illustrato in 5 3 5 4 e 5 5 Parete di cemento armato di mattoni Parete di montanti di legno Y X Y X Z cavo di sicurezza Cavo di sicurezza 40mm 45mm 8mm G a N D...

Page 31: ...30 5 5 Attaccare il cavo d acciaio di sicurezza al TV Passaggio 5 Grazie per aver scelto i nostri prodotti Per qualsiasi dubbio si prega di contattare Perlesmith supportus perlesmith com ...

Reviews: