background image


ASSEMBLY INSTRUCTION 

Tip:    For  ease  of  assembly,  ask  somebody  to  help  by  holding  the  additional  units  while 
you fix them to the fan. 
 

1.

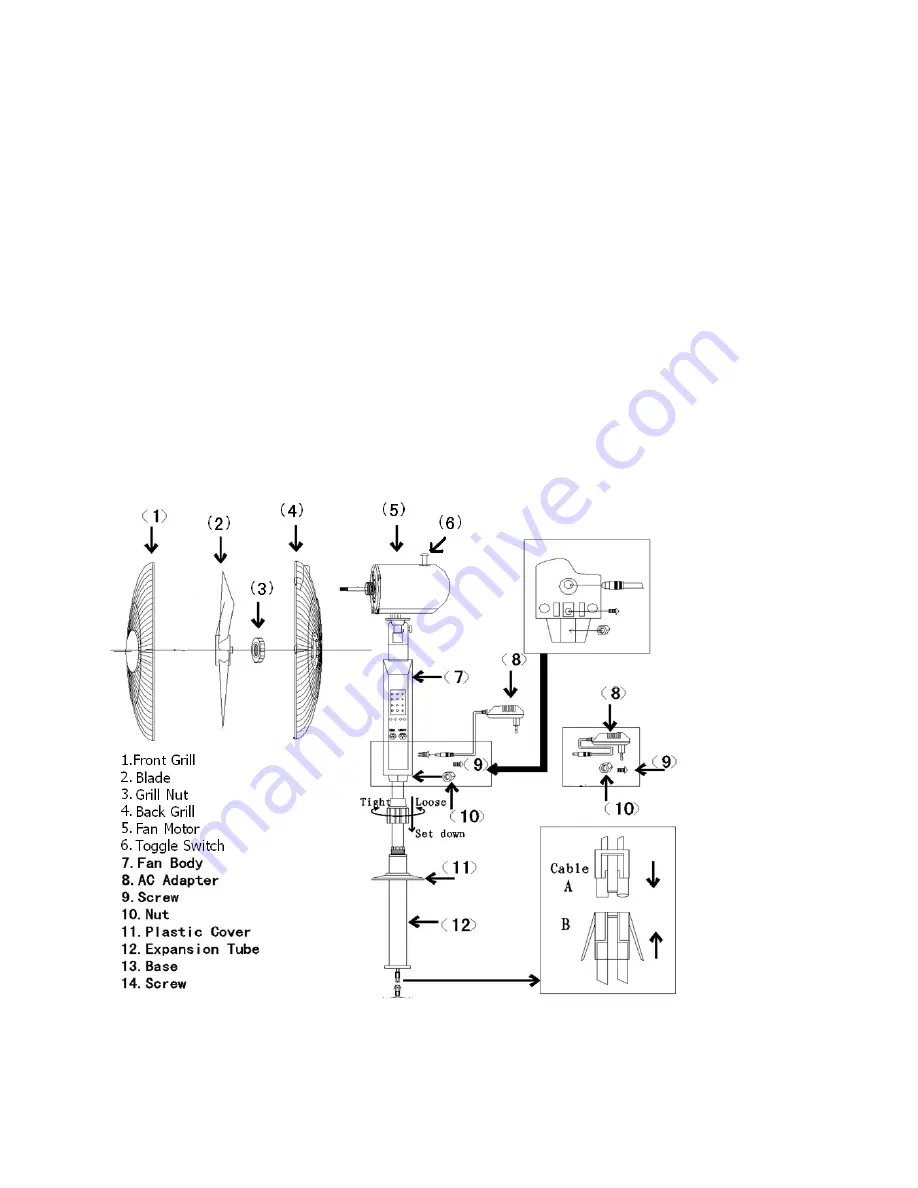
  Unpack  the  rechargeable  fan  components  ensuring  that  all  the  parts  are  present 

and that there are no components left in the box.  Also ensure the product is free from 
all packing material as this could melt.  
See Fig 1 

2. Take the extension tube, take out the big screw (part 12), install the plastic cover 
(part 11) on the extension tube. See Fig 2 

3. Take the fan body (part 7) out and connect the cable through the extension tube, 
take out the nut from poly bag (part 10) and tighten screws to fix the expansion tube 
and fan body. See Fig 3  


Summary of Contents for CE-12V16B

Page 1: ...PIONEER STREET LEKKI EPE EXPRESSWAY Rechargeable Standing Fan Dual Power Supply System AC DC CE 12V16B Instructions for use PERMAFLO TECHNOLOGIES LTD EPE EXPRESSWAY OSAPA LONDON LEKKI LAGOS NIGERIA P...

Page 2: ...product Alth designed low voltage low power it is a household turn off the power and pull the plug when it isn t working n and extend useful time of the appliance Please keep away from children This i...

Page 3: ...ontacting Check if batteries are aging or damaged If so please replace the batteries CARE AND MAINTENANCE When not in use the fan should be stored in a dry location Aways unplug the fan before cleanin...

Page 4: ...battery must be fully charged before use Recharge every 3 months to guarantee battery life WARNINGS Ensure power rating complies with local power supply Do not break light box If lamp tube is damaged...

Page 5: ...Do not connect the Rechargeable fan to the power supply if any of the components or the cable appear damaged If in doubt contact the place of purchase CHARATERISTICS This product can be powered by AC...

Page 6: ...no components left in the box Also ensure the product is free from all packing material as this could melt See Fig 1 2 Take the extension tube take out the big screw part 12 install the plastic cover...

Page 7: ...e base connect the wire terminal between fan body and base recess tightening 4 screws from poly bag to f part 5 out and tighten the big plastic nut part to the motor shaft tightening blade nut part 2...

Page 8: ...be valid 2 Please present this Warranty Certificate and purchase receipt before maintenance 3 Warranty Period within 1 year after purchase 4 Warranty restriction Warranty will be not be valid in the f...

Reviews: