background image

Settings

26

User Manual Corpus

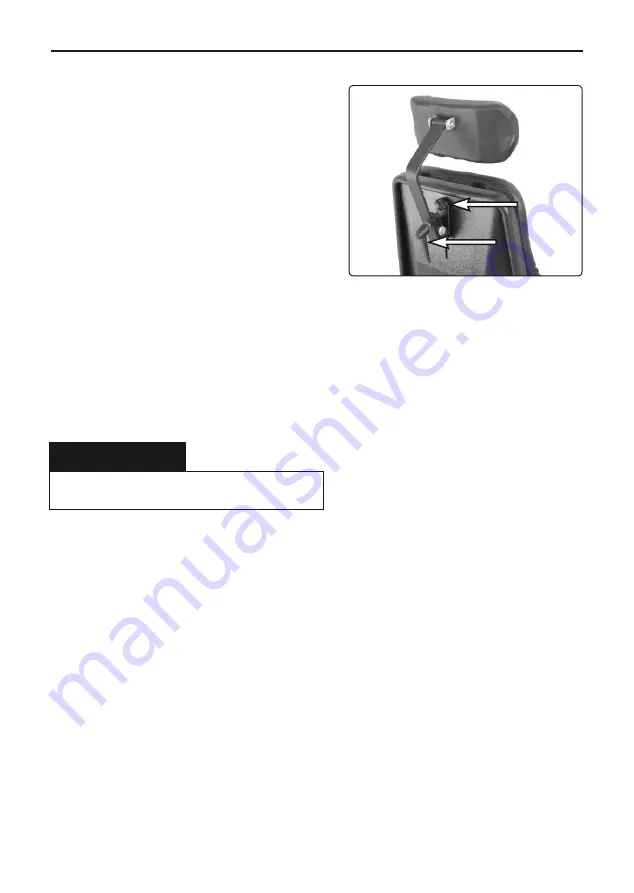
Head rest adjustment.

1

2

Settings 

Head rest 

(accessory)  

Adjustment of height  

1.

  Undo the knob (1) on the rear of the 

back rest, see illustration.

2.

  Adjust the height of the head rest as 

required.

3.

  Tighten the knob (1).

Adjustment forwards/backwards
1.

  Undo the knob (2) on the rear of the 

back rest, see illustration.

2.

  Adjust the head rest backwards/for-

wards as required. 

3.

  Tighten the knob (2).

m

   WARNING

Do not subject the head rest to load when adjus-

ting it.

Summary of Contents for X850 Corpus 3G

Page 1: ...USER MANUAL UK UK Order no 205295 UK 0 Corpus Corpus X850 Seat system for electric wheelchair...

Page 2: ......

Page 3: ...weden Tel 46 60 59 59 00 Fax 46 60 57 52 50 E mail info permobil se After Sales Service Permobil Trading Kunshan Co Ltd No 7 Plant building Rui an Road Shipai Sweden Industrial Park Bacheng Town Kunsh...

Page 4: ...Produced and published by Permobil AB Sweden Version no 1 2013 10 Order no 205295 UK 0 Corpus X850 Seat system for electric wheelchair...

Page 5: ...ety instructions 8 15 Design and function 16 General 16 Seat lift 18 Seat angle 18 Electric back rest 19 Electric leg rests 19 Key box 20 Manual seat functions Back rest angle 22 Settings 23 Arm rest...

Page 6: ...t safety and maintenance informa tion as well as describing possible problems that can arise during use Always keep these operating instructions handy in connection with your wheel chair since the nee...

Page 7: ...contact page Here is the needed contact information and a guidance document in what information we need to investigate the incident Complete the information as much as possible This is of great help...

Page 8: ...user manual contains the following warning labels which are intended to draw attention to situations which could lead to undesirable problems near misses personal injury or damage to the seat etc Tak...

Page 9: ...eering controls and with the various adjustment options etc before starting to use it Do not set out alone on your first test ride Make sure you have assistance close by if you should need help To ens...

Page 10: ...d Using these functions alters the center of gravity which always means an increased risk of tipping Always drive at low speed and only use these seat functions on a level surface and not on slopes ra...

Page 11: ...ance between the wheelchair and the point to which the user is moving If this distance is increased it could result in the user losing balance or falling over Permobil recommends that users get in and...

Page 12: ...s seats are designed to tolerate most weather conditions but you should avoid exposing the seat to severe cold persistent dampness heavy rain snowfall and similar situations If the seat is exposed to...

Page 13: ...ing points on the transport vehicle are well anchored An inadequately secured seat wheelchair could cause great damage and injury if it broke loose affecting persons in the transport vehicle the vehic...

Page 14: ...ified service engineer or Permobil The power supply must always be disconnected for all work on or servicing of the seat s electrical system Read more on how you can do this in your wheel chair user m...

Page 15: ...rt noticing that the seat and its various functions are not behaving as expected or if you suspect something is wrong stop your test drive as soon as possible turn off the wheelchair and contact your...

Page 16: ...e seat frame constitut ing the core element which can then be supplemented with a selection of seats back rests arm rests and accessories such as a thigh rest trunk rest chest rest head rest etc The s...

Page 17: ...ntrol panel Functions seat lift seat angle back rest angle Manual seat functions may vary depending on the equipment fitted on your wheelchair The seat can be adjusted manually by adjusting manual loc...

Page 18: ...f the wheelchair will be reduced Design and function Electric Seat Angle The electrically controlled seat angle function permits steplessly variable adjustment of the seat angle m WARNING Raising the...

Page 19: ...tric back rest Design and function Electric back rest The electrically controlled back rest permits steplessly variable adjust ment of the back rest angle m WARNING There will always be a crushing ris...

Page 20: ...etails see the chassis user manual The number of available functions will vary depending on the equipment fitted on your wheel chair and seat m NOTE Key box The wheelchair s key box is fixed to the ri...

Page 21: ...ate out and on the lower surface to retract it This makes it easy to set the leg length for the user and you are able to stretch your legs while driving m WARNING Make sure that there is nothing stuck...

Page 22: ...From an upright position the back rest can be inclined max 45 backwards 1 Pull out the quick release lock s spring action handle so that the locking tube moves freely and the back rest can be angled...

Page 23: ...fort 1 Undo the two lock nuts on the inside of the arm rest bracket 2 Adjust to the required height angle and tighten the nuts 3 Following adjustment check that the position of the arm rest is locked...

Page 24: ...est consists of three back cushions with Velcro fastening which can be separated depending on how much back support is required 1 Remove the back rest cushion 2 Adjust the back curve support as requir...

Page 25: ...ght 1 Remove the back rest cushion 2 Undo the knobs holding the trunk rest to the rear of the back rest 3 Adjust the height of the trunk rest to the required position 4 Tighten the knobs 5 Replace the...

Page 26: ...the back rest see illustration 2 Adjust the height of the head rest as required 3 Tighten the knob 1 Adjustment forwards backwards 1 Undo the knob 2 on the rear of the back rest see illustration 2 Ad...

Page 27: ...while preserving the same setting Removal 1 Undo the knob 3 on the rear of the back rest see illustration 2 Remove the head rest by lifting it straight up Fitting Fit in the reverse order 2 3 1 Adjus...

Page 28: ...e optimum driving position It is also possible to adjust the angle of the panel sideways which facilitates getting in and out Length adjustment 1 Undo the screw on the panel holder and adjust the pane...

Page 29: ...the snap lock on the side that best suits the user and the other half with the buckle on the opposite side 2 After fitting check that the belt buckle locks properly in the snap lock m WARNING Permobi...

Page 30: ...d 1 Remove the back rest cushion 2 Undo the locking pin and locking knobs on the rear of the back rest 3 Press the top part of the back rest slightly forward so that it disengages from the locking pin...

Page 31: ...ion 2 Undo the upper locking pin and locking knobs on the rear of the back rest 3 Push the upper part of the back rest slightly forward so that it disengages from the upper locking pin 4 Undo the back...

Page 32: ...actual upholstery Metal surfaces For normal cleaning it is best to use a soft cloth sponge hot water and a mild detergent Wipe down carefully with a cloth and water and dry off Remove scuff marks from...

Page 33: ...33 User Manual Corpus Accessories Accessories for Permobil seats are being continuously developed Contact your nearest Permobil sales person for more information on what accessories are available for...

Page 34: ...tandard design fitted on a Permobil X850 General Type X850 Corpus Dimension and weight information Length 1260 1460 mm Width 720 mm Height 1164 mm Weight incl batteries approximately 190 kg Max weight...

Page 35: ......

Reviews: