Pagina 49 di 53
9 - “MASTER” FUNCTION
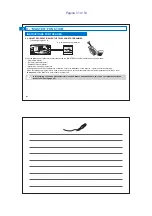
To assign "Master" chronothermostats to zones (channels), carefully follow instructions
found in the chapter "Preparing the receiver for operation with Master" in the receiver
instruction manual.
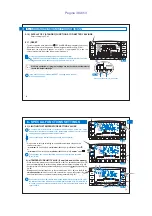
Activate the "Master Test" status ON THE "MASTER" CHRONOTHERMOSTAT:
•
press the
“
”
(example in fig. 82).
Master key for 4 seconds: MASt
will be displayed
ON THE RECEIVER:
•
verify zone status and perform assigning operations indicated in the receiver instruction manual.
After operations have been completed:
Deactivate the "Master - Test" status
pressing the
“
”
ON THE "MASTER" CHRONOTHERMOSTAT,
MASt
Master key for one second:
disappears and the program previously in progress will appear on the display.
9.3.2) DELETING ASSIGNMENT OF A ZONE TO A "MASTER"
Also with deleting operations, carefully follow instructions found in the receiver instructions manual.
.
Activate the "Master Test" status ON THE "MASTER" CHRONOTHERMOSTAT:
•
press the
“
”
(example in fig. 82).
Master key for 4 seconds: MASt
will be disp yed
la
.
ON THE RECEIVER:
•
verify zone status and perform cancelling operations indicated in the receiver instruction manual.
Deactivate the "Master - Test" status ON THE "MASTER" CHRONOTHERMOSTAT:
•
press the
“
” disappears and the program previously in progress will appear on the display.
Master key for one second: MASt
9.3.1) ASSIGNMENT OF ZONES TO THE "MASTERS”
(to be performed after matching transmitters, see for example paragraph 4.8).
INSTRUCTIONS FOR THE INSTALLER
"Master - Test" status remains active for maximum 3 minutes, after which the chronothermostat will return to its normal operation.
press for 4 seconds
This function can be protected by a password (see chapter ).
8
0
8
10 12 14 16 18
2
4
6
t1
t2
t3
20 22
fig. 82
96
EN
9 - “MASTER” FUNCTION
In installations with zones assigned to a "MASTER" chronothermostat, the
“Master”
function can be activated or deactivated by the user with a quick press of the
Master
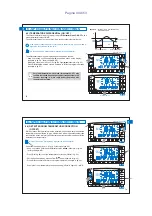
key. The activated "Master" status will be indicated on the display by the constantly
lit
message (fig. 83).
Master
“Master” function deactivated:
the "MASTER" chronothermostat behaves as a normal chronothermostat and acts only in the zone where it
is coupled.
“Master” function activated:
until the function is deactivated, the "MASTER" chronothermostat replaces chronothermostats and/or
thermostats coupled to assigned zones, as shown in the following paragraphs.
Within the "MASTER" FUNCTION, it is possible to modify temperature levels and values, pass from temporary manual to permanent manual
or from a programme (or profile) in operation.
9.4.1) TEMPORARY MANUAL MASTER
Activation:
•
briefly press the
key on the MASTER chronothermostat to enter into
“
”
temporary manual operation;
(see details in
appears blinking symbol “
”
paragraph
) (example in fig. 84).
7.1 point A
Briefly press the
key: the constantly lit message
will appear on
“Master”
Master
the display.
Operation:
•
temperature control of all zones assigned to the “Master” is managed by the
“Master”: temperature level (comfort “t1”, economy “t2”, absence “t3”) and
temperature values are those set in the "Master".
9.4)
“MASTER” OPERATION MODE
INSTRUCTIONS FOR THE USER
In “Temporary manual master” mode
at midnight
, the following events can occur
:
• If the “Master” chronothermostat was in “temporary manual” mode when “Master” mode was selected, it quits both “temporary
manual” mode and “Master” mode and resumes functioning in program mode.
• If the “Master” chronothermostat was set first to “Master” mode and then to “temporary manual” mode, it quits “temporary manual”
mode and resumes functioning as “Master” in program mode. (see operation in par. 9.4.3)
Example: operation with
temporary manual Master
fig. 83
0
8
10 12 14 16 18
2
4
6
20 22
t1
t2
t3
.
.
.
fig. 84
0
8
10 12 14 16 18
2
4
6
20 22
t1
t2
t3
.
.
.
1°
2°
97
EN
Summary of Contents for 1TXCRTX05
Page 52: ...Pagina 52 di 53...


