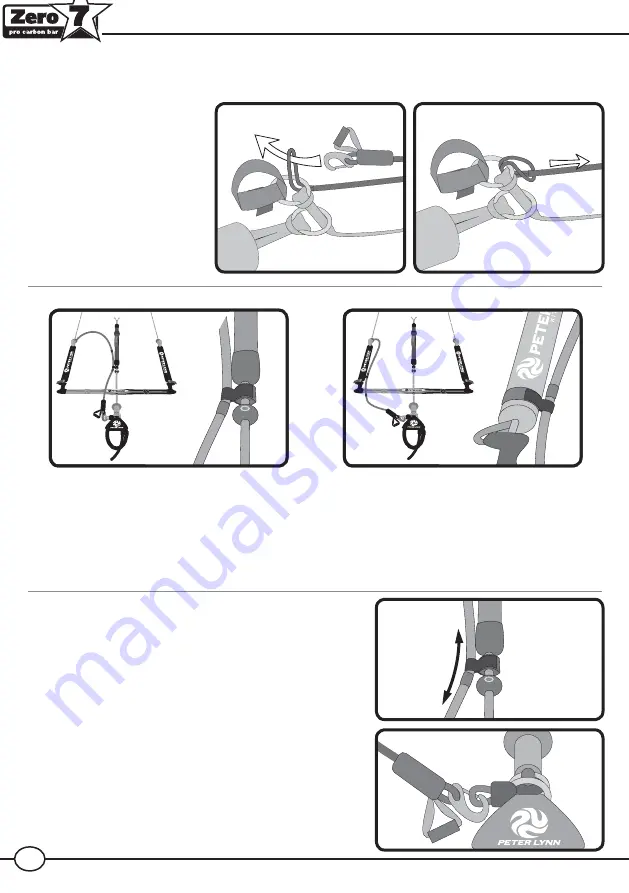
Setting up the safety leash
To suit your personal preference, you can set up your safety leash in two different ways as well as
choose to attach it either to the left or right side of the bar.
Attaching the leash to the
side leader lines
Slide the loop on the end of the
leash through the ring attached
to the self landing handle (not
the ring attached to the lower
part of the leader lines).
Take the other end of the leash
(with quick release and clip) and
slide it through the loop. Pull the
larkshead tight.
Running the leash through the center
Attach the Velcro connection piece on the leash
to the Velcro connection point just above the
black stopper ball on the depower line. Slide the
Velcro connection piece over the leash so it sits
on the lower leash positioning piece.
Running the leash to the side
Make sure the extra Velcro leash side connector
is attached to the left or right fl oater as desired.
Place the Velcro connection piece on the leash to
the Velcro side connector on the fl oater.
Slide the Velcro connection piece over the leash
so it sits on the higher leash positioning piece.
Guiding the leash
Changing the ‘tension’ on the leash
If the leash is too tight or too slack, you can slide the Velcro
connection piece over the leash so it sits on or next to the
leash positioning pieces.
Attaching the leash to the depower loop or spreader bar
To have the leash automatically spinning around the de-
power line, attach the leash clip to the spinning connection
point on the depower loop.
If desired, the leash can also be clipped onto the spreader
bar or harness.
4


