background image

6

EN

Hair texture 

 Recommended 
setting

Bleached, fragile, damaged  
 or fine hair 

I

Normal hair 

I/II

Very coarse, thick or curly hair 

II

After rolling in the hair, allow the heat to 

• 

work on the hair for a few seconds. If the 
air feels too hot, set a lower temperature. 
To roll out the curls, press the roll-out 
button (2). The curling attachment (3) will 
be disengaged and can be rolled out of the 
formed curl.
To switch off the appliance, set the 

• 

temperature switch (1) to the "O" position.
Remove the mains plug from the wall 

• 

socket.
Allow the appliance to cool down 

• 

completely.

Hints for use

Use shampoo to wash your hair. If your 

• 

hair is chemically treated or damaged, use 
a hair conditioner to wash your hair.
Dry your hair (almost fully) before curling 

• 

your hair.
Comb your hair out before curling your 

• 

hair.
Curl your hair in sections. If you have thick 

• 

hair, you must use smaller sections than if 
you have thin hair.
If you want spiral curls, divide your hair 

• 

into small sections and move through each 
section a couple of times.
If you want loose curls, divide your hair 

• 

into flat, larger sections and move through 
each section a couple of times.
Shake out the curls, then style your hair 

• 

with your fingers.
Apply hairspray to keep your curls in place. 

• 

Use a humidity-resistant hairspray in humid 
climates.

Overheating protection (fig. A)

If the air outlets are covered or if they are 
blocked with hair, the emerging air will become 
too hot and the overheating protection will 
switch off the appliance.

Set the temperature switch (1) to the "O" 

• 

position.
Remove the mains plug from the wall 

• 

socket.
Clean the appliance. Refer to the section 

• 

"Cleaning and maintenance".
After five minutes, insert the mains plug 

• 

into the wall socket.
To switch on the appliance, set the 

• 

temperature switch (1) to the "I" or "II" 
position.

Storage

Put the appliance and the accessories in 

• 

the original packaging.
Store the appliance with the accessories in 

• 

a dry and frost-free place, out of the reach 
of children.

U.K. Wiring instructions

The wires in the mains lead are coloured in 
accordance with the following code:
BLUE 

NEUTRAL

BROWN 

LIVE

As the colours of the wire in the mains lead of 
this appliance may not correspond with the 
colour markings identifying the terminals on 
your plug, proceed as follows:
The wire which is coloured BLUE must be 
connected to the terminal which is marked 
with the letter N or coloured black.
The wire which is coloured BROWN must be 
connected to the terminal which is marked 
with the letter L or coloured red.

Should the fuse in the BS1363 plug require 
replacement, a 3Amp BS1362 fuse must be 
fitted.

This is a double-insulated appliance and does 
not need an earth connection.

Warning!

 On no account should either the live 

or neutral wires be connected to the earth 
terminal.

Summary of Contents for 520001

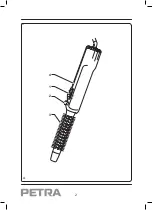
Page 1: ...520001 Petra Air Curl AC 200 English 3 Fran ais 8 Deutsch 13 Italiano 18 II I 0...

Page 2: ...2 II I 0 3 2 1 4 A...

Page 3: ...ith a physical sensory mental or motorial disability or lack of experience and knowledge if they are supervised or instructed on how to use the appliance in a safe way and understand the hazards invol...

Page 4: ...ension cable of a suitable diameter at least 3 x 1 mm2 Make sure that water cannot enter the contact plugs of the mains cable and the extension cable Always fully unwind the mains cable and the extens...

Page 5: ...rs from the curling attachment using a soft brush Clean the curling attachment under running water Thoroughly dry the curling attachment with a clean dry cloth Description fig A Your 520001 Petra hair...

Page 6: ...d climates Overheating protection fig A If the air outlets are covered or if they are blocked with hair the emerging air will become too hot and the overheating protection will switch off the applianc...

Page 7: ...7 EN Disclaimer Subject to change specifications can be changed without further notice...

Page 8: ...lus et des personnes pr sentant un handicap physique sensoriel mental ou moteur voire ne disposant pas des connaissances et de l exp rience n cessaires en cas de surveillance ou d instructions sur l u...

Page 9: ...con u pour tre utilis avec une minuterie externe ou un syst me de t l commande s par Connectez l appareil une prise murale mise la terre Si n cessaire vous pouvez utiliser une rallonge d un diam tre a...

Page 10: ...ns La brosse de l accessoire friser peut devenir tr s chaude l usage Tenez la brosse uniquement par l avant de son cache Nettoyage et entretien Avant de proc der vous devez faire attention aux remarqu...

Page 11: ...sitionnez l interrupteur de temp rature 1 sur O D branchez la fiche secteur de la prise murale Laissez l appareil refroidir compl tement Conseils d usage Lavez vos cheveux avec du shampooing Si vos ch...

Page 12: ...ez l appareil avec les accessoires dans un endroit sec hors de port e des enfants et l abri du gel Clause de non responsabilit Sous r serve de modifications les sp cifications peuvent tre modifi es sa...

Page 13: ...ur betrieb ausgetauscht werden Das Ger t kann von Kindern ab 8 Jahren und von Personen mit einer k rperlichen sensorischen geistigen oder motorischen Behinderung oder einem Mangel an Erfahrung und Ken...

Page 14: ...Gebrauch stets dass die Netzspannung mit der Spannung auf dem Typenschild des Ger ts bereinstimmt Das Ger t ist nicht daf r ausgelegt von einer externen Zeitschaltuhr oder einem Fernsteuersystem betr...

Page 15: ...feuchtem Haar verwenden werden Oberhaut und Hirnrinde angegriffen Bringen Sie das Ger t nicht mit k nstlichem Haar in Ber hrung Bedecken Sie die Luftauslas sstellen nicht mit Kleidung Haaren oder Ihre...

Page 16: ...des besch digtes oder feines Haar I Normales Haar I II Sehr grobes dickes oder lockiges Haar II Lassen Sie die Hitze nach dem Aufrollen der Haare einige Sekunden auf die Haare einwirken F hlt sich da...

Page 17: ...n Sie das Ger t Siehe Abschnitt Reinigung und Wartung Stecken Sie den Netzstecker nach f nf Minuten in die Wandsteckdose Um das Ger t einzuschalten stellen Sie den Temperaturschalter 1 auf Position I...

Page 18: ...mbini di almeno 8 anni e da persone con ridotte capacit fisiche sensoriali mentali o motorie oppure senza la necessaria pratica ed esperienza sotto la supervisione di un adulto o dopo aver ricevuto ad...

Page 19: ...r esterno o telecomando Collegare l apparecchio a una presa a parete dotata di messa a terra Se necessario utilizzare un cavo di prolunga dotato di conduttore di messa a terra di diametro adeguato alm...

Page 20: ...sclusivamente utilizzando l apposito supporto Pulizia e manutenzione Prima di procedere necessario porre attenzione alle seguenti note Prima di qualsiasi operazione di pulizia o manutenzione spegnere...

Page 21: ...atura 1 sulla posizione O Disinserire la spina di alimentazione dalla presa a parete Far raffreddare completamente l apparecchio Suggerimenti per l uso Usate uno shampoo per lavare i capelli Se avete...

Page 22: ...22 IT Clausola di esclusione della responsabilit Soggetto a modifica le specifiche possono subire variazioni senza preavviso...

Page 23: ...23...

Page 24: ...Petra 2013 05 13 V1 PETRA Deutschland GmbH Eberhardstra e 73312 Geislingen Steige Deutschland www petra electric de...

Reviews: