background image


PR730 


11 

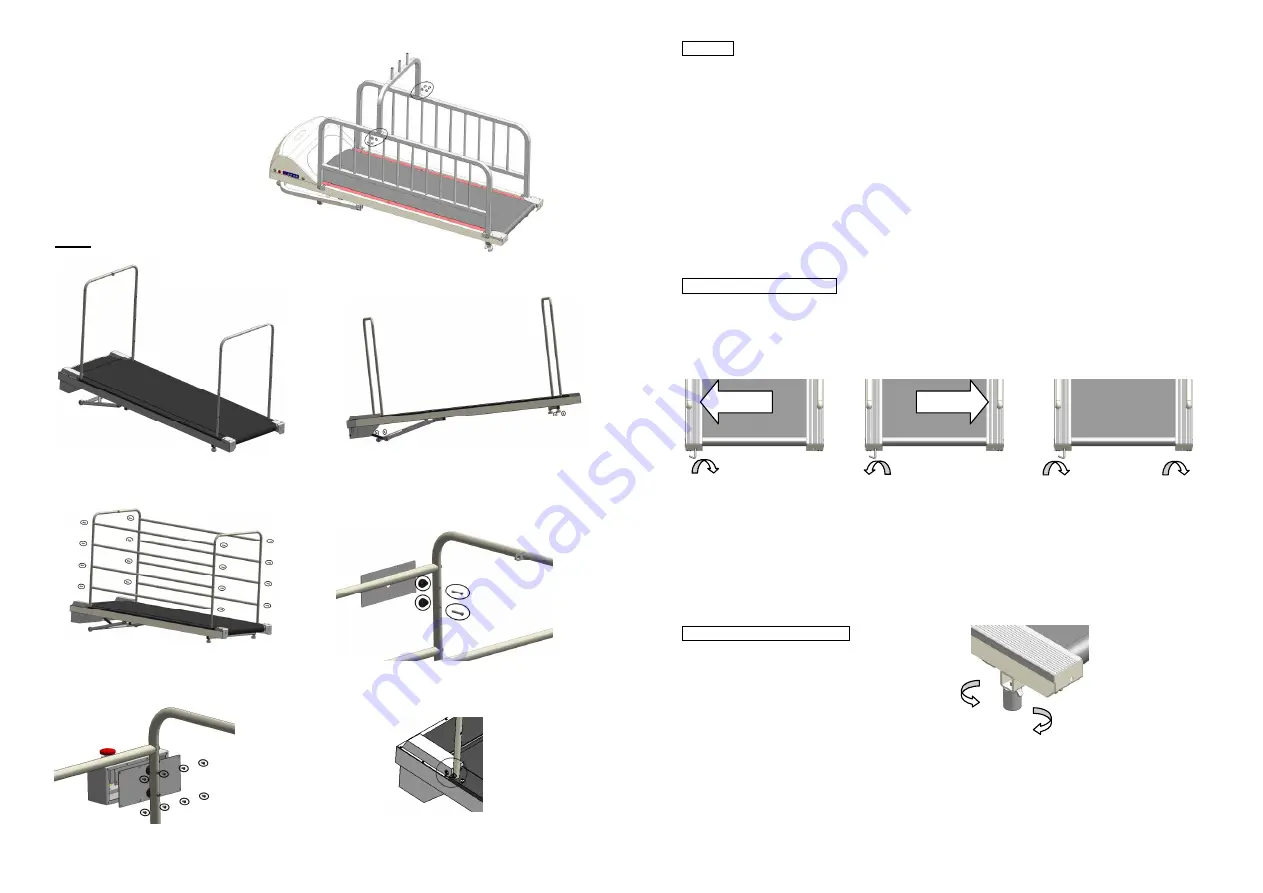
[step 2]


Use L-wrench_5mm, screw(M8x15L) 
and washer(M8x1.6T) to fasten the rope 
hanger on the top of both side fences.   

[step 3]


Use L-wrench_5mm and screw (M8x40L) to 
fasten the side fences.   

[step 2]


Fasten screw (M8x25L) 
by L-Wrench_5mm 

[step 4]


Use L-wrench_4mm, bushing and screw 
(M6x40L) to fasten the plate of control 
console on the left side of front fence.   

[step 6]


Plug the cable connector. 

[step 1]


Insert both front fence 
and rear fence. 

[step 5]


Plug the cable connector and use Phillips 
screw (M4x8L) to fasten the control 
console. 

To Start   

 
1. Plug the power cord into the correct voltage outlet. 
2. Turn on the power switch (the power switch light will turn on) 
3. Allow the dog to stand on the running belt. 
4. Push 

[START] 

button on begin exercise, and gradually adjust speed at a pace suitable for your 

dog. 

5. Push 

[STOP] 

button to stop when finished exercising. 

 
    Suggestion:Gradually decreasing speed will allow your dog sufficient time to calm down   

(e.g., 6 Km

3 Km

Stop 

6. Refer to page 3 for additional notes. 


Running belt adjustment   


If the running belt slants to one side or the other after a period of usage, it will need to be 
adjusted to move it back to the middle position. 

1. 

Turn on the power switch. 

2. 

Increase the speed to 4 km/hr and maintain that speed for 2~3 minutes, then start to adjust. 


12 


If the running belt moves to the 
left side, please use attached 
6mm T wrench to adjust the left 
side screw, turning clockwise, 
by 1/4 turn each time, until the 
running belt moves to and 
remains in the middle. 


If the running belt moves to the 
right side, please use attached 
6mm T wrench to adjust the 
right side screw, turning 
anticlockwise, by 1/4 turn each 
time, until the running belt 
moves to and remains in the 
middle. 


If the running belt is loosen, 
please use attached 6mm   
T wrench to adjust both the left 
and right side screws, turning 
clockwise, by 1/4 turn each time 
until the running belt is tight and   
remains is the middle. 

Rear rubber feet adjustment 


If the floor do not flat, adjust the rubber feet by turn 
anticlockwise until whole machine stable. 

Summary of Contents for PR 700

Page 1: ...national Developing Co Ltd Iwate International Developing Co Ltd has the rights to change the components without advance notification Index Symbol Definitions 1 Warning 1 Daily maintenance 2 Prohibitions 2 Warranty 2 Doggy size Model 2 Owner guide 3 Medical Observations 3 Component Identification 3 4 5 Accessory parts 5 6 Manual control button Power switch illustration 7 IR remote control instruct...

Page 2: ...d unplug it Contact your local distributor for further assistance Caution after use Always unplug when the treadmill is not in use Clean while the treadmill is unplugged by first removing any dog hair on the running belt first then wiping the treadmill with a damp cloth Dilute gentle detergent with lukewarm water soak the cloth then wring any excess water from the cloth before wiping the machine D...

Page 3: ...edical data points were observed Weight decrease Maximum approximately 14 average approximately 8 Pulse decrease Maximum approximately 16 average approximately 13 Temperature Young dogs 38 5 to 39 0 Adult dogs 7 5 to 38 5 Rate of Breathing 10 to 30 times per minute Pulse rate Young dogs about 80 to 120 beats per minute Adult dogs about 70 to 80 beats per minute Component Identification PR700 PR710...

Page 4: ...3 4 6 7 5 8 PR720E PR725 PR730 Please ensure all quantities of accessory parts are correct before assembly 6 No Accessory Parts Name Q ty No Accessory Parts Name Q ty 1 Left Fence 1 7 L Wrench_5mm 1 2 Right Fence 1 8 T Wrench_5mm 1 3 Rope Hanger 1 9 Remote Controller 1 4 Power Cable 1 5 Screw M8x15L 12 6 Washer M8x1 6T 12 No Accessory Parts Name Q ty 1 Front fence 1 2 Rear fence 1 3 Side Fence 8 4...

Page 5: ...nd back to set up mode 7 START Start the machine 8 STOP Stop the machine 9 MODE Speed Distance display exchange 10 SPD Speed setting 11 S KEY Push S KEY MODE to set up remote control channel Electric Saving Mode The LCD display will access into electric saving mode if no setting over 1 minute Push any key to go back the normal display besides RESET key Battery NO 4 1 5V Alkaline Battery x 2 pcs In...

Page 6: ...ely Push again to reset START Speed Up Down Speed Setting 1 0 16 0Km Stop automatically when time reaches 99 59 min Time Up Down Time Setting 1 0 99 0Min Assembly Procedure PR700 PR710F PR720F PR720E PR725 10 step 1 Insert front fence step 2 Upright the PetRun then fasten screw M6x18L by L wrench_4mm step 3 Insert both left right fence step 4 Fasten screw M6x18L by L wrench_4mm step 5 Fasten screw...

Page 7: ...time to calm down e g 6 Km 3 Km Stop 6 Refer to page 3 for additional notes Running belt adjustment If the running belt slants to one side or the other after a period of usage it will need to be adjusted to move it back to the middle position 1 Turn on the power switch 2 Increase the speed to 4 km hr and maintain that speed for 2 3 minutes then start to adjust 12 If the running belt moves to the l...

Page 8: ...fixing locker to position Lock Step 2 Lift up the machine at end side by both hands and it will be easy to move Step 1 Pull out the lock pin from position A and then insert it into position B Step 2 Pull down the machine and it will drop to level position automatically Incline for PR720E PR725 PR730 only PR720E PR725 PR730 PR720E PR725 PR730 14 Step 1 Pull out the incline adjust lever Step 2 Adjus...

Page 9: ...ce Emergency Switch Safety Locker Foldable model only Control Display LCD LED Operation Switch E SW START STOP SPEED Up Down Model Size Cm 53x110x38 W L H 53x156x41 W L H 53x183x41 W L H 53x170x103 W L H 53x220x121 W L H 84x251x136 W L H Cm 63x119x27 W L H 63x164x30 W L H 63x191x30 W L H 63x178x39 W L H 63x228x39 W L H 92x260x40 W L H Packaged Size Cu Ft 7 15 10 95 12 75 15 44 19 78 33 79 Net Weig...

Reviews: