16
Customer Care Center 1-800-732-2677
GET
TING ST
AR
TED
GET
TING ST
AR
TED
Install Pet Door
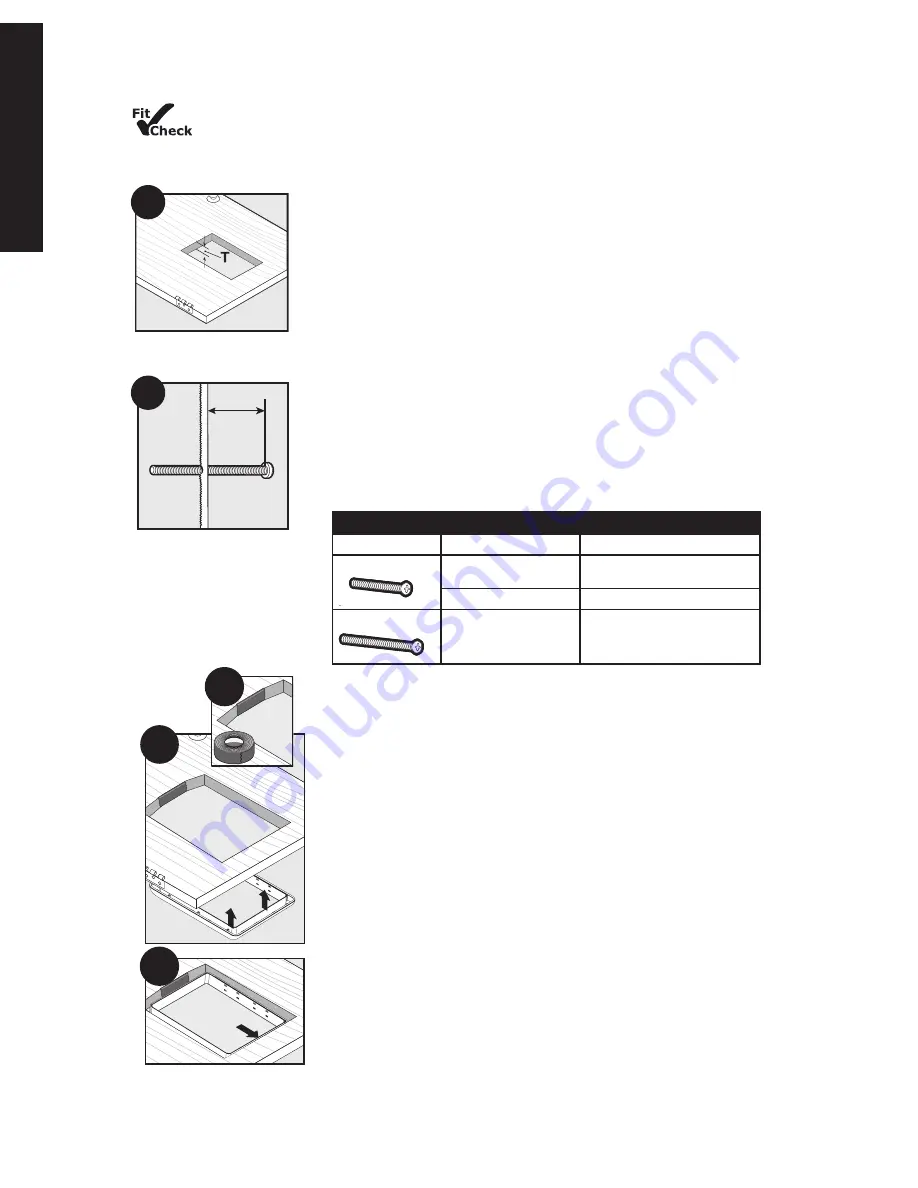
Before putting away your jigsaw, place interior frame (frame with flap) inside the cut-out and
check the fit. Then place the exterior frame into the underside of the cut-out to check the fit. If the frames do
not fit inside the opening, you may need to recut opening before proceeding with installation.
4A
Measure the thickest part (T) of cut-out. Note this measurement.
4B
Before installing pet door, you need to determine which screw length is
needed for your installation depending on your door thickness, the screws may
need to be trimmed with a hacksaw or screw cutter. If the screws are too long,
the finishing plugs will not fit. Use the Screw Selection Guide (Chart 1) to select
which screw to use and if it needs to be trimmed.
Chart 1
Screw Selection Guide
Screw Length
Cut-Out Thickness (T)
Trimming Instructions
3 ₇⁄₁₆” screw (88mm)
3
⁄₁₆” - 1” (4mm - 25mm)
Trim screw to door thickness
(T)
+2
3
⁄₁₆” (56mm). (See Illustration 5B)
1” - 1
1
⁄₁₆” (25mm - 38mm)
No trimming needed.
3
3
⁄₁₆” screw (100mm) 1
1
⁄
2
” - 2” (38mm - 51mm)
No trimming needed.
Helpful Tip:
Remove pencil marks and make sure surface is free of debris and
shavings before installing frames.
4C
Apply duct tape along top interior and exterior edge of cut-out. Leave
approximately 2” uncovered on either side of tape and make sure no excess
tape will show outside the frame. This is to cover raw edge of cut-out to keep it
from pinching or cutting sensor wire.
4D
Place exterior frame into cut-out from the underside of the door.
4E
Align exterior frame flush with bottom of cut-out.
Helpful Tip:
Use sawhorse or other flat surface to keep exterior frame in
place while installing interior frame.
4A
T
+2
3
∕
₁₆
"
(56mm)
4B
4E
4D
4C
Step
4


