background image

TIGHTENING TORQUES AND SPECIAL TOOLS

Page: 9

Reproductions or translations, even partial, are forbidden without the written consent of Peugeot Motocycles

TIGHTENING TORQUES AND SPECIAL TOOLS

Tightening torques

Lower body fairing

0.2m.daN

Footboard

0.4 m.daN

Speedo casing

0.1 m.daN

Saddle cover

0.6 m.daN

Front panel

0.1 m.daN

Rear panel

 0.1 m.daN

Side fairings

0.1 m.daN

Rear mudguard *

0.8/0.1 m.daN

Mudflap *

0.6/0.8m.daN

Saddle locking plate

1.2 m.daN

Frame:
Front wheel spindle nut

6 m.daN

Rear wheel spindle nut

10 m.daN

arm to frame mounting

4.6 m.daN

Shock absorber upper mount

4.3 m.daN

Shock absorber lower mount

2.5 m.daN

Steering locknut

7 m.daN

Motor:
Arm to motor mount

2.3 m.daN

Battery terminal nut

12 m.daN

Strap and 200 A fuse

1.2 m.daN

Brush fixing screws

Standard:
Nut and bolt 5 mm diameter

0.5 m.daN

Nut and bolt 6mm diameter

1 m.daN

Nut and bolt 8mm diameter

2.2 m.daN

Nut and bolt 10mm diameter

3.5 m.daN

Nut and bolt 12mm diameter

5.5 m.daN

Special tools:

Steering column spanner

754086

Discharge bench

753012

TEP 96

753011

Optional charger

5409

* depending on size of bolt

Summary of Contents for Scoot'elec

Page 1: ...WORKSHOP MANUAL SERVICE AND REPAIR SALES DIVISION NETWORK TECHNICAL INFORMATION ...

Page 2: ...8 TIGHTENING TORQUES AND SPECIAL TOOLS 9 Tightening torques 9 Frame 9 Motor 9 Standard 9 Special tools 9 BODY 10 To remove lower body fairings Step 1 10 To remove the footboard Step 2 10 To remove the saddle Step 3 10 To remove the saddle cover and lock Step 4 11 ELECTRICITY 12 To remove the charger Step 5 12 Removal of the 200 Amp fuse Step 6 12 To remove the ECU Step 7 13 Setting the throttle se...

Page 3: ...er or Schabmüller Max power output 2 8 kW Motor speed 2100 rpm Torque speed 2000 rpm Frame 1 Manufacturer s plate 2 VIN number Capacities Relay module 0 12 litres Esso Gear Oil EZL 848 P N 753054 Dimensions Length 1755 mm Width 695 mm Height without rear view mirror 1100 mm Ground clearance Wheelbase 1300 mm Weight Weight 115 kg Tyres Front wheel 2 5 x10 Front tyre 100 80x10 Front tyre pressure 2 ...

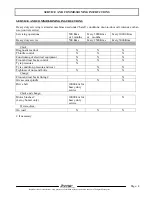
Page 4: ...3 months Every 5000 Kms or months Every 10000 Kms Heavy duty service 500 Kms Every 2500 Kms Every 5000 Kms Check Diagnostic readout X X X Throttle control X X X Functioning of electrical equipment X X X Front and rear brake control X X X Tyre pressures X Tyre condition pressure and wear X X Tightness of nuts and bolts X X X Change Front and rear brake lining X Grease cam spindle X X Drive belt 100...

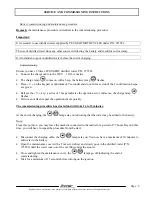
Page 5: ... and do not release it until the 2 confirmation beeps are given Release the V key a series of 3 beeps indicates the operation is to commence the charge lamp flashes If it does not flash repeat the operations more quickly The commissioning procedure has started and will take 1à to 15 minutes At the end of charging the lamps stay on indicating that the water may be added to the battery Note From thi...

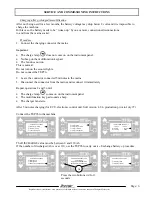
Page 6: ...es to the mains 3 Disconnect the connector from the mains and reconnect it immediately Repeat operations 2 and 3 until The charge lamp comes on on the instrument panel The multifunction key pad sounds a beep The charger fan starts After 5 minutes charging for ECU electronic control unit Soft version 4 2 4 production prior to July 97 Connect the TEP96 to the machine The DISCHARGE value must be betw...

Page 7: ...er Check the wheel nuts are tight Front wheel 6 m daN Rear wheel 10 m daN Check all nuts and bolts are tight Check brake adjustment and efficiency Check the tyre pressures cold Front wheel 2 5 bar Rear wheel 2 5 bar Check operation of the lights flashers road and pedestrian horn and brake light Check operation of the various instrument panel lamps Check the power reserve Carry out a road test ...

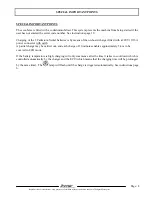
Page 8: ...he 3 Cadmium Nickel batteries is by means of the on board charger fitted with a 220V 10 16A power connector with earth A partial charge may be carried out and each charge of 10 minutes enables approximately 5 km to be covered in ECO mode If the battery temperature is high charging will only commence after the time it takes to cool down which is controlled automatically by the charger and the ECU w...

Page 9: ... m daN Frame Front wheel spindle nut 6 m daN Rear wheel spindle nut 10 m daN arm to frame mounting 4 6 m daN Shock absorber upper mount 4 3 m daN Shock absorber lower mount 2 5 m daN Steering locknut 7 m daN Motor Arm to motor mount 2 3 m daN Battery terminal nut 12 m daN Strap and 200 A fuse 1 2 m daN Brush fixing screws Standard Nut and bolt 5 mm diameter 0 5 m daN Nut and bolt 6mm diameter 1 m ...

Page 10: ...t the written consent of Peugeot Motocycles BODY To remove lower body fairings Step 1 Remove the 4 screws 1 Remove the lower body fairings 2 To remove the footboard Step 2 Remove the 5 screws 1 Remove the footboard 2 To remove the saddle Step 3 Remove the 2 bolts 1 Remove the saddle 2 ...

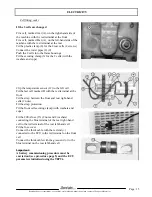
Page 11: ...marked green on the rear left cell Then continue with the positive 2 the thick cable marked red on the front cell This operation must be carried out before any work in order to avoid short circuits Remove the 4 screws 3 and the 2 screws 4 from the lock Unclip the diagnostic plug Raise the saddle cover and pull rearwards 5 it fits at the front in the frame crossmember Disconnect the charging cable ...

Page 12: ... wire 3 connected to the charger fixed to the frame with a plastic tie wrap Remove the 4 self tapping screws 4 2 screws on the frame 2 screws on the support Remove the charger 5 The charger must not be opened Only the manufacturer is authorised to service this component Removal of the 200 Amp fuse Step 6 Remove the lower body fairings see step 1 Remove the footboard see step 2 Remove the saddle se...

Page 13: ...U Release and unclip the 37 pin connector 3 from the ECU Remove the 2 nuts 4 which also secure the charger bracket note fitting position Remove the ECU 5 Check the 37 pin connection is in perfect condition The contacts must be properly aligned The ECU must not be opened Only the manufacturer is authorised to service this component Setting the throttle sensor With the lever 1 in the rest position t...

Page 14: ...king it Remove the front cell securing clamp 3 2 screws 4 Check that the springs and cups are fitted under the clamp Remove the front cell 5 Remove the temperature sensor 6 clip on the rear left cell Remove the rear cells securing clamp 7 Check that the springs and cups are fitted under the clamp Slide the 2 rear cells towards the front of the machine Remove the plastic securing clamp 8 behind the...

Page 15: ... cups Clip the temperature sensor 12 to the left cell Fit the last cell marked D with the red terminal at the front Fit the strap between the front and rear right hand cells 2 nuts Fit the strap protection Fit the front cell securing clamp with washers and cups Fit the 200A fuse 13 2 nuts and 2 washers connecting the blue terminal of the rear right hand cell to the red terminal of the rear left ha...

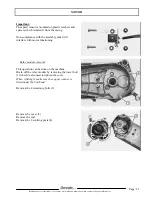
Page 16: ...p 1 Remove the saddle cover see step 2 Disconnect the 3 wires 1 connecting the motor to the ECU Clear these 3 wires away from the frame Remove the right 3 screws and left 4 screws covers Disconnect the 2 pin connector from the speed sensor Disconnect the rear brake control from the brake plate Suspend the machine Remove the shock absorber lower mount Remove the shaft 3 from the power unit ...

Page 17: ...tiffener plate 8 To remove the brushes On Leroy Somer motor only Remove the brush weather protection strap Remove and if necessary change the 4 brushes one y one so that the connecting wires retain their shape and position Note it is essential that the tightening torques of the brushes are complied with xx mN Check there is not contact between the wires connected to the brushes and the motor body ...

Page 18: ...moval of the motor mounting rod and the stand Note the position and remove the motor bracket rod 1 4 nuts and bolts Remove the stand springs 2 Remove the stand to bracket 2 mounting nuts and bolts 3 Remove the stand 4 with its 2 shoulder bushes 5 Note the position of the bushes Remove the stand bracket 6 2 nuts and bolts 7 ...

Page 19: ... remove the transmission system Remove the bolt from the 34 tooth pulley 1 Remove the pulley using 2 6mm bolts 2 Remove the belt 3 Bolt tightening torque 40 5 mN Remove the indexer ring 4 and the 64 tooth pulley 5 The pulley fits both ways round Note how the pulley washers and bush are stacked Bolt tightening torque 40 5 mN ...

Page 20: ... 5 bolts 1 securing the motor to the casing Remove the motor The motor cannot be refurbished Only replacement is possible if necessary To remove the speed sensor Remove the sensor wire securing clamp 1 Remove the speed sensor 3 2 bolts 2 The 2 self tapping screws must be removed wit care in order to avoid breakage and coated with grease when refitting ...

Page 21: ...e casing Non compliance with the assembly order will interfere with motor functioning Relay module removal This operation can be done on the machine Drain off the relay module by removing the lower bolt 1 which is also used to tighten the cover When refitting it make sure the copper washer is fitted under the bolt head Remove the 4 remaining bolts 2 Remove the cover 3 Remove the seal Remove the 2 ...

Page 22: ...MOTOR Page 22 Reproductions or translations even partial are forbidden without the written consent of Peugeot Motocycles Remove the 2 shafts 5 from the relay module ...

Page 23: ... translations even partial are forbidden without the written consent of Peugeot Motocycles MISCELLANEOUS OPERATIONS Keypad removal Remove the headlight fairing 5 screws 1 Remove the fairing 2 Remove the 2 screws 3 from the keypad 4 Remove the keypad 4 ...

Page 24: ...11 754720 00 For reasons of continuous improvement Peugeot Motocycles reserves the right to modify delete or add any part number quoted DC PS ATR printed in EU 07 2001 photos non contractual www peugeot motocycles com ...

Reviews: