background image


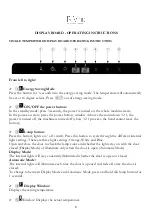
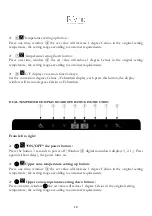
TURNING ON YOUR WINE COOLER 


Plug in and switch on the unit by pressing the power button 

for a few seconds.


When you use the wine cooler for the first time (or restart the wine cooler after having it shut off for a long 

period), there will be a few degrees variance between the temperature you have selected and the one indicated 

on the LED display. This is normal and it is due to the length of the activation time. Once the wine cooler is 

running for a few hours everything will stabilize. 


Important: If the unit is unplugged, power is lost, or turned off, wait 3 to 5 minutes before restarting the 

unit. The wine cooler will not start if you attempt to restart before this time delay. 


OPERATING NOISES 


The noise level is very low. Both the compressor and the fan has a very low noise level during normal operation. 

The compressor can run at different speeds. This saves energy. Higher compressor speed is used to increase the 

cooling capacity, for example at initial switch on, the thermostat’s set point is lowered, or if the door has been 
open. When the correct temperature is reached or wine bottles are cooled the compressor will again run at 

reduced speed and have a very low noise level. During start-up, the compressor will always run with maximum 

speed. This provides a higher level of noise until the set temperature has been reached. 

To obtain the desired temperature settings, this wine cooler, like all wine coolers operating with compressors 
and fans, may produce the following types of noises. 

The noises are normal and may occur as follows: 

Gurgling and hissing sound - caused by the refrigerant flowing through the appliance’s pipes and nozzles. 

Cracking/popping sounds - resulting from the contraction and expansion of the refrigerant gas to produce cold. 
Fan operating sound - to circulate the air inside the wine cooler. 

Opening door alarm: If the door opening more than 5 minutes, the display panel will show “0000”,and the wine 

cooler will have ”DIDI” sound. 


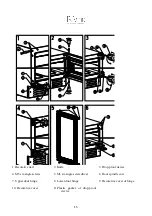
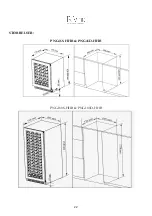
LOADING YOUR WINE COOLER 

 
You may load your wine bottles in single or double rows while taking the following into consideration: If you do 

not have enough bottles to fill your wine cooler entirely, it is better to distribute the load evenly throughout the 

wine cooler so as to avoid “all on top” or “all below” type loads. 

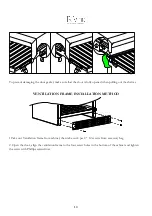
You can remove or relocate adjustable wooden shelves to accommodate larger type of bottles or increase the 
capacity of the cabinet by stacking the bottles up when necessary. (See: Removing shelves) 

Keep smalls gap between the interior walls and the bottles to allow air circulation. Like an underground cellar air 

circulation is important to prevent mould and for a better homogeneous temperature within the cellar. 


Do not overload your wine cooler. 

Summary of Contents for PNG180D-HHB

Page 1: ...1 WINE COOLER USER GUIDE PeVino PNG46S HHB PeVino PNG180S HHB PeVino PNG46D HHB PeVino PNG180D HHB Dansk version side 18 www pevino com ...

Page 2: ...ged it must be replaced by the manufacturer s service agent or a similarly qualified person in order to avoid a hazard This wine cooler is only for storage of wine If you choose to built in your wine cooler please note it cannot stand on a heated surface f inst heated flooring as this will affect the cooling function DANGER WARNING Discarded or abandoned appliances are dangerous Even if they will ...

Page 3: ...ent temperatures may also cause the unit not to perform properly Avoid locating the unit in moist areas Plug the wine cooler into a properly installed wall outlet Any questions concerning power should be directed toward a certified electrician or an authorized products service center Pay attention to this Store wine in sealed bottles Do not overload the wine cooler Do not open door unless needed D...

Page 4: ...tive electronic components which are susceptible to damage through lightning and electricity supply faults It is therefore advised to use a power surge protector to avoid problems of this nature In warm climate zones an air vent or grid with a minimum ventilation size of 200mm x 50mm MUST be cut out at the rear top of the back cabinet or at the top of either side of the cabinet allowing cool fresh...

Page 5: ...ng or to be installed inside a cabinet The cabinet must be with good ventilation space and no back panel otherwise it will affect the wine cooler s ability to function normally Please follow the installation diagram PNG46S HHB PNG46D HHB PNG180S HHB PNG180D HHB ...

Page 6: ...6 DOOR OPENING ANGLE AND DIMENSIONS PNG46S HHB PNG46D HHB PNG180S HHB PNG180D HHB ...

Page 7: ...provides a higher level of noise until the set temperature has been reached To obtain the desired temperature settings this wine cooler like all wine coolers operating with compressors and fans may produce the following types of noises The noises are normal and may occur as follows Gurgling and hissing sound caused by the refrigerant flowing through the appliance s pipes and nozzles Cracking poppi...

Page 8: ...he setting is modified and or whenever a large number of bottles are added to the cellar TEMPERATURE SETTINGS Important The LED display indicates by default the actual internal air temperature The electrical circuit board of all models comes with memory function All settings will return to the pre set temperature after power is restored NOTICE It is important to understand that there is a differen...

Page 9: ...e the button Ø Lamp button Press the button lights on off switch Press this button to cycle through the different internal light settings There are three light settings Orange White and Blue Open and close the door to check the lamp color and whether the lights stay on with the door closed Display Mode or illuminate only when the door is open Automatic Mode Display Mode The internal lights will st...

Page 10: ... button the display window will be into degrees Celsius or Fahrenheit DUAL TEMPERTURE DISPLAY BOARD OPERATING INSTRUCTION From left to right Ø ON OFF the power button Press the button 3 seconds to power off Window digital countdown displays 3 2 1 Press again without delay the power turns on Ø Upper zone temperature setting up button Press one time window the set value will increase 1 degree Celsiu...

Page 11: ...through the different internal light settings There are three light settings Orang White and Blue Open and close the door to check the lamp color and whether the lights stay on with the door closed Display Mode or illuminate only when the door is open Automatic Mode Display Mode The internal lights will stay constantly illuminated whether the door is open or closed Automatic Mode The internal ligh...

Page 12: ... located at the back of the wine cooler next to the compressor The heat is transferred from the compressor and evaporates any condensation that has collected in the container The wine cooler is equipped with a double glazed door that has a third internal acrylic layer to minimize condensation on the glass door The wine cooler is not totally sealed fresh air admission is permitted through the drain...

Page 13: ... out the shelves VENTILATION FRAME INSTALLATION METHOD 1 Take out Ventilation frame from cabinet then take out 4 pcs 4 12 screws from accessory bag 2 Open the door align the ventilation frame to the four screw holes in the bottom of the cabinet and tighten the screw with Phillips screwdriver ...

Page 14: ...the drop proof device Drawing 1 4 Hold the door use six angle screwdriver Tool 5 to screw out the door shaft core 6 from the two ends of the top of the door Take out the door and set aside Drawing 2 5 Discharge the upper and lower door hinge 7 8 by M5 inner six angle screwdriver Tool 5 then to assemble the door hinge on the opposite side Drawing 3 and 4 6 Remove the decorative cover 9 10 and Plast...

Page 15: ... 2 Knife 3 Drop proof device 4 M5 six angle screws 5 M5 six angle screwdriver 6 Door spindle core 7 Upper door hinge 8 Lower door hinge 9 Decorative cover of hinge 10 Decorative cover 11 Plastic gasket of drop proof device ...

Page 16: ...intervention on the electrical must should be performed by a qualified electrician Notes Any intervention performed by a non authorized person may lead to the warranty being annulled and void POWER FAILURES In the event of a power interruption all previous temperature settings are automatically preserved and the system will revert to a pre set temperature setting Most power failures are corrected ...

Page 17: ... opened too often Door is not closed completely Temperature control is not set correctly Door gasket does not seal properly The light does not work Not plugged in Current circuit breaker RCD activated or the fuse is broken Bulb is out of order The light button is OFF Vibrations Check to assure that the wine cooler is level The wine cooler seems to make too much noise The rattling noise may come fr...

Page 18: ...18 VINKØLESKAB BRUGSANVISNING PeVino PNG46S HHB PeVino PNG180S HHB PeVino PNG46D HHB PeVino PNG180D HHB www pevino com ...

Page 19: ...adiget skal den udskiftes af producenten eller en autoriseret elinstallatør Dette vinkøleskab er kun beregnet til opbevaring af vin Hvis de vælger at indbygge vinkøleskabet må det ikke stå på en opvarmet flade f eks gulvvarme da dette vil ødelægge køle evnen ADVARSEL IKKE børnevenligt Kasserede eller efterladte apparater kan være farlige for børn og du bør derfor bortskaffe det forsvarligt efter e...

Page 20: ...de temperaturer kan også forårsage at enheden ikke virker ordentligt Undgå at placere enheden i fugtige områder Tilslut vinkøleskabet til en stikkontakt Ethvert spørgsmål angående el bør rettes til en autoriseret elinstallatør Vær opmærksom på følgende Opbevar vin i lukkede flasker Overbelast ikke skabet Åbn ikke døren medmindre det er nødvendigt Tildæk ikke hylder med aluminiumfolie eller andre h...

Page 21: ...ationsstørrelse på 200 mm x 50 mm skæres ud på bagsiden af kabinettet eller øverst i hver side af kabinettet Dette sikrer tilgang af frisk luft ind til det 30 mm dybe mellemrum bag på kabinettet Denne luftudluftning eller gitter må ikke være åben mod samme side som andre apparater som ovne eller lignende Der må heller ikke åbnes mod et område der er uden adgang til frisk kølig luft HUSK Vinkøleska...

Page 22: ...22 STØRRELSER PNG46S HHB PNG46D HHB PNG180S HHB PNG180D HHB ...

Page 23: ...23 DØRÅBNING VINKEL OG DIMENSIONER PNG46S HHB PNG46D HHB PNG180S HHB PNG180D HHB ...

Page 24: ...simal hastighed Dette giver et højere støjniveau indtil den indstillede temperatur er nået For at opnå de ønskede temperaturindstillinger kan dette vinkøleskab som alle vinkøleskabe der kører med kompressorer og ventilatorer producere følgende typer lyde Lyde er normale og kan forekomme som følger Klukkende og hvæsende lyd forårsaget af kølemidlet der strømmer gennem systemets rør og dyser Knirken...

Page 25: ...det sker når indstillingen ændres og eller når der fyldes et stort antal flasker i vinkøleskabet INDSTILLLING AF TEMPERATUR Vigtigt LED displayet angiver som standard den faktiske lufttemperatur inde i skabet Printkortet på alle modeller kommer med hukommelsesfunktion Alle indstillinger vender tilbage til den forindstillede temperatur når strømmen er genoprettet BEMÆRK Det er vigtigt at forstå at ...

Page 26: ...slukke lyset Tryk flere gange på knappen for at indstille farven på lyset Der er 3 farver Orange Hvid og Blå Tryk yderligere i ca 1 sekund for styre lysets Tænd sluk funktion når døren lukkes Ẵben og luk døren for at se om lyset er tændt eller slukket med døren lukket Display vindue Displayet viser den indstillede temperatur Vindue Viser den faktiske temperatur Temperatur indstillings knap Tryk en...

Page 27: ... Viser temperaturen i øverste zone Vindue Viser temperaturen i nederste zone Nederste zone temperature indstillings knap Tryk en gang og vindue 5 vil vise indstilling stige med 1 grad celsius indstil i h t Deres ønske Nederste zone temperature indstillings knap Tryk en gang og vindue 5 vil vise indstillingen med 1 grad celsius lavere temperature i h t Deres ønske Lys knap Tryk på knappen for at tæ...

Page 28: ...i en afløbsbeholder som er placeret på bagsiden af vinkøleskabet ved siden af kompressoren Varmen overføres fra kompressoren og fordamper eventuel kondens som er opsamlet i beholderen Vinkøleskabet er udstyret med en dobbeltglasdør der har et tredje indre akryllag for at minimere kondens på glasdøren Vinkøleskabet er ikke fuldstændigt forseglet friskluft adgang sker gennem afløbsrøret Luft cirkule...

Page 29: ...um 2 benyt en lille kniv 2 til af fjerne hul propperne 1 tegning 1 3 Brug en skruetrækker nr 5 til fjerne skruerne 4 fra støtte beslaget 3 fjerne nu støtte beslaget tegning 1 4 Hold døren medens skruerne til hængslerne fjernes fra døren 6 og fjern nu døren tegning 2 5 Løsn det øverste og nederste hængsel 7 8 med en skruetækker og monter nu begge hængsler I modsatte side 6 Fjern hul propperne 9 10 ...

Page 30: ...30 1 hulpropper 2 kniv 3 Dørstøtte 4 Skruer 5 Skruetrækker 6 Dør hængsel 7 Øverste dørhængsel 8 Nederste dørhængsel 9 Dørhængsel dæksel 10 dæksel 11 Plastik dæksel ...

Page 31: ...ke system udføres af en autoriseret elektriker Bemærk Al arbejde udført af ikke autoriserede personer kan resultere i at garantien bortfalder STRØMAFBRYDELSE OG FORSTYRRELSER I tilfælde af strømafbrydelse bevares alle tidligere temperaturindstillinger automatisk og systemet vender tilbage til en forudindstillet temperaturindstilling De fleste strømfejl korrigeres inden for en kort periode Tab af s...

Page 32: ... ikke indstillet korrekt Lyset virker ikke Ikke tilsluttet strøm Vinkøleskabet er slukket HFI relæet er slået fra eller sikringen er gået Lyskilden er i stykker Lyset er slukket på displayet Vibrationer Sørg for at vinkøleskabet står i perfekt lod og vater Vinkøleskabet ser ud til at støje for meget Den raslende lyd kan skyldes cirkuleringen af kølegas hvilket er helt normal Ved slutningen af hver...

Reviews: