background image

E

Mounting

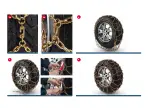
Spread out the chains in front of or behind the tires with the 
tension lever, depositing spring and tension chain looking 
outwards. Put the mounting rope transversely on the middle top 
of the tire. Hook the traction chain into the mounting hooks. 

For mounting without mounting rope, hold the traction chain 
by the inside chain, raise the chain, push it backwards and 
distribute it uniformly on the tire.

Slowly drive approx. a full turn of the wheel (1/4 when mounting 
without mounting rope). In this process, the chain will fit on the 
tire. Loose the tracton chain by unhooking the rings or mounting 
hooks. Remove the mounting rope. 

Close the side chains – start with the inner side of the wheel, 
then continue with the outer side of the wheel and finally hook 
the ends of the chains on the tread (3a). 

Attention:

 Make sure that the chain legs are not twisted.

Tighten the tension chain on the outer side of the wheel and 
hook the tension lever into the closest link of the tension chain. 
Secure the tension lever with the link.

Hang the loose chain end with depositing spring into the side 
chain.

Demounting

See picture:

Unhook the depositing spring.

Open the tension lever, loose the tension chain.

Open the locking hooks (start with the inner side of the 
wheel). Take off the chains.

Maintenance

After each use, make sure that the chains are dried quickly. 
Clean dirty chains with hot water and dry them. Highly corroded 
chains are to be re-galvanized.

Regular inspections of the chain state

Turn round the chains when the material of one side of the chain 
link is worn by 1/3 of the material cross-section.

1

1a

2

3-4

5

6

5

4

3

Please read the vehicle manufacturer’s manual and 
enclosed precaution instructions carefully.
Subject to technical modifications and colour changes. 

Summary of Contents for 24797

Page 1: ...Mounting instruction offroad extreme ...

Page 2: ...1 1a 2 3 ...

Page 3: ...3a 4 5 6 3b ...

Page 4: ... la plus profonde et sur les sommets les plus hauts La bande de roulement dense n offre pas seulement du grip parfait mais aussi de la stabilité de routé et une longue durée de vie pewag offroad extreme vás jistě přivede do nejhlubšího lesa a na nejvyšší vrcholky hor Hustá řetězová síť zajišťuje nejen perfektní záběr ale zároveň klidnou a pohodovou jízdu a dlouhou životnost Dzięki łańcuchom pewag ...

Page 5: ...eite und zuletzt die Kettenenden auf der Reifenlauffläche einhängen 3a Nach dem Einhängen prüfen Kettenstränge dürfen nicht verdreht sein Auf der Radaußenseite Spannkette anziehen und den Spannhebel in das nächste erreichbare Glied der Spannkette einführen Spannhebel mit Glied sichern Freies Kettenende mit Verwahrungsfeder in Seitenkette verwahren Demontage der Gleitschutzkette Siehe Bild Verwahru...

Page 6: ...ns on the tread 3a Attention Make sure that the chain legs are not twisted Tighten the tension chain on the outer side of the wheel and hook the tension lever into the closest link of the tension chain Secure the tension lever with the link Hang the loose chain end with depositing spring into the side chain Demounting See picture Unhook the depositing spring Open the tension lever loose the tensio...

Page 7: ...rollare che la catena non si fosse stravolta Tensionare la catena di tensione sul lato esterno della ruota ed inserire la leva di tensione nella maglia più vicina della catena di tensione Assicurare la leva di tensione con l anello La fine della catena libera con la moela di deposito inserire nella catena laterale Smontaggio Vedi foto Sganciare la molla di deposito Aprire la leva di tensione allen...

Page 8: ...a chaîne contrôler que la chaîne et les maillons ne sont pas vrillés Tendre la chaîne de tension sur le côté extérieur de la roue et introduire le levier de tension dans le premier maillon accessible de la chaîne de tension Fixer le levier de tension avec l anneau Gardez la fin de la chaîne libre et le ressort de fixation dans la chaîne latérale Démontage des chaînes antidérapantes Voir photo Décr...

Page 9: ...vé řetězové prameny překrouceny Na venkovní straně kola napnout napínací řetěz a zavléci napínací páku do nejbližšího volného článku napínacího řetězu Zajistit napínací páku kroužkem Volný konec omotat kolem venkovního bočního řetězu Umístit volný konec řetězu s zajišťovací pružinou do bočního řetězu Demontáž protismykových řetězů Viz obrázek Vyvěsit zajišťovací pružinu Rozevřít napínací páku uvol...

Page 10: ...rznej stronie koła Przełóż dźwignię przez ogniwo łańcucha napinającego Zabezpiecz dźwignię pierścieniem Zaczep luźny koniec łańcucha zakończony sprężyną napinającą za ogniwo łańcucha bocznego Demontaż łańcuchów antypoślizgowych Patrz zdjęcie Odczep sprężynę napinającą Rozepnij dźwignię napinającą poluzuj łańcuch napinający Rozepnij łańcuchy boczne zacznij po wewnętrznej stronie koła Ściągnij łańcu...

Page 11: ...a Внимание Проверьте пожалуйста чтобы звенья цепи не были перекручены На наружной стороне колеса подтянуть натяжную цепь и ввести натяжной рычаг в ближайшее звено натяжной цепи до которого можно дотянуться Натяжной рычаг зафиксировать кольцом Свободный конец цепи зафиксировать на боковой цепи Демонтаж Смотрите рисунок Снять натяжную пружину Открыть натяжной рычаг ослабить натяжную цепь Открыть зам...

Page 12: ...Schneeketten GmbH A 9371 Brückl Kettenwerk 1 Phone 43 505011 0 Fax 43 505011 100 schneeketten pewag com www pewag com MA 00606 www pewag com issuu pewag com Find us on Facebook facebook pewag com youtube pewag com ...

Reviews: