E
E
11
10
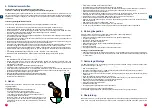
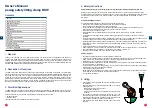
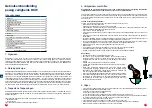
• Check that the teeth of the cam are free from dirt and if necessary clean with a wire brush
• Remove any grease, dirt and mill scale from the beam at the site of the lifting clamp
• Use the lever to open the clamp
• Place the jaws as far as they will go over the beam, making sure that the clamp is positioned so as to balance the
load when it is being lifted
• Make sure that the lifting shackle is facing towards the centre of the beam or structure
• Close the clamp by fully turning the lever back
• Lift gently to allow the lifting force to be applied; check whether the clamp is slipping
• If the load is slipping, read through this chapter on Lifting again
• If the load continues to slip, read the following Chapter 6 – Maintenance
• Make sure that the load is in a stable position, before taking the clamp off the plate
6. Maintenance
The clamp is to be checked once a month (see Disassembling/Assembling).
Stop using the clamp if:
• The body is split or deformed, particularly in the corners of the jaws
• The lifting shackle is visibly deformed
• The cam and/or pivot teeth are no longer sharp
• The spring has become stretched or broken
• The lever locking mechanism has become inefficient or has ceased to work
• The spindles have been visibly deformed
• Any retaining pins are missing
• The side of the lifting shackle is pressed in at the spacer pins
Depending on the defects noted:
• Dismantle and clean the beam lifting clamp (see Chapter 7 – Disassembling/Assembling) or have the clamp
overhauled by pewag austria GmbH or by an authorised mechanical repair centre (see Chapter 8 – Overhaul)
7. Disassembling/Assembling
The safety beam lifting clamp can be easily disassembled for cleaning and inspection purposes – see construction
drawing on page 22.
• Open the clamp to its full extent
• Remove the tension spring (13); in case of the type 1,5 BKW, first remove the retaining pin (11) in the cam assembling (4)
• Remove the retaining pin and the cam pin (8)
• Remove the lifting shackle (3) and the cam assembling
• Remove the shackle pin (2)
• Dismantle the lever (5) by removing the retaining pin and take the lock assembling (7) out of the clamp
• Remove the pivots (6) using a socket and ring spanner
• Clean all parts with a standard degreasant
• Grease all shackle pins with a bearing grease
• Oil the spring if necessary
• Assemble all the parts in reverse sequence
• Always insert new and original retaining pins and do so with the aid of a hammer, combination pliers and pin punch
• Always fit new pivot bolts and nuts
• When replacing parts always make sure to use original pewag components
• Remove any burr with a file
8. Overhaul
At least once (1x) a year required by law or in case of any damage to the BKW safety beam lifting clamp, the clamp
should be inspected, tested and if necessary overhauled by pewag austria GmbH or by an authorised mechanical
repair centre.
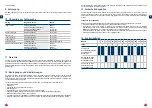
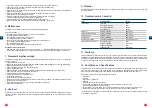
Fault
Possible Cause
Action
Load slipping
Load dirty
Pivot and/or cam dirty
Pivot and/or cam blunt
Jaws bent open
Clean
Clean
Replace
Replace
Body bent
Clamp overloaded
Reject clamp
Lifting shackle oval shape
Clamp overloaded
Reject clamp
Spring defective
Spring worn out
Reject spring
Spindles bent
Clamp overloaded
Reject clamp
Retaining pins missing
Incorrectly assembled
Fit new retaining pins
Clamp difficult to open/close
Key way slot dirty
Clamp overloaded
Clamp contaminated
Clamp worn out
Clean
Reject clamp
Clean
Reject clamp
9. Disposal
Provided that the BKW safety beam lifting clamp is rendered unfit for further use, it may be disposed of, in line with
the local guidelines.
10. Troubleshooter’s Checklist
11. Warranty
pewag austria GmbH provides end users with a 5 year warranty on its lifting clamps. This warranty is applicable to the
original end user of the lifting clamps. Only if the clamp has been inspected, checked and maintained in line with the
manufacturer's and distributor's instructions during the entire warranty period. This warranty period of 5 years is valid
from the day of purchase, and is subject to all conditions and specifications stated in this document.
12. Conditions and Specifications
This warranty only covers faults which are due to production errors and occur during normal use. The warranty covers
no wear to components such as pivots, cam assemblies, lock springs etc. Should there be any kind of failure within
this warranty period, the lifting clamp will be replaced or repaired following assessment by the producer.
No warranty is given to clamps with faults due to the following:
• Normal wear
• Overload
• Wrong and/or careless use
• Damages
• Not following procedures and measures
• Hoisting differing material other than indicated on clamp or stated in the user's manual
• Adapting and/or modifying of the pewag clamp
• The incompetent use of the clamp, and not following all indications which are stated in the users manual
• When maintenance and/or revision has not been carried out by an authorised pewag distributor
The producer is not responsible for incidental damage or damage due to incorrect use of the lifting clamps as well as
from violation of this manual.


