4
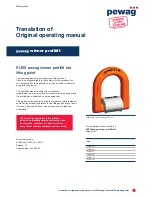
Translation of original operating manual for PLEW pewag winner profilift eta lifting point
February 2018
3.1 General
• Mounting must only be carried out by persons who have
received instructions on the safe use of the product and
who have the required knowledge and skills for the task.
• Choose lifting points that are sufficiently large based on
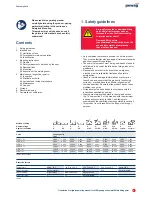
load capacities table 1, depending on the size of your load
and the arrangement of the lifting points.
• The material of the object to which the lifting points are
weld-on, must be able to absorb the applied forces without
deformations (safety evidence).
• Choose the layout of the lifting points in a way that ensures
the symmetrical distribution of the load and positions the
centre of gravity underneath the lifting point(s).
When choosing the position of the lifting points, make sure
to avoid incorrect loading, for instance if:
- There is no possibility to align in the pull direction.
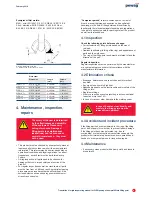
- The pull direction is not in the specified area acc. to fig. 1.
• Always check whether any limitations of use apply.
• Mount the lifting points in such a way that they may
be reached with ease and without obstructions when
attaching/removing the connection element. Also make
sure that the lifting points are affixed in such a way that no
dangerous areas are produced that may endanger the user
or prevent correct use (bruising, shearing, trapping
or bumping).
• Only original pewag parts may be used – recognisable by
the stamping (Manufacturer, Batch number, ...).
• The delivery condition may not be changed.
The delivery condition may not be changed. It is not
permitted to perform mechanical machining, heat and/or
surface treatments with material-damaging effects
(e.g. electro galvanised).
• Always refer to the user manual and mounting instructions
for the lifting points used and, where applicable, also for
the load to be lifted.
• Only use non-defective lifting points
• Used lifting points must be checked according to the
maintenance instructions prior to each use
(section 4.1 and 4.2).
• Ensure prior to each use that the lifting point has been
attached correctly and that it is in a flawless condition.
• The attached lifting device (e.g. hook) must be free to
move within the ring.
• Keep the lifting points clean and dry.
3.2 Safety measures to be taken
by the user
Please refer to the limitations of use and the maximum
capacity of the lifting points used. Always wear protective
gloves when attaching the lifting device.
Align the lifting point in the expected direction of pull and
leave the hazard area before the load is lifted.
Keep a sufficient safety distance during
the lifting of the load and ensure that
the load has been fully lowered to a
stable position before removing the
lifting device. Do not overlad lifting
points. A falling load may cause injury
and/or death!
3.3 Residual risks
Overloading by not respecting the maximum load capacities
or due to undue environmental influences (temperature, etc.).
Wrong adjustment of the lifting points can also lead to failing,
as can the use of non-authorised or damaged parts of the
attached lifting device.
3.4 Mounting
• Persons welding this product have to be in possession
of a valid qualification acc. to EN 287 or EN ISO 9606-1.
Basically, the local mandatory regulations of the respective
country apply (For USA: Welder is to be qualified acc. to
AWS American Welding Society and/or ASME American
Society of Mechanical Engineers).
• The surface of the part to be welded has to be thoroughly
cleaned before starting to weld. Damp, dirt, oil, color,
tinder, etc. have to be removed.
• The verification of the basis material suitability for welding
(counter part of the lifting point), the analytical and strength
equivalence of the basis material to the pewag part and the
degree of safety of the whole device is the responsibility of
the welding company.
• Material of weld on block: S355J2.
• The part on which the lifting point will be welded must be
able to resist the load and load application on the
desired place.
• After welding, the weld-on block and the welding seam
should be protected against corrosion (e.g. by varnishing).
3.5 Execution of the welding seam
• Select the pre-heating and the interpass temperature as well
as the build-up sequence in accordance with the material
thickness and the grade of the basic material.
• The root seam must be cleaned carefully prior to adding
more subsequent weld runs and the final run.
• The nubs on the weld-on bracket determine the gap for the
root seam and must not be removed.
• Ensure that the weld metal does not touch the orange ring/
the metal spring. After welding, the ring must be rotatable by
180° without jamming.
• The weld metal must be placed in such a way as to cover the
entire cross-section of the welding seam.


