4
Original Operating Instructions for pewag winner PLGW-PSA Fall protection anchorage eye bolts
January 2019
3.2 Safety measures to be taken
by the user
Please refer to the operational limitations and the maximum
number of permitted person according to table 1. Make
sure that no unauthorised persons have access to the
anchorage system during the entire duration of operation.
Make sure that there is no danger of
falling before removing the anchorage
system.
3.3 Residual Risks
Overloading by not respecting the maximum number
of persons or due to undue environmental influences
(temperature etc.). Wrong adjustment of connecting
elements can also lead to the failing of the anchorage
points, as well as using unauthorised or damaged body
harness’ parts (ropes, fall-impact-absorbers, tether).
3.4 Mounting
• The mounting surface must be even and have a
minimum diameter of the width of the anchorage point.
The thread hole should be in the middle and at a right
angle with enough depth so that the screw can be fully
screwed in (by bind holes).
• Before screwing, check the thread hole for damages or
contamination.
• The minimum screw length is as follows:
1 x M in steel
1,5 x M in cast steel
(M = thread size, e.g. M20 = 20 mm)
3.4.1 PLGW-PSA „Supreme“ with latches
• The anchorage point PLGW-PSA has an easy system
for tool-less mounting.
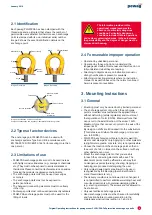
• To screw in the anchorage point, fold the latches up
so that they completely lie flat on the side of the screw
(position A – see image 3). The latches are held in
position using a spring.
• Screw the anchorage point into the anchorage system
until the underside lies completely flat.
• Tighten the anchorage point by hand.
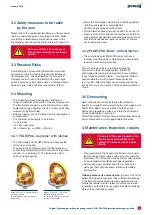
• Fold the latches back down into position ‚B‘ as seen in
image 4. Even in this position the latches are held by a
spring. Before hanging the connecting elements, make
sure that the latches are really in position ‚B‘ and are
not touching the screw.
3.4.2 PLGW-PSA „Basic“ without latches
• The anchorage point PLGW-PSA does not have a
tool-less mounting system. Screwing and unscrewing
requires a commercial Allen key.
If the anchorage point is to remain permanently
connected to the anchorage system, tighten the
anchorage point using the appropriate tool and tighten
to the torque specified in table 1, securing the thread if
needed (vibrations) with a liquid thread protection
(e.g. Loctite). After mounting, avoid improper stress by
turning the ring to the direction of the expected direction
of pull.
3.5 Demounting
Demounting is carried out by folding the latches to
position A (image 3) and unscrewing the anchorage point.
PLGW-PSA “Basic” version without the latches, the
demounting requires an Allen key. Store the anchorage
point as highlighted in section 5.
Protect the thread of the anchorage system from damage
and contamination by using appropriate measures.
4. Maintenance, inspection, repairs
The safety of the user is based on the
effectiveness and durability of the
equipment. Please carry out regular
checks.
• This product must be checked by trained personnel at
least annually in accordance with all the manufacturer
information. The time period can be shorter with regards
to the operational conditions and legal regulations.
• During inspection, all parts need to be checked for
damages that could negatively influence the safety
and function.
Trained personnel is someone who,
in view of his or her
expert training and experience, has sufficient knowledge
in the field of personal fall protection equipment and is
sufficiently familiar with the relevant norms and national
regulations so that he/she can judge the safe-for-working
state of the product being used.
Image 3: Position ‚A‘ – both latches are
touching the screw.
Only permitted during mounting and
demounting.
Image 4: Position ‚B‘ – none of the
latches is touching the screw.
The anchoring point is only ready to
be used in this position.

