33
32
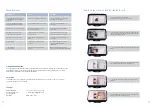
CLEAN THE NAVIGATION CAMERA
CAUTION: If the lens is soiled, DO NOT touch the lens.
NOTES
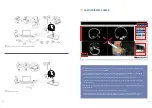
1. Remove debris from the navigation camera using a facility vacuum source.
2. Wipe the surface of the navigation camera body and cable with a soft cloth dampened with water.
3. Dip a cotton swab into a lens cleaning fluid and softly wipe the lens. Make sure all the debris is removed from
the lens surface.
4. When the cleaning fluid has evaporated, use a lens cleaning tissue to softly wipe the lens. Wipe from the center
of the lens to the edge of the lens in a counterclockwise direction.
PERIODIC MAINTENANCE
CLEANING
!
Warnings
:
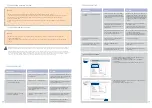
Upon initial receipt and before each use, operate the equipment and inspect each component for damage. DO
NOT use any component if damage is apparent.
Perform recommended maintenance as indicated in these instructions. Only trained and experienced healthcare
professionals should maintain this equipment.
DO NOT service this equipment. If you require service, contact your PHACON sales representative.
NOTE: If any component must be discarded and replaced, see the
Disposal/ Recycle
section and the Accessory
Information section.
CLEAN THE HEAD
NOTES
• Make sure the Patient has been removed from the head and the head has been removed from the tray.
• Thoroughly remove all debris from the Patient lever to make sure the lever has complete freedom of movement.
Failure to comply may prevent the proper installation of the temporal bone insert into the bone cavity
during set up.
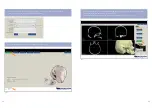
1. Remove loose debris from the surface of the head, including the mounting plate, cables, and suction port
using an external vacuum source.
2 . Carefully remove all debris from the risk structure contact pins of the head using a dry brush and an external
vacuum source.
3. While articulating the Patient lever, remove all debris from around the lever using a dry brush and an
external vacuum source. Make sure the lever has complete freedom of movement.
4 . Remove all debris from the spillways within the head using a dry brush and an external vacuum source.
Make sure the spillways are clear to allow water to low freely during the use of irrigation.
5 . Wipe all the surfaces of the head, including the contact pins, insert lever, and spillways with a soft cloth wet
with water.
See the
Cleaning
section.
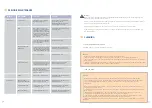
Lens is covered by debris.
Navigation Camera with
Thumb Screw
Replace the camera or thumb screw.
See the
Accessory Information
section.
Surface is cracked or broken. Lens is
scratched. USB cable or USB exten-
sion cable insulation is cut or frayed.
Thumb screw is damaged or missing.
See the
Cleaning
section.
Contact pins are covered with debris.
T-Bone insert lever is soiled and/or
does not move freely.
Before each use
Laptop Computer
See the
instructions for use supplied
with the laptop computer
.
Replace the laptop computer. See the
Accessory Information
section.
INTERVAL
COMPONENT
ACTION
CRITERIA
The laptop computer is operating
improperly or is damaged.
Head
Replace the module. See the
Accessory
Information
section.
Model surface, suction port, or
mounting plate is cracked or broken.
Contact pins are bent or broken.
T-Bone insert lever is broken. USB
cable or instrument ground cable in-
sulation is cut or frayed. Ground
cable with magnet or hook-and-loop
tape is damaged.
Head Holder with Tray
Replace the head holder. See the
Accessory Information
section.
Holder surface or ball-joint mounting
plate is cracked or broken. Lever(s)
or lock(s) are broken or damaged.
See the
Cleaning
section.
Ball-joint mounting plate is soiled
and/or does not move freely.
Lever(s) or lock(s) are soiled and/or
do not move freely.
Pointer
Replace the pointer. See the
Accessory
Information
section.
Surface or tip is cracked or broken.
Before each use
Manual Instrument
Tracker with Thumb Screw
Replace the tracker. See the
Accessory
Information
section.
Surface is cracked or broken. Thumb
screw is damaged or missing.
Drill Tracker with O-ring
Replace the tracker or O-ring. See the
Accessory Information
section.
Surface is cracked or broken. O-ring
is damaged or missing.
Electrical Bur Adapter
Replace the electrical bur adapter. See
the
Accessory Information
section.
Adapter is damaged or missing.


