35
34
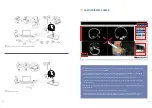
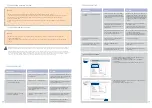
CLEAN THE HEAD HOLDER WITH TRAY
NOTES
1. Remove loose debris from the exterior of the tray using an external vacuum source.
2 . While articulating the ball-joint mount and each lever, remove all debris from the ball-joint mount using a
dry brush and an external vacuum source. Make sure the ball-joint mount and levers have complete
freedom of movement.
3. Wipe all the surfaces of the tray, including the ball-joint mount and each lever, with a soft cloth wet with
water.
CLEAN THE TRAINER ACCESSORIES
NOTES
1. Wipe all the trainer accessories, including the pointer, trackers, cables and electrical bur adapter with a
soft cloth wet with water.
2. After all the trainer components and accessories have been cleaned properly, see the Storage and Handling
section.
!
Warnings
: ALWAYS disconnect the laptop computer from the facility power source before cleaning. See the instructions for use supplied with
the laptop computer. ALWAYS disconnect and remove all system components from the laptop computer before cleaning system components.
Cautions:
ALWAYS clean the surgical instruments after a training session. See the instructions for use and/or care instructions supplied with
the surgical instrument. DO NOT sterilize this training system or any component of the system. DO NOT use solvents, lubricants, or other chem-
icals, unless otherwise specified. DO NOT allow a liquid to run directly into any electrical or mechanical connection or opening. Moisture may
cause corrosion to electrical and/or mechanical components. DO NOT bend any connector pins during cleaning.
The ground cable with magnet is not in-
stalled on the manual instrument body or
is not making contact with the manual in-
strument body.
Make sure the ground cable with magnet
is installed properly.
See the
To Install the Temporal Bone Insert
and Connect Surgical Instruments
section.
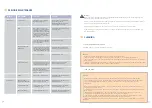
The trainer is not detecting critical risk
structures.
PROBLEM
CAUSE
ACTION
TROUBLESHOOTING
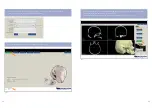
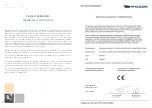
Choose right graphic adapter NVIDIA
1: Open the selection window (context menu) with a right click on your
desktop and choose NVIDIA Control Panel.
2: Select the “Manage 3D settings” in the left column of the NVIDIA
Control Panel.
3: In the Global Settings klick on “High-performance NVIDIA processor”.
4: If the “Apply” button does not appear, please select “High-performance
NVIDIA processor” again.
5: Save settings by click on the “apply” button.
5.
4.
3.
2.
The navigation system is not functioning
or is not functioning properly.
The software application locks up.
The application is experiencing an inter-
nal malfunction.
Press the CTRL/ALT/Delete buttons simultane-
ously to perform a soft reboot. Press the ON/
OFF button to perform a hard reboot.
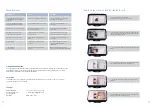
PROBLEM
CAUSE
ACTION
TROUBLESHOOTING
The camera lens is covered with debris.
Clean the camera lens. See the
To Clean the
Navigation Camera
section.
An unobstructed lineof- sight does not
exist between the navigation camera lens
and the tracker.
Make sure the lineof–sight between the
navigation camera lens and the tracker is
unobstructed.
The navigation system is not accurate
based on visual indications.
The pointer, drill, or instrument is out of
calibration.
Recalibrate the pointer, drill, or instrument.
See the
Perform Tool Calibration
section.
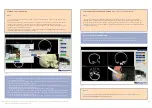
During scrolling through the CT-images,
always the same area is shown.
The view mode ENDOSCOPIC is
enabled.
Change to the Classic mode in the view
panel options.
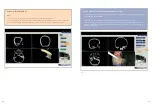
The virtual 3-D model has a delayed
reaction.
The notebook is accu driven. The power
supply is not connected.
Connect the power supply.
An instrument tracker is in the line-of-sight
of the camera in the classic mode.
Remove the tracker from the line-of-sight
of the camera.
The electrical bur adapter is not installed
on the drill attachment or the bur adapter
is damaged and not making contact with the
cutting accessory.
Make sure the electrical bur adapter is in-
stalled properly. See the
To Install the Tempo-
ral Bone Insert and Connect Surgical Instru-
ments
section. Replace the adapter if damage
is apparent. See the
Accessory Information
section.
The ground cable with hook-and-loop tape
is not installed on the drill body or is not
making contact with the drill body.
Make sure the ground cable with hook-and-
loop tape is installed properly.
See the
To Install the Temporal Bone Insert
and Connect Surgical Instruments
section.
The temporal bone insert is out of cali-
bration.
Recalibrate the bone insert. See the
To
Perform T-Bone Calibration
section.


