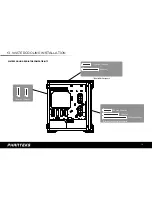
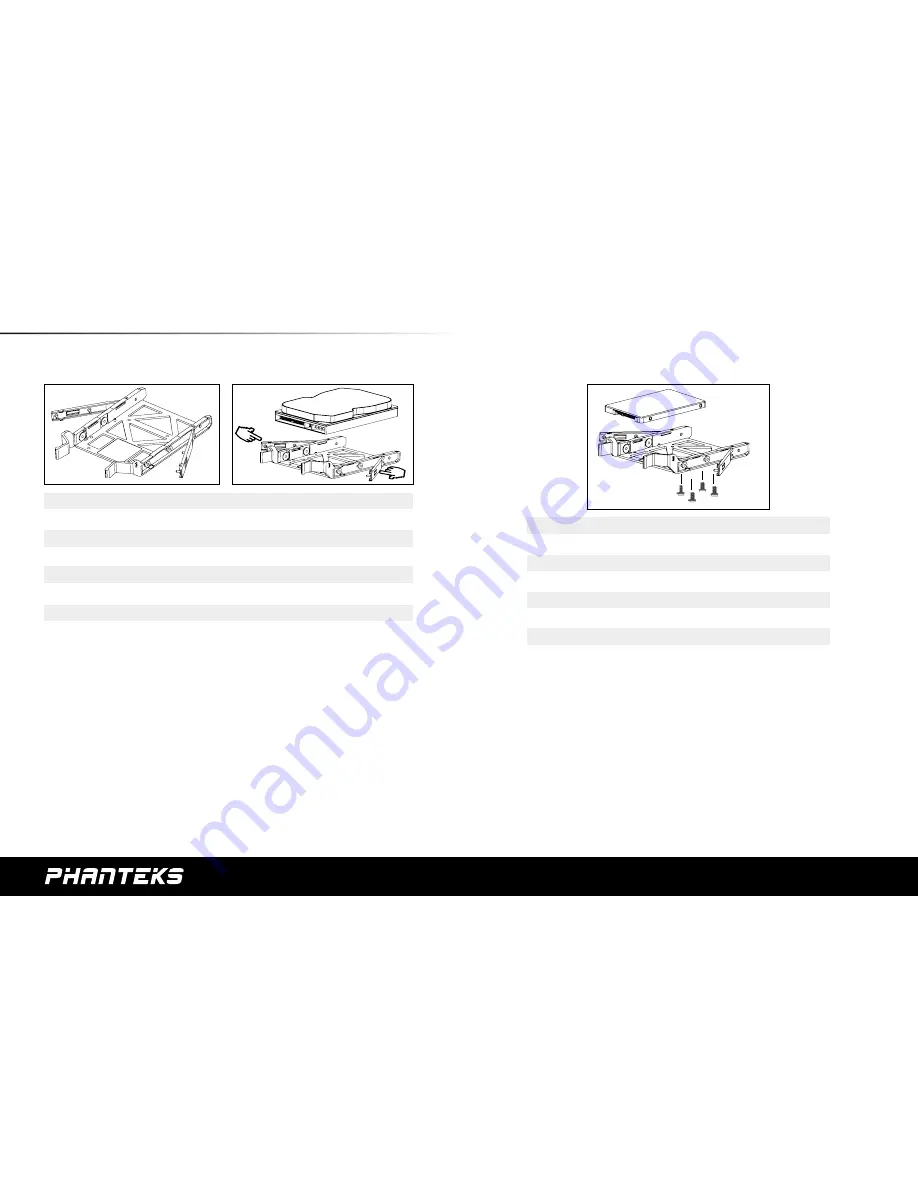
background image

15

3.5” INSTALLATION

2.5” INSTALLATION

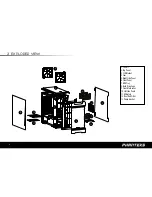
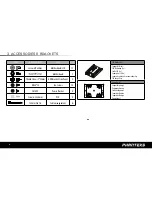
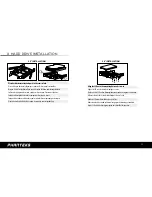
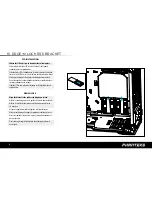
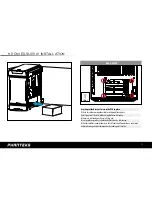
9. HARD DRIVE INSTALLATION

Place hard drive into tray and push in the arms to lock. 

Placez le disque dur dans le logement et poussez les bras pour le verrouiller.
Bringen Sie die Festplatten im Fach an und drücken die Arme zum Verriegeln hinein.
Collocare disco rigido nel cassetto e spingere i bracci verso l’interno per bloccare.
Coloque o disco rígido na bandeja e empurre os braços para travar.
Coloque el disco duro en la bandeja y pulse sobre los brazos para que quede sujeto.
Plaatst de harde schijf in de lade en duw de armen in voor vergrendeling.

Align the SSD onto the mounting holes and screw in.

Aligner le SSD avec les trous de montage et vissez.
Richten Sie die SSD an den Montagelöchern aus und befestigen die Schrauben.
Allineare l’unità ssd su i fori di installazione e fissare le viti.
Alinhe o SSD nos orifícios de fixação e parafuse.
Alinee la unidad de estado sólido con los agujeros de montaje y atorníllela.
Lijn de SSD uit op de bevestigingsgaten en schroef de schroeven in.

Summary of Contents for PH-ES314ETG

Page 1: ...USER S MANUAL MATX DESIGNED IN THE NETHERLANDS ...

Page 2: ......

Page 3: ...ines 3mm anodized aluminum with dual tempered glass side panels System builders and watercooling enthusiasts can now present their build with a premium touch The EVOLV MATX is equipped with innovative features amazing water cooling potential and RGB illumination Caution Please take a moment to carefully go through the installation guide Phanteks will not take responsibility for any damages incurre...

Page 4: ...S REMOVAL 11 7 MOTHERBOARD INSTALLATION 13 8 FILTERS REMOVAL 14 9 HARD DRIVE INSTALLATION 15 10 DROP N LOCK SSD BRACKET 16 11 POWER SUPPLY INSTALLATION 17 12 FANS COMPATIBILITY 18 13 WATERCOOLING INSTALLATION 19 14 HARD DRIVE CAGE REMOVAL 21 15 PUMP BRACKET INSTALLATION 22 16 UPGRADE EXPAND 23 17 SUPPORT AND SERVICES 25 ...

Page 5: ...inum Tempered Glass Steel chassis Motherboard support Micro ATX Mini ITX Front I O USB 3 0 Mic Headphone RGB LED control Side window Yes Tempered Glass Panels left and Right EXPANSION DRIVE BAYS Expansion slots 4 Internal 3 5 2x Internal 2 5 dedicated 2x COOLING 120 mm 140 mm Front 3x 2x 1 included Top 2x 2x Rear 1x 1x 1 included LIQUID COOLING 120 mm radiator 140 mm radiator Front Up to 360 Up to...

Page 6: ...1 Chassis 2 Top Panel 3 SSD Bracket 4 Fans 5 Right Side Panel 6 Front Panel 7 HDDTray 8 Hard Drive Cage 9 Front Mesh cover 10 Left Side Panel 11 Mid plate 12 Rear Dust Filter 13 Pump bracket 1 2 3 4 5 6 7 13 8 9 10 11 12 ...

Page 7: ...co Rígido 9 Tampa de malha frontal 10 Painel Lateral Esquerdo 11 Placa média multifuncional 12 Filtros de Pó Inferiores 13 Suporte da Bomba 1 Chasis 2 Panel superior 4 Soporte de unidad de estado sólido 5 Panel lateral derecho 6 Panel frontal 7 Bandejas de unidad de disco duro 8 Compartimento de disco duro 9 Cubierta de malla frontal 10 Panel lateral izquierdo 11 Placa central multifuncional 12 Fi...

Page 8: ... SSD beugel 2x Pump Bracket Support de pompe Pumpenhalterung Staffa della pompa Suporte da Bomba Soporte de Bomga Pomp beugel ITEM DESCRIPTION USE QTY Screw M3 x 5mm Motherboard SSD 17 Motherboard 1 Thumb Screws 9 20mm HDD Bracket Side Panel 2 KB4 8 10 Fan Screws 12 CM6 5 Pump Bracket 5 Screw 6 32 x 6mm PSU 5 150mm ZipTie Cable management 6 ...

Page 9: ...3 Cuffie 4 InterruttoreLED 5 Tastod alimentazione 1 USB 3 0 2 Microfoon 3 Hoofdtelefoon 4 LED bediening 5 Power knop 1 USB3 0 2 Micrófono 3 Cascos 4 InterruptorLED 5 Botóndealimentación 1 USB 3 0 2 Microphone 3 Headphone 4 LED Switch 5 Power Button 1 2 3 4 5 Long Press On Off Short Press 1sec Choose LED Color 10 colors 2 Sec Press Choose Mode Mode 1 Static Mode 2 Breathing Mode 3 Color Cycle 1 sec...

Page 10: ...RGB LED STRIP Connects Phanteks mulicolor LED strip for interior lighting Power SW HD AUDIO H D D LED USB 3 0 12V SATA input T O P S U T O P H A N T E K S RGB LEDSTRIPS RGB connector expansion T O M O T H E R B O A R D ...

Page 11: ... Blende vollständig ausschwenken Tirare la parte frontale e far scivolare fuori completamente il pannello Puxe pela frente e retire o painel Tire de la parte frontal y desplace completamente el panel hacia afuera Trek het zij paneel los vanuit de voorzijde en zwaai het volledig open tot de achterzijde Caution when moving the case around glass panels can automatically open ...

Page 12: ...e as mãos na área ilustrada e puxe para fora Para sacar el panel frontal coloque las manos en el área indicada y tire hacia afuera Voor het verwijderen van het voorpaneel trek het paneel naar u toe zoals aangegeven op de tekening Remove Retirer Entfernen Remover Quitar Rimuovere Verwijderen Pull up to remove the top panel Tirez vers le haut pour enlever le panneau supérieur Deckblende zum Entferne...

Page 13: ...vis du support sont préinstallées Abstandhalterschrauben sind vorinstalliert Le viti dei distanziatori sono installate precedentemente Os parafusos separadores estão pré instalados Los tornillos separadores vienen preinstalados Afstandschroeven zijn vooraf geïnstalleerd ...

Page 14: ...tromend water door de filter lopen voor het reinigen van de filters Droog de filters voordat u het weer bevestigd To remove the bottom and front filter pull out Mesh cover on top panel can also be cleaned Pour retirer les filtres en bas et à l avant tirez dessus La grille du panneau avant peut aussi être nettoyée Ziehen Sie den unteren und vorderen Filter heraus Die Gitterabdeckung an der oberen B...

Page 15: ... braços para travar Coloque el disco duro en la bandeja y pulse sobre los brazos para que quede sujeto Plaatst de harde schijf in de lade en duw de armen in voor vergrendeling Align the SSD onto the mounting holes and screw in Aligner le SSD avec les trous de montage et vissez Richten Sie die SSD an den Montagelöchern aus und befestigen die Schrauben Allineare l unità ssd su i fori di installazion...

Page 16: ...na del soporte con la guía y empuje hacia abajo para que quede sujeta Plaats de beugel langs de uitlijning en druk richting de pijl om te bevestigen DROP N LOCK Faites coulisser le disque SSD et vissez le depuis le côté pour le verrouiller dans son emplacement Schieben Sie die SSD ein und fixieren Sie diese seitlich mit Schrauben Far scorre l unità SSD e fissare le viti dal lato per bloccarla in p...

Page 17: ...entation en place Befestigen Sie das Netzteil mit den mitgelieferten Schrauben Utilizzare le viti fornite per fissare la PSU in sito Use os parafusos para fixar a Unidade de Proteção e de Comutação Utilice los tornillos suministrados para fijar la fuente de alimentación en su posición Gebruik de meegeleverde schroeven om de voeding vast te zetten ...

Page 18: ...18 12 FAN COMPATIBILITY FAN COMPATIBILITY TABLE 140mm 120mm Top 2 2 Front 2 3 Rear 1 1 ...

Page 19: ...19 13 WATERCOOLING INSTALLATION 240mm 120mm 140mm 140mm 120mm WATERCOOLING RADIATOR COMPATIBILITY 120mm 140mm 240mm Radiator Bracket required Midplate bracket needs to be removed 280mm 360mm ...

Page 20: ...Rear Arrière Rückseite Parte posteriore Traseira Posterior Achterkant Top Dessus Oberseite Parte superiore Topo Superior Bovenkant 140mm 280mm Caution Supported Radiator size and thickness varies depending on your setup Avertissement Les tailles de radiateur et les épaisseurs supportées varient en fonction de votre configuration Achtung Unterstützte Kühlkörpergröße und dicke variieren je nach Aufb...

Page 21: ...tte und die 4 Schrauben an der Unterseite des Gehäuses Per la rimozione svitare le 4 viti sulla piastra intermedia e le 4 viti sulla parte inferiore del case Para remover solte os 4x parafusos na placa do meio e os 4x parafusos na parte inferior do gabinete Para realizar la extracción desatornille los 4 tornillos situados en la placa central y los 4 tornillos situados en la parte inferior de la ca...

Page 22: ...on collegamento universale permette di installare varie pompe Suporte da Bomba com suporte universal permite que múltiplas bombas sejam instaladas El soporte de bomba con montaje universal le permite instalar varias bombas Pompbeugel met universele schroefgaten geeft ondersteuning voor meerdere type pompen Location1 Phanteks pump bracket can also be 1 mounted on a 120mm fan mount location or 2 ont...

Page 23: ...GNETIC RGB LED STRIP Easy installation thanks to magnets High quality 3M adhesive included 100CM MAGNETIC RGB LED STRIP Easy installation thanks to magnets High quality 3M adhesive included 200CM MAGNETIC RGB LED STRIP Easy installation thanks to magnets High quality 3M adhesive included RGB LED ADAPTER Also functions as an extension cable Allows you to synchronize with other RGB products using th...

Page 24: ...gth Sync Phanteks cases LED strips and motherboard s software CABLE EXTENSION SET PH CBCMBO Available in multiple colors Includes clear cable combes Also available as seperate cables Included cables Motherboard 24 pin CPU 4 4 pin 2x GPU 6 2 pin PHANTEKS PH F140MP High static pressure Silent operation 120mm and 140mm sizes Available in Black orWhite 24 16 UPGRADE EXPAND ...

Page 25: ...erior experience you deserve We are here for you If you have a question or a concern about our products we have numerous ways you can reach us Please choose one most convenient for you to connect with our team CUSTOMER CARE RMA and Technical Support Hours Monday Friday 9 00 5 00 PST Phone number 1 909 598 2115 Email us support phanteksusa com US Email us support phanteks com International ...

Page 26: ...DESIGNED IN THE NETHERLANDS ...

Reviews: