Setup Setup
Setup
Take Down Take Down
Take Down
Introduction Introduction
Introduction
WE ADVISE YOU TO ASSEMBLE THIS PRODUCT AT LEAST ONCE AT HOME BEFORE GOING ON A
TRIP. Obtaining a familiarity with the assembly and disassembly processes will help ensure your satisfaction
and ease concerns you may have should you find yourself setting up in the dark and adverse weather
conditions.
GET THE MOST ENJOYMENT FROM YOUR PRODUCT BY READING THIS OWNER'S MANUAL
THOROUGHLY; THEN FOLLOW OUR CAMPING SUGGESTIONS OUTLINED BELOW.
Warning Warning
Warning
Not complying with these warnings will void your Instant Canopy warranty!
DO NOT set-up or leave your Instant Canopy assembled in rain, hail, sleet, snow, drizzle, lightning, strong
winds or any harsh weather conditions.
DO NOT allow water of any kind to accumulate on the canopy top.
Use TIe-downs, Stakes or Weight Bags to secure your Instant Canopy in windy conditions. Commercial Stake
Kits and Weight Bags need to be purchased as accessories separately.
Always follow directions when setting-up your Instant Canopy. Be aware of hands and fingers when
expanding or collapsing frame.
It is recommended to remove canopy top from frame after take-down. Storing top on frame may result in
fabric tears or other damage requiring repair or re-purchase.
Never clean the canopy top in a washing machine - serious damage will result. If cleaning is required, while
set-up on the frame, use a light detergent on a cloth and gently clean top by hand, then rinse off with a
garden hose.
DO NOT use detergent or hand cleaner if top has custom silk-screened graphics.
Allow top to dry completely before storing.
Keep your canopy off of steep slopes and inclines
DO NOT use your Instant Canopy as a permanent shelter. It is designed for temporary use only!
Never leave your Instant Canopy unattended.
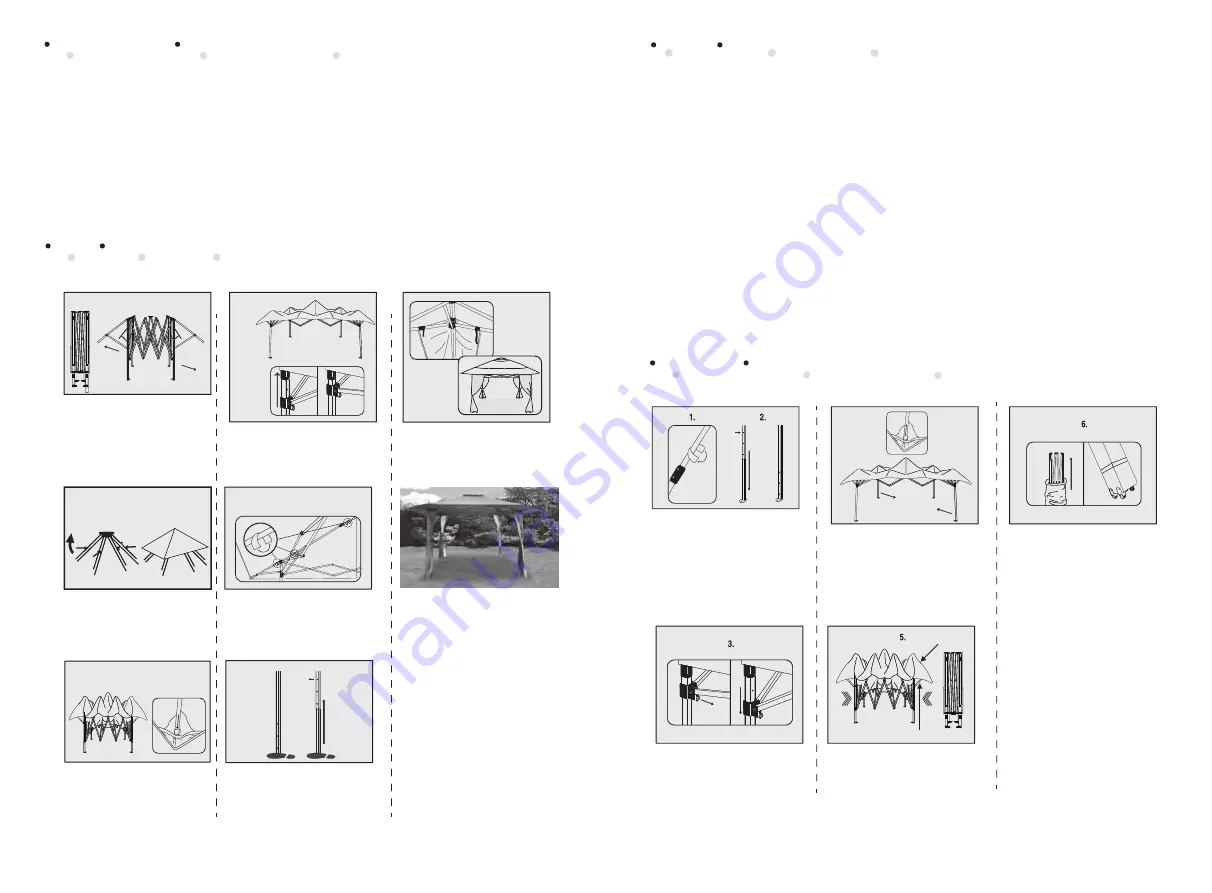
1A)
Stand the Instant Canopy
frame upright in the center desired
set-up location.
1B)
Stand opposite a partner and
lift frame off the ground walking
backwards away from partner.
2A)
Turn up each thin pole which
connect to the roof pole.
2B)
Attach a small canopy top to
the four thin pole to become a
small roof.
8)
Your Instant Canopy is now
complete!
Remove Top
Make sure to manually push slider bar down. It's
important to place hand closer to bottom of bracket.
1B.
1A.
4a.
4b.
2B.
2A.
4A.
4B.
5.
6.
(a)
(b)
(c)
7.
3B.
3A.
3A)
Place canopy top over partially
opened frame.
3B)
Align eave extension corners of
the top and the frame then attach the
elastic loops to each corner of the
frame.
4A)
Open frame completely
4B)
Engage the slider at each corner
by placing one hand on the truss, one
hand on the top of the leg and pushing
up until the pin “clicks” in place.
5)
Attach the hook and loop straps to
each corner and overhead truss bars.
6)
Extend each inner leg to raise canopy
to the desired height by stepping on the
lower footpad and allowing the snap
button to lock in place.
7)
Attach corner curtains to top truss
bars (a), (b) & (c).
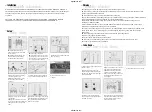
1)
Detach hook and loop straps from the
top and curtains.
2)
Raise a leg off the ground and
depress the snap button to disengage
the lower leg. Repeat until all four legs
have been lowered.
3)
Pull the pin on the slider at each
corner bracket to disengage the frame
and allow it to close.
4A)
Remove elastic loops on the top
from each eave extension corner.
4B)
Stand opposite a partner and
grasp the lower truss bar. Lift the
frame off the ground and slowly walk
toward partner being careful not to
pinch fingers.
5)
Remove canopy top and completely
close frame. We recommends storing
canopies without the top to avoid
mildew and pinch tears.
6)
Store frame and top in roller bag.
AlphaMarts.com
AlphaMarts.com


