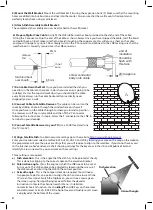
LNB
45cm Free-to-Air Digital Satellite Kit
SET-UP GUIDE
1) Identify your South Facing Wall: The dish needs to be on a South facing wall in order to pick up the Astra 2A, 2B,
2D and Eurobird1 satellites. Identify your south facing wall and look to mount your satellite dish on the outside of
the wall, at the nearest point to your main TV. Tip: Look at your neighbours’ houses someone is sure to
have Sky, see which way their dish is facing. If none of your neighbours have Sky,
you can use a compass to determine which wall faces south.
Please note that
the mounting
bracket can be
mounted on
either a wall or
a flat roof.
2) Check line of sight: Make sure there are
no obstructions (trees/tall buildings) in line
between the dish and the satellites.
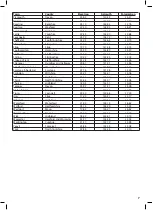
The following website gives bearing/
direction by postcode:
http://www.dishpointer.com
3) Assemble the Dish and Brackets:
Before assembly check that your kit contains all the items listed.
Assemble the dish and brackets as shown in the diagram
but do not yet attach to the wall mount arm (18).
Wall Mount Roof Mount
1
28216R
Every satellite dish installation is
different in nature. To fit suitable
brackets, fixings and poles/masts you need to take into
consideration: a.) The state and type of surface being
mounted to. b.) The weight of the assembly to be mounted
c.) The exposure to and effect of prevailing winds.
Fixings
and brackets supplied with this product may not be suitable for
your particular installation.
If in doubt please consult a CAI
registered installer.
WARNING
GENERAL SAFETY
The risk of accidents can be
greatly reduced by planning before starting a project.
Before starting installation check structure is sound and
check for hidden electrical wiring or plumbing. • When
working on an installation outside, beware of overhead
power lines. • Observe safe working practices, tread carefully
and ensure adequate lighting is available in loft or roof space.
• Before making any connections switch electricity off at the
mains. • Always follow manufacturer’s operating and safety
instructions before using tools and/or equipment.
• Only carry out work outdoors at height if you are
competent in the use of ladders and related access
equipment. • Always read and follow the manufacturer’s
instruction label affixed to the ladder. • To avoid injury always
route cables or wiring carefully. Ensure cable is correctly
routed before fixing into position, taking care not to over
tighten cable clips . • This product may contain small parts -
keep out of reach of children. • After installation make
regular maintenance checks for wear and tear.
This Free-to Air Digital Satellite Kit, can be fitted by a
competent DIYer, but please note warnings below.
No.
Image
Description
Qty.
1
M6 x 20mm bolts for
LNB holder
2
2
M6 x 12mm bolts for swivel
bracket/LNB holder
5
3
PVC LNB arm inserts
2
4
M6 x 30mm bolts for
LNB arm
2
5
M6 x 16mm bolts for dish
fixing
4
6
M6 nuts for dish bracket
4
7
washers
9
8
M6 x 65mm bolts for
mast clamp
2
9
M6 x 50mm expansion bolts
4
10
PVC cap for wall mount arm
1
11
satellite dish
1
12
dish bracket
1
13
LNB arm
1
14
mast bracket
1
15
mast clamp
1
16
upper part 40mm LNB holder
1
17
lower part 40mm LNB holder
1
18
wall mount arm
1
19
M6 nuts for LNB holder
2


