


9
Philips AVENT Microwave Steam Steriliser
GB
GB
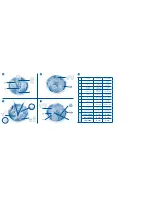
Loading the steriliser
Assembly and Use
Before using the Microwave Steam Steriliser, always
ensure that the items are positioned according to the
below loading instructions.
Loading six 125ml/4oz or 260ml/9oz
AVENT Feeding Bottles
1. Position the teats in the teat cavities around
the dome cap stem.
2. Place the screw rings over the teats.
3. Place the first three dome caps in the lower slots
of the dome cap stem.
4. Place the remaining three dome caps in the upper
slots of the dome cap stem.
5. Position the bottles upside down around the
previously loaded teats and screw rings.
Loading three 330ml AVENT Feeding Bottles
1. Position the teats in the three teat cavities
surrounding the dome cap stem.
2. Place the screw rings over the teats.
3. Position the bottles upside down in the three
outer teat cavities.
4. Arrange the three dome caps around the edge
of the rack in between the inverted bottles.
Loading one or two Philips AVENT Breast
Pumps (non-electrical components only) and
two 125ml/4oz OR two 260ml/9oz AVENT
Feeding Bottles
1. Disassemble the Breast Pump ensuring
the stem is removed from the diaphragm.
2. Position the Breast Pump bodies into the
two slots provided.
3. Position the teats in the teat cavities around
the dome cap stem.
4. Place the screw rings over the teats.
5. Place one dome cap in the unobstructed lower
slot of the dome cap stem, then the second in
the upper slot on top of the inserted dome cap.
6. Position the bottles upside down in the
unobstructed bottle cavities.
7. Place the remaining
NON-ELECTRICAL
pump
components in any unobstructed space on the rack.
Loading six 180ml/6oz OR 240ml/8oz
AVENT VIA Cups and Lids
1. Position the VIA Cups upside down around
the dome cap stem.
2. Position the VIA Lids vertically around the racks
edge. Rims should face out for easier loading.
Loading one VIA Feeding System* and up to
four 180ml/6oz OR 240ml/8oz VIA Cups and Lids
1. Position the teat in an outer teat cavity.
2. Place the screw ring over the teat.
3. Position the VIA Cups upside down around
the dome cap stem.
4. Place the VIA Adaptor on its side around the
racks edge (as shown).
5. Position the VIA Lids vertically around the racks
edge. Rims should face out for easier loading.
6. Place the dome cap in the unobstructed upper
slot of the dome cap stem.
Loading other feeding and baby product items
When sterilising other
NON-ELECTRICAL PRODUCTS
simply place the components in the rack allowing
enough space so that steam can effectively circulate.
* Consists of VIA Cup, Lid and Adaptor, an Extra Soft Slow
Flow teat, dome cap & screw ring.
A
B
D
C
Contents
1.
Lid
a. Clips
2.
Bottle/Accessories Rack
b. Dome cap stem
c. Bottle cavity
d. Teat cavity
e. Breast Pump slots
3.
Base
f. Safety grips
Before each use
Wash all items in warm
soapy water and then
rinse in water.
1. Remove rack from the
steriliser and pour
200ml of water
into the base.
IMPORTANT: Failure to add
enough water may cause
damage to the Microwave
Steam Steriliser and/or your
microwave. Adding too much
water may mean your items are
not properly sterilised.
2. Put the rack back into
the base.
3. Position the lid over the
steriliser base and lock the
clips into place until you
hear them “click”.
4. Ensure that the microwave
is clean and dry before use
– Place the steriliser into the
centre of the microwave.
Select microwave wattage
and timings – See Table III
–
do not exceed these times.
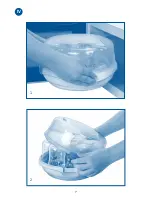
After each cycle
IMPORTANT: Allow the unit to cool for at least
two minutes before removing the steriliser from
the microwave.
1.
Removing the steriliser from the microwave:
After
the unit has cooled, remove it from the microwave
by holding the skirt and/or safety grips and then
place on an even, heat resistant surface.
NB: Items will remain sterile in the Microwave Steam Steriliser
for up to 24 hours providing the lid is not removed.
2.
After removing the steriliser from the microwave:
Remove the lid by unlocking the clips – When
removing the lid, point it away from you to allow
steam to escape.
Care and cleaning
• Always drain the excess water from the unit
and rinse to prevent the build up of limescale.
• Always store when completely dry.
• The Microwave Steam Steriliser is dishwasher safe.
WARNINGS
– FAILURE TO FOLLOW INSTRUCTIONS MAY
CAUSE SCALDING OR DAMAGE TO THIS PRODUCT AND/
OR YOUR MICROWAVE
• Wash your hands before handling your
sterilised products.
• Always ensure you use 200ml of water before
sterilising. (The unit should be emptied of residual
water before each subsequent use.)
• Always follow loading instructions and do
not overload.
• Do not use bleach or chemical sterilising solutions
/tablets in steriliser or on products to be sterilised.
• Do not sterilise metallic or electronic items
in the steriliser.
• Always use the appropriate heating time for the
power of your microwave unit. (see Table
III
)
• In combination ovens, ensure grill is switched off
and has cooled before use.
• Be sure that the lid is properly fastened to
the base before placing in microwave.
• Always allow at least 2 minutes cooling time
before removing from the microwave.
• Do not remove the lid from the steriliser
immediately after cycle. Allow to cool as the steam
will be hot.
• When removing from microwave, be sure to hold
the steriliser level to avoid leaking or spilling of
hot water.
• When taking the steriliser out of the microwave,
TAKE CARE – it will still be hot.
• When removing the lid, point it away from you to
allow steam to escape.
• Take care when handling the sterilised products as
they may be hot.
• Do not rinse the bottles when you remove them
from the steriliser.
• Always keep out of reach of children.
• Do not microwave bottle brush.
NB: Do not overload the steriliser.
NB: Do not place dome caps in the steriliser upside down.
NB: The Microwave Steam Steriliser is designed to
specifically hold the wide shape of AVENT Feeding
Bottles.
Some products featured may not be available
in all countries. Please contact Philips AVENT
to check availability.
Philips AVENT is here to help
GB: Call FREE on
0800 289 064
IRL: Call FREE on
1800 509 021
AU:
1 300 364 474
www.philips.com/AVENT
I
IV
II
Thank you for
choosing Philips AVENT
Now you can enjoy the convenience
and ease of using the Philips AVENT
Microwave Steam Steriliser, which
effectively eliminates harmful
bacteria in just minutes! Its large
capacity holds more than any
other microwave steriliser – up
to six bottles – yet it is compact
and lightweight enough for travel.
Advanced features such as cool safety
grips aid in safe handling, and make
it easier than ever to sterilise Philips
AVENT Breast Pumps, Bottles, Cups
and more.
E
Please take a few minutes to read
through the ENTIRE INSTRUCTION
LEAFLET including the warnings before
using your Microwave Steam Steriliser
for the first time. PLEASE RETAIN THESE
INSTRUCTIONS. Also available at
www.philips.com/AVENT
III
8
Summary of Contents for SCD283/00
Page 3: ...IV 1 2 7...
Page 14: ...Philips AVENT Philips AVENT 28 Philips AVENT Philips AVENT IL 29 IL...
Page 15: ......


