background image

6

7

TYPE B APPLIED PART

FOLLOW OPERATING 
INSTRUCTIONS

ONLY USE INDOORS

CLASS II E

Q

UIPMENT

GENERAL WARNING

EUROPEAN STANDARD

DISPOSE OF THROUGH 
SEPARATE COLLECTION 
ROUTE FOR WASTE 
ELECTRICAL E

Q

UIPMENT

8.  Open the lid carefully to avoid any residual steam.

  Be careful when opening the lid as steam can escape and cause injury. Use a cloth when 

removing the container, as it may be hot (vii). Use the lifter to raise small bottles, VIA Cups 

or small food jars. Pull the lifter just above the circular rim. Rest the lifter on the rim where 

it naturally sits.


Note: Do not remove the lifter from the warmer.

9.  Before feeding your baby: 

Always check feed temperature before feeding

  (a) Milk – shake the bottle, nurser or milk storage container and check the temperature of 

the milk by sprinkling a few drops on the back of your hand.

  (b) Food – stir the food thoroughly and test it yourself with a spoon to ensure it is not too 

hot. If food is not warm enough, consult the Troubleshooting Guide.


Note: Please ensure the lid of the container is tightly secured prior to shaking.

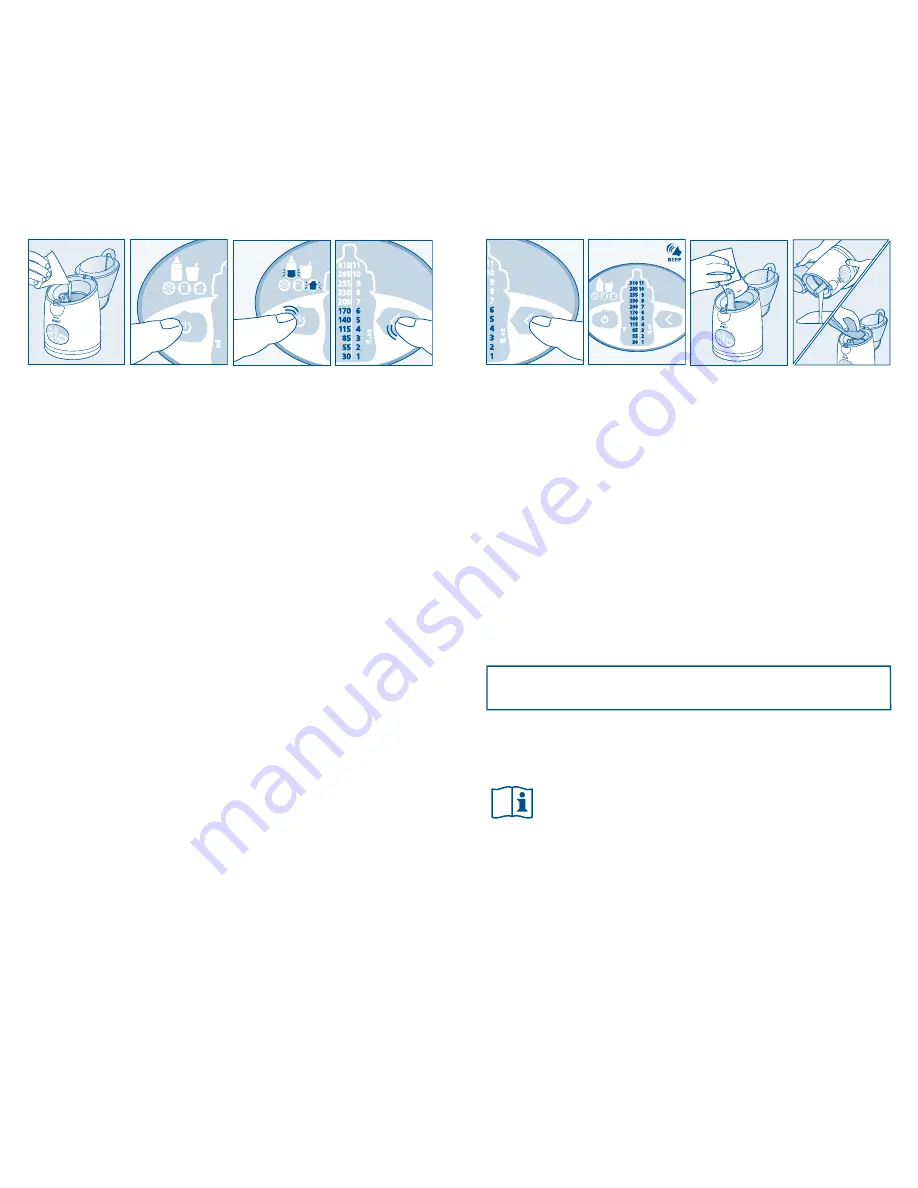
10. Unplug the warmer and empty any residual water (viii). Ensure that the plug does not come 

into contact with water. If warming an additional bottle or container, continue from step 1. 

Otherwise, clean the inside and outside of the warmer with a damp cloth (viii). To remove 

the lifter for cleaning purposes ONLY, lift vertically up until it naturally resists. Push the 

handle away from you and rotate 90º or until it can naturally be removed, then lift out


Note: For microbiological and hygienic reasons, once heated, milk and food should not 

be reheated again, and should be discarded if not used immediately. Please consult your 

health professional/breastfeeding advisor for further guidance about safety recommendations 

on feeding.

 
  Note: If at any time the warmer is switched on and not running a cycle, it will automatically 

  turn off after 3 minutes if no selections have been made.

i

ii

iii

iv

Instructions for Use

1.   Ensure that the warmer is placed on a firm level surface. 

  Open the lid using the front catch, and fill the warmer with the appropriate amount of water (i) 


– See chart on page 5 to determine water amount. 

  Place the fully assembled bottle or nurser (including dome cap to prevent overheating) or  

storage container with lid in the warmer. For food jars, please refer to manufacturer’s 

instructions.


Note: When warming an 11oz/330ml bottle or an 8oz/236ml Tempo

, the lid flap will lift to 

accommodate the larger size. This will cause a small amount of steam to rise from the warmer.

  Close the lid ensuring that the front catch ‘clicks’ shut.

2.  Plug in the warmer.
3.  Switch on the warmer by holding the Power/Mode Selection Button for 3 seconds (ii). 

  The warmer will beep, and the milk, room temperature and oz/ml symbols will illuminate.  

It is now ready for use. If the lid has not been closed correctly, the symbols will flash.

  When the unit is switched on, it automatically defaults to the milk/room temperature mode.  

If this is the mode you need, go to step 5. If not, proceed to step 4.

4.  Choose milk or food, and select the starting temperature (iii) by pressing the Power/Mode  

Selection Button repeatedly until the desired symbols are illuminated. 

  Please note that there are 6 possible options: milk from room temperature, milk from chilled,  

milk from frozen, food from room temperature, food from chilled, and food from frozen.  

(See Display Guide on page 5 if needed.)


Note: Warming food jars from frozen is NOT recommended. 

  Note: Please ensure that the correct options are selected, as milk and food should not be 

heated for too long.

5.  Select the amount of milk or food in the bottle or container by repeatedly pressing the  

Volume Selection/Start Button until the desired volume is illuminated (iv). If the desired 

amount is not shown on the display, please select the amount nearest to it. 


Note: For volumes in grams, select the same amount in ml (e.g. for 80g select 80ml).


Note: The maximum volume that may be selected when warming food from frozen is 

8oz/240ml.

6.  Start the warming cycle (v): Once the desired settings are illuminated, hold down the Volume 

Selection/Start Button until the warmer beeps. The volume display will now flash ascending 


and descending lights up to the selected amount. 

The warming cycle is in progress – 

Do not open the lid.

7.  Completion of warming cycle (vi): When the cycle is complete, the warmer will beep 

intermittently for 30 seconds and all the volume display lights will continuously flash for 


3 minutes. You can remove the contents as soon as the warmer begins beeping. After 


3 minutes, the warmer will beep 5 times and will turn off automatically. 


Note: Philips AVENT recommends removing and using the contents immediately when the 

warming cycle is complete, even before the warmer automatically turns off.

v

vi

vii

viii

Key to Product Label

Summary of Contents for SCF260/33

Page 1: ...Digital Bottle and Baby Food Warmer Calentador digital de Biberones y Alimentos para Bebés Chauffe biberon chauffe repas numérique EN ES FR ...

Page 2: ...rvice facility for examination repair or adjustment There are no serviceable parts inside the Digital Bottle and Baby Food Warmer Do not attempt to open service or repair the warmer yourself The use of accessory attachments not recommended by the appliance manufacturer may cause injuries Do not use outdoors Do not let cord hang over edge of table or counter or touch hot surfaces Do not place on or...

Page 3: ...the warmer with a damp cloth DO NOT USE AN ABRASIVE CLEANER Using cool pre boiled or filtered water in your warmer may reduce limescale build up When the warmer needs de scaling the mode and starting temperature symbols will flash on the electronic display To ensure maximum effectiveness you should de scale your warmer every time it is required To acknowledge the de scale warning press and hold th...

Page 4: ...or food jars please refer to manufacturer s instructions Note When warming an 11oz 330ml bottle or an 8oz 236ml Tempo the lid flap will lift to accommodate the larger size This will cause a small amount of steam to rise from the warmer Close the lid ensuring that the front catch clicks shut 2 Plug in the warmer 3 Switch on the warmer by holding the Power Mode Selection Button for 3 seconds ii The ...

Page 5: ...the cycle is complete Follow Step 8 onwards to remove the bottle or container from the warmer If all mode and starting temperature symbols are flashing then the unit requires de scaling See section Care of your Digital Bottle and Baby Food Warmer on page 5 To acknowledge the de scale warning press and hold the Power Mode Selection or Volume Selection Start Button for 3 seconds If you do not wish t...

Page 6: ...asegure que esté usando el volumen correcto de agua antes de iniciar el ciclo de calentamiento Se debe vaciar del calentador cualquier agua que quede antes de utilizarlo nuevamente NO SE RECOMIENDA calentar tarros de comida congelados dentro de este calentador Para evitar la posibilidad de escaldarse no coloque las manos encima de la solapa de la tapa ni abra la solapa de la tapa durante el ciclo ...

Page 7: ...da Abre la tapa utilizando el pestillo de delante y llene el calentador con la cantidad apropiada de agua i Vea el gráfico en la página 12 para determinar la cantidad de agua Meta el biberón o biberón desechable completamente montado incluyendo la tapa de cúpula para evitar que se caliente demasiado o el contenedor para conservación con tapa en el calentador Para tarros de comida favor de ver las ...

Page 8: ...ador no iluminará Calentador no se encenderá Asegure que la tapa esté cerrada correctamente Asegure que el calentador esté enchufado correctamente Luego sujete el Botón Potencia Selección de Modo por 3 segundos Símbolos en el visualizador están parpadeando Si los símbolos de leche temperatura ambiente y oz ml están parpadeando no se ha cerrado la tapa correctamente Si todos los símbolos de volumen...

Page 9: ...cordon ou la fiche sont abîmés et cessez de l utiliser s il ne fonctionne pas bien ou s il est endommagé Retournez l appareil au centre de service agréé le plus près de chez vous aux fins de vérification réparation ou réglage Aucune pièce interne de ce chauffe biberon chauffe repas numérique ne peut être réparée par l utilisateur N essayez pas d ouvrir l appareil pour en faire l entretien ou pour ...

Page 10: ... Affiche la quantité de liquide ou d aliments en oz et en ml 150 120 90 60 30 ml fl oz 5 4 3 2 1 Guide du panneau d affichage électronique interactif Note Si vous trouvez que les préparations plus épaisses ne sont pas suffisamment chaudes à la fin du cycle consultez le Guide de dépannage Note Nous vous conseillons de NE PAS chauffer des petits pots de verre d aliments congelés pour bébé Toutefois ...

Page 11: ...on avec la quantité d eau recommandée i voir tableau à la page 19 pour connaître la quantité d eau nécessaire Mettez le biberon complètement assemblé avec son capuchon pour prévenir la surchauffe ou le contenant de conservation avec son couvercle dans le chauffe biberon Pour les petits pots consultez les directives du fabricant Note Lorsque vous faites chauffer un biberon de 11 oz 330 ml ou un bib...

Page 12: ...u qui reste et suivez les directives à partir de l étape 1 Comme cela pourrait survenir à n importe quel moment du cycle de chauffage jetez le lait ou les aliments pour des raisons de sécurité sanitaire Difficulté de sélectionner la quantité appropriée d aliments congelés Lorsque vous désirez réchauffer des aliments congelés vous ne pouvez sélectionner une quantité supérieure à 8 oz 240 ml Le lait...

Page 13: ...1600 Summer Street Stamford CT 06905 5125 Canada Philips Electronics Ltd 281 Hillmount Road Markham ON L6C2S3 EN Trademarks owned by the Philips Group Koninklijke Philips Electronics N V All Rights Reserved ES Las marcas son propiedad del Philips Group Koninklijke Philips Electronics N V Todos los Derechos Reservados FR Les marques de commerce sont la propriété du Groupe Philips Koninklijke Philip...

Reviews: