

EN
EN
22. Do not use chemical sterilizing
solutions/tablets or bleach in your
steam sterilizer or on products to
be sterilized.
23. Do not use abrasive, anti-bacterial
materials or scourers to clean
the sterilizer.
24. Do not use softened water in
the sterilizer.
25. A short power cord has been provided
to prevent the risk of it becoming
entangled or being tripped over.
26. Extension cords may be used if
care is exercised in their use.
27. If an extension cord is used, its
electrical rating must be as great
as the rating of the appliance and
not draped over the edge of the
table top where it could be pulled
by children or tripped over. The
extension cord should be a grounded
type 3 wire cord.
28. The power cord supplied must not
be used on any other appliance and
no other power cord should be used
with the Sterilizer.
29. There are no serviceable parts
inside the Sterilizer. Do not
attempt to open, service or
repair the Sterilizer yourself.
30. Failure to follow de-scaling
instructions may cause
irreparable damage.
SAVE THESE
INSTRUCTIONS
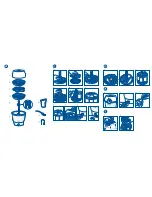
Instructions for Use
Please refer to the diagrams in the back of
the leaflet.
Before using your sterilizer for the first time
(see diagram B)
Remove all items from inside the
sterilizer body.
1) Pour in exactly 90 ml of tap water.
2) Assemble all the blue components
(baskets, stem and bottle rack).
Place the assembled components
in the sterilizer and put the lid on.
3) Connect the cord into the back of the
sterilizer and plug into an electrical
outlet. The light should come on
automatically. If it does not, press
down on the sterilizer switch.
4) At the end of the cycle the unit will
switch off automatically and the light
will go out.
5) Allow unit to cool, unplug and
disconnect the sterilizer cord from
the back of the sterilizer.
6) Remove baskets and bottle rack, pour
away any remaining water and wipe dry.
Before each use
1) Before sterilizing, wash all items in
mild soapy water and rinse.
2) Pour exactly 90 ml of water into the
sterilizer body. If you add more than
90 ml you will prolong the cycle time.
If you use less than 90 ml, your items
may not be properly sterilized.
Note: When loading, always ensure
that the steam can effectively circulate
around all surfaces and that any water
can drain off easily.
To sterilize up to six 4 oz/125 ml,
9 oz/260 ml or 11 oz/330 ml AVENT Bottles
(see diagram C)
1) Slide the lower basket onto the
central stem.
2) Thread 2 screw rings onto the
central stem.
3) Slide the bottle rack down the central
stem, with the neck facing down,
until it rests on the top screw ring.
4) Place the nipples through the center
of the holes in the bottle rack onto
the lower basket.
5) Thread 4 screw rings onto the
central stem.
6) Place the 6 inverted bottles in the
bottle rack.
7) Push the upper basket onto the
central stem until it rests on the catch.
Place the 6 dome caps and tongs into
the upper basket.
8) The upper basket is not required
when sterilizing 11 oz/330 ml bottles
(see diagram C8).
9) Place the assembled unit into the
sterilizer body and put the lid on.
10) Put the cord into the back of the
sterilizer body and plug into an
electrical outlet. Switch on.
11) Cycle times will vary depending on
the load. After each cycle the unit
will switch off automatically and the
light will go out (approx. cycle time:
8 minutes).
To sterilize the Philips AVENT Manual Breast
Pump (see diagram D)
1) Click the Breast Pump body into the slot
in the upper basket and arrange the
other breast pump components as
shown. Assemble remaining
components of the Breast Pump
in the lower basket.
2) Up to six bottles (not including screw
rings, nipples or dome caps) can be
sterilized with the pump.
3) Place assembled unit into the sterilizer
body, put the lid on.
4) Put the cord into the back of the
sterilizer body and plug into electrical
outlet. Switch on.
To sterilize narrow neck bottles and other
feeding items
Nipples should be placed around the central
stem in the lower basket and screw rings in
the top basket, as they are too narrow for the
stem. Always ensure items are positioned
within baskets / racks to ensure effective
circulation of steam. The bottle rack
and / or upper basket can be removed
to make more room.
After sterilization (see diagram E)
1) Do not remove the lid right away. Let the
sterilizer cool down for 3 minutes.
2) Unplug and disconnect the cord from the
back of the sterilizer.
3) Wash your hands thoroughly before
removing the sterilized items.
4) Remove the lid.
5) If necessary, shake excess water from
items before assembling.
6) The tongs can be used to remove small
items and to pull the sterile nipples
through the screw rings of the bottles.
7) The contents will remain sterile for up to
six hours, following the end of the cycle,
provided the lid is not removed.
4
5
Summary of Contents for SCF274/30
Page 2: ...16 2 17...


