background image

51

Q

UALITY SERVICE IS AS CLOSE AS YOUR TELEPHONE

! S

IMPLY LOOK OVER THE LIST BELOW FOR THE NUMBER OF A

F

ACTORY

S

ERVICE

C

ENTER

NEAR YOU

. Y

OUR PRODUCT WILL RECEIVE EFFICIENT AND EXPEDIENT CARRY

-

IN

MAIL

-

IN

OR IN

-

HOME SERVICE

AND YOU WILL RECEIVE PEACE OF MIND

,

KNOWING YOUR PRODUCT IS BEING GIVEN THE EXPERT ATTENTION OF

P

HILIPS

’ F

ACTORY

S

ERVICE

. A

ND

IF THE PHONE NUMBER LISTED FOR YOUR AREA IS LONG DIS

-

TANCE

CALL

1-800-242-9225 

FOR

F

ACTORY

S

ERVICE

.

COMMENT OBTENIR NOTRE SERVICE APRÈS VENTE RAPIDE ET EFFICACE SOIT PAR COURRIER, À DOMICILE, OU EN SE PRÉSENTANT À UN CENTRE DE SERVICE PHILIPS. PLUS DE 600 CENTRES

DE RÉCEPTION DE PRODUITS À RÉPARER À TRAVERS LE PAYS: CONTACTER LE CENTRE DE SERVICE AUX CONSOMMATEURS LE PLUS PROCHE POUR SAVOIR L’EMPLACEMENT DE CES DÉPÔTS

DANS UN RAYON DE 50 À 75 MILES (80 KM À 120 KM) DU CENTRE DE SERVICE LOCAL.

CÓMO OBTENER UN SERVICIO OPORTUNO Y EFICIENTE POR CORREO, EN CASA O EN PERSONA PARA SU PRODUCTO A TRAVÉS DE UN CENTRO PHILIPS DE SERVICIO. MAS DE 600 SITIOS POR

TODO EL PAIS PARA LA RECEPCION DE PRODUCTOS NECESITADOS DE REPARACIONES: COMUNICARSE CON EL CENTRO DE SERVICIO DE FABRICA MAS CERCANO PARA ESTOS LUGARES DENTRO

DE UN RADIO DE 80 A 120 KM (50 A 75 MILLAS) DEL CENTRO DE SERVICIO LOCAL.

GEORGIA
Philips Factory Service of Georgia
200 N. Cobb Pkwy., Suite 120
Marietta, GA 30062
(770) 795-0085

FLORIDA
Philips Factory Service of Florida
1911 US Highway 301 North
Tampa, FL 33619
(813) 621-8181

WESTERN U.S.A.
Philips Factory Service Western
Region
681 East Brokaw Rd.
San Jose, CA 95112
(408) 436-8566

TEXAS
Philips Factory Service of Texas
1110 N. Post Oak Rd., Suite 100
Houston, TX 77055
(713) 682-3990

CENTRAL U.S.A.
Philips Factory Service Central
US
950 Keynote Circle
Brooklyn Heights, OH 44131
(216) 741-3334

MICHIGAN
Philips Factory Service of
Michigan
25173 Dequindre
Madison Heights, MI 48071
(248) 544-2110

DALLAS AREA
Philips Factory Service of Dallas
415 N. Main Street, #107
Euless, TX 76040
(713) 682-3990

LLINOIS
Philips Factory Service of Illinois
1279 W. Hamilton Pkwy.
Itasca, IL 60143
(630) 775-0990

TENNESSEE
Philips Factory Service of East
Tennessee
6700 D Papermill Rd.
Knoxville, TN 37919
(423) 584-6614

MID-ATLANTIC
Philips Factory Service Mid-
Atlantic
352 Dunks Ferry Rd.
Bensalem, PA 19020
(215) 638-7500

51

F

ACTORY

S

ERVICE

L

OCATIONS

EL4482-3 Rev. BB 3135 015 07541

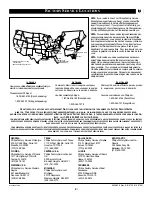
★ 

Miami/SE Florida

Chicago

Cleveland/

    N Ohio 

• 

Tampa/W Florida

★ 

Ft. Myers/SW Florida   


San Francisco/Metro Area

Detroit/Toledo

★ 

Pittsburgh/WV Area

Philadelphia/S New Jersey

Atlanta/N Georgia

Houston/Galveston

Beaumont

Knoxville/E Tennessee

Charlotte

Los Angeles


Dallas


Columbus


Wash/Balt

★ 

Orlando

 Indicates In-Home Service Only

    1-800-242-9225

• 

Indicates In-Home/Carry-In Service

MAC2929 12/99

NOTE: If you reside in one of our Philips Factory Service
Branch areas (see directory on back), you can contact the
nearest Service Branch to obtain efficient and expedient
repair for your product. If your product is In-Warranty, you
should have proof-of-purchase to ensure No Charge Service.
For Out-of-Warranty service, call the location nearest you.

NOTA: Si vous résidez dans une des régions desservies par
une succursale de service après vente du fabricant Philips
(voir liste ci-dessous), vous pourrez contacter la branche de
service après vente la plus près de chez vous pour obtenir un
service après vente rapide et efficace.  Si le produit est sous
garantie, il suffira de présenter une preuve d`achat pour
bénéficier d'un service sans frais.  Pour les produits non cou-
verts par la garantie, contactez le centre le plus près de chez
vous. 

NOTA: Si Ud. reside en una de nuestras zonas para sucur-
sales Philips de servicio al de fábrica (ver directorio más
abajo), Ud. puede comunicarse con la sucursal de servicio
más cercana para obtener una reparación oportuna y eficaz
de su producto.  Si su producto está todavía bajo garantía,
Ud. debe presentar comprobante de compra para no ocasion-
ar ningunos cargos por servicio.  Para servicio después del
vencimiento de la garantía, llame al lugar más cercano de los
abajo indicados.

In Canada

How you can obtain efficient and expedient carry-in,
mail-in, or in-home service for your product

Please contact Philips at

1-800-661-6162 (French speaking)

1-800-363-7278 (English speaking)

Au Canada

Comment obtenir le service après-vente pour
les produits apportés ou envoyés par la poste à
notre centre de service ou le service à domicile

Veuillez contacter philips á:

1-800-661-6162 (Francophone)

1-800-363-7278

En el Canadá

Cómo recibir servicio efficiente para su produc-
to, en persona, por correo o a domicillo

Favor de comunicarse con Philips al:

1-800-661-6162 (francófono)

1-800-363-7278 (anglófono)

Summary of Contents for 27PT81S

Page 1: ...Instructions for use Color Television 27PT81S1 3135 015 21361 ...

Page 2: ...ause an electrical shock For the safety of everyone in your household please do not remove product covering sThe exclamation point calls attention to features for which you should read the enclosed lit erature closely to prevent operating and maintenance problems WARNING TO PREVENT FIRE OR SHOCK HAZARD DO NOT EXPOSE THIS EQUIPMENT TO RAIN OR MOISTURE CAUTION To prevent electric shock match wide bl...

Page 3: ...ibed in the operating instructions or as marked on the appliance 11 Power Cord Protection Power supply cords should be routed so that they are not likely to be walked on or pinched by items placed upon or against them paying particular attention to cords and plugs convenience receptacles and the point where they exit from the appliance 12 Cleaning The appliance should be cleaned only as recommende...

Page 4: ... Volume Leveler 30 Sound Using Incredible Surround 31 Sound Setting the TV for Stereo and SAP Second Audio Program 32 Sound Setting the Audio Out Control 33 Sound Using the TV Speaker Control and Audio Output Jacks 34 Sound Using the Surround Sound External Speaker Connections 35 Sound Using the Audio Video Input Jacks 36 38 TABLE OF CONTENTS AutoChron AutoLock AutoPicture AutoSound M Link and Ima...

Page 5: ...peration of the TV and Remote Control Selection of the Onscreen Menu Language QUICK USE AND INSTALLATION GUIDE QUICK USE AND INSTALLATION GUIDE TABLE OF CONTENTS Getting Started Warning Precautions 1 Hooking Up Your TV 1 Basic TV and Remote Control Operation 2 How to Use the INSTALL Controls 3 4 Using the Language Control 3 Setting the TV to Auto Program Channels 3 Setting the TV for a Cable or An...

Page 6: ...stment bar will be shown to the right Use the CURSOR LEFT or CUR SOR RIGHT button to adjust the BRIGHTNESS level of the picture After adjusting the BRIGHTNESS control press the CURSOR DOWN button to select another picture adjust ment COLOR PICTURE SHARP NESS TINT OR COLOR TEMP Press the CURSOR LEFT or CUR SOR RIGHT button to adjust the selected control NOTE The menu will show only five items at a ...

Page 7: ... can sometimes appear slightly ÒspeckledÓ an indication of signal noise in the picture The DNR Dynamic Noise Reduction control can help eliminate this type of interference and improve the quali ty of the picture Press the MENU button on the remote to show the onscreen menu PICTURE will be highlight ed Press the CURSOR RIGHT button and the menu will shift to the left BRIGHTNESS will be highlighted ...

Page 8: ...FF 2 1 3 5 ImageMaxª helps you sharpen the picture quality by making dark portions of the picture darker and light portions of the picture brighter Follow these steps to turn ImageMaxª ON Press the MENU button on the remote control to show the onscreen menu PICTURE will be highlighted Press the CURSOR RIGHT button and the menu will shift to the left BRIGHTNESS will be highlighted Press the CURSOR ...

Page 9: ... a CAPTION MODE CC1 CC2 CC3 CC4 CMUTE TXT1 TXT2 TXT3 or TXT4 CC DIS PLAY turns text OFF or ON if the TV station broadcasting on the channel is making CLOSED CAP TIONING available With CC DIS PLAY highlighted press the CUR SOR RIGHT button to toggle Closed Captioning ON or OFF NOTE You also can press the CC button on the remote control to turn the CC TEXT option ON or OFF Press the STATUS EXIT but ...

Page 10: ...inute increments up to 60 minutes then 30 minute increments up to 90 min utes then 60 minute increments up to 240 minutes Press the SLEEP button on the remote control The SLEEP timer onscreen display will appear in the upper part of the screen Within five seconds press the SLEEP button repeatedly to pick the amount of time 15 minute increments up to 60 minutes then 30 minute increments up to 90 mi...

Page 11: ...he TIME control Press the CURSOR RIGHT but ton again to highlight the time indica tor area Press the CURSOR LEFT or CURSOR RIGHT button to select the position or digit you wish to enter Press the CURSOR UP or CUR SOR DOWN button to select the digits for the time Or press the NUMBERED buttons to enter the correct time Press the CURSOR RIGHT but ton to move to the AM or PM posi tion Press the CURSOR...

Page 12: ... day Follow these steps to set the Start Time Press the MENU button on the remote control to show the onscreen menu Press the CURSOR DOWN button twice to highlight FEA TURES Press the CURSOR RIGHT button and the menu will shift to the left TIMER will be highlighted Press the CURSOR RIGHT button again to shift the display left Then press the CURSOR DOWN button once to highlight the START TIME contr...

Page 13: ...guide you in set ting the TV to turn itself OFF once or at the same time every day Press the MENU button on the remote control to show the on screen menu Press the CURSOR DOWN button twice to highlight FEA TURES Press the CURSOR RIGHT button and the menu will shift to the left TIMER will be highlight ed Press the CURSOR RIGHT button again to shift the display left Then press the CURSOR DOWN button...

Page 14: ...elect a specific channel that the television will tune to when the timer turns the set ON Follow these steps to select the channel Press the MENU button on the remote control to show the onscreen menu Press the CURSOR DOWN button twice to highlight FEA TURES Press the CURSOR RIGHT button and the menu will shift to the left TIMER will be highlighted Press the CURSOR RIGHT button again to shift the ...

Page 15: ...ME 10 30 AM STOP TIME CHANNEL TUNER MODE A 5 Through the START TIME fea ture you can select either TUNER A or TUNER B to be the main signal source when the TV is powered ON Press the MENU button on the remote control to show the on screen menu Press the CURSOR DOWN button twice to highlight FEA TURES Press the CURSOR RIGHT button and the menu will shift to the left TIMER will be highlight ed Press...

Page 16: ...U button on the remote control to show the onscreen menu Press the CURSOR DOWN button twice to highlight FEA TURES Press the CURSOR RIGHT button and the menu will shift to the left TIMER will be highlight ed Press the CURSOR RIGHT button again to shift the display to the left Then press the CURSOR DOWN button repeatedly until the ACTIVATE control is highlighted Press the CURSOR RIGHT button again ...

Page 17: ...rmanently display the time in the upper right corner of the screen Press the MENU button on the remote to show the onscreen menu Press the CURSOR DOWN button twice to highlight FEA TURES Press the CURSOR RIGHT button and the menu will shift to the left TIMER will be highlighted Press the CURSOR RIGHT button again to shift the menu left Then press the CURSOR DOWN button repeatedly until the DIS PLA...

Page 18: ...ive dialogue PG 13 Parents Strongly Cautioned This programming contains material that parents may find unsuitable for children under the age of 13 It contains one or more of the following violence sexual situations coarse language or suggestive dialogue R Restricted This programming is specifi cally designed for adults Anyone under the age of 17 should view this programming only with an accompanyi...

Page 19: ...access code or changing it to a new one If your code has been changed without your knowledge then you will become aware that blocked channels may have been viewed AutoLockTM allows parents to block out or ÒcensorÓ any channels they think children should not watch A channel blocked by the AutoLockTM control cannot be viewed until a correct access code is used to unlock the channel for viewing First...

Page 20: ... sources that can be shown through the A V input jacks Select AV1 AV2 or AV3 and then select BLOCK After your personal access code has been set see the previous page you are ready to select the channels or inputs you want to block out or censor Press the MENU button on the remote control to show the onscreen menu Press the CURSOR DOWN button twice to highlight FEA TURES Press the CURSOR RIGHT butt...

Page 21: ... to censor Press the MENU button on the remote control to show the onscreen menu Press the CURSOR DOWN button twice to highlight FEA TURES Press the CURSOR RIGHT button and the menu will shift to the left Then press the CURSOR DOWN button once to highlight the AutoLock control Press the CURSOR RIGHT button again to highlight ACCESS CODE Enter your four digit ACCESS CODE CORRECT will flash very bri...

Page 22: ...sexual content dia logue or fantasy violence are avail able for TV Y7 TV PG TV 14 and TV MA To access these subratings press the CURSOR RIGHT button Press the CURSOR UP or DOWN button to select the subrating that you want to block or unblock Then press the CURSOR RIGHT or CURSOR LEFT button to turn the block on the subrating ON or OFF Press the STATUS EXIT but ton to remove the menu BEGIN 10 11 TV...

Page 23: ...can be thought of as the Òmas ter switchÓ for AutoLockª This control affects the settings you have chosen for blocking programs according to movie ratings or TV ratings or for blocking programs that have no rating or are unrated When the BLOCKING control is OFF the blocking or censoring of programs is disabled When the BLOCKING control is ON block ing will occur according to the set tings you have...

Page 24: ...blocking specific ratings or channels you may choose to block all programming that is unrated Press the MENU button on the remote control to show the onscreen menu Press the CURSOR DOWN button twice to highlight FEA TURES Press the CURSOR RIGHT button and the menu will shift to the left Then press the CURSOR DOWN button once to highlight the AutoLock control Press the CURSOR RIGHT button again to ...

Page 25: ...AA Motion Picture Association of America or the tele vision broadcasters see the expla nation on page 19 To block such programming follow these steps Press the MENU button on the remote to show the onscreen menu Press the CURSOR DOWN button twice to highlight FEA TURES Press the CURSOR RIGHT button and the menu will shift to the left Then press the CURSOR DOWN button once to highlight the AutoLock...

Page 26: ...screen BEGIN SMART HELP Remember the review screen will appear only if BLOCKING is set to ON For details see page 23 MOVIE RATING R NC17 X BLOCK UNRATED NO RATING TV RATING Y7 PG 14 MA ON OFF MOVIE RATINGS Shows all blocked movie ratings that were set within the MOVIE RATING feature Some or all may be blocked at one time NOTE If a lower rating is blocked higher ratings also will be blocked automat...

Page 27: ...iew the blocked program ming and turn OFF the AutoLock feature by clearing all blocking options or by entering your access code Press the MENU button on the remote to show the onscreen menu Press the CURSOR DOWN button twice to highlight FEA TURES Press the CURSOR RIGHT button and the menu will shift to the left Then press the CURSOR DOWN button once to highlight the AutoLock control Press the CUR...

Page 28: ... the sound playback of TV programs Press the MENU button on the remote control to show the onscreen menu Press the CURSOR DOWN button once to highlight SOUND Press the CURSOR RIGHT button and the menu will shift to the left TREBLE will be highlight ed and an adjustment bar will be shown to the right Use the CURSOR RIGHT or CURSOR LEFT button to adjust the TREBLE high frequency level of the televis...

Page 29: ...control to see the TVÕs volume level settings on the TV screen The Volume Bar will be seen each time the VOLUME buttons on the TV or remote con trol are pressed Press the VOLUME or Ð button on the remote control to show the VOLUME bar display on the screen Press the VOLUME or Ð button to adjust the televisionÕs sound level SOUND ADJUSTING THE VOLUME BEGIN SMART HELP Try it out Press the VOL and Ð ...

Page 30: ...he same With the AVL Audio Volume Leveler control turned ON you can have the TV level out sound that is being heard This makes for a more consistent sound by reducing the peaks and valleys that occur during program changes or commercial breaks To turn the AVL ON follow these steps Press the MENU button on the remote control to show the onscreen menu Press the CURSOR DOWN button once to highlight S...

Page 31: ...asts Press the INCR SURR but ton on the remote control to turn the Incredible Surround feature ON When the TV signal is being received in Stereo pressing this button will give you the options STEREO or INCR SURROUND When the TV signal is in MONO the choices displayed will read SPATIAL or MONO BEGIN NOTE If the TV signal is being received from a stereo source press ing the INCR SURR button will tog...

Page 32: ...tton to select STEREO or MONO When STEREO has been selected the television will reproduce any stereo broadcast signal it receives Press the STATUS EXIT but ton to remove the menu from the screen An SAP is an additional part of the stereo broadcast system Sent as a third audio channel an SAP can be heard apart from the current TV pro gram sound TV stations are free to use SAP for any number of purp...

Page 33: ... INPUT jacks on a stereo receiver set AUDIO OUT to either VARIABLE or FIXED to determine whether you adjust the volume at the stereo or at the TV If you select VARIABLE change the vol ume at the TV using the TVÕs remote control If you select FIXED adjust the volume at the stereo using the stereoÕs controls To select FIXED or VARIABLE follow these steps Press the MENU button on the remote control t...

Page 34: ... AUDIO OUT jacks on the TV to the R and L audio input jacks on your amplifier or sound system Set the audio systemÕs volume to a normal listening level Turn the TV and audio sys tem ON You can now adjust the sound level coming from the audio system with the VOLUME or Ð button on the TV or remote control To hear the TV sound from only the audio system speakers Press the MENU button on the remote co...

Page 35: ...ing area is between the TV and the rear surround speakers See overhead view drawing Turn the TV ON The rear Surrond Sound speakers will not be heard at the same volume level as the front TV speakers Adjust the sound level with the Volume buttons After setup whenever a stereo sig nal is received the audio will be heard in Surround Sound REAR SURROUND SOUND SPEAKER TERMINALS SMART HELP Remember Surr...

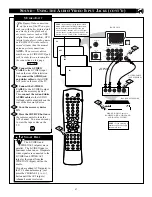
Page 36: ...trated on this page If AV1 did not appear onscreen as one of the choices available to you by pressing the SOURCE button press the M Link button on the remote control to display the M Linkª onscreen menu Press the CURSOR RIGHT or CURSOR LEFT button to highlight CVI Press the CURSOR UP but ton to toggle from CVI to AV1 Press the STATUS EXIT button to remove the M Link menu from the screen Press the ...

Page 37: ...VIDEO CABLE to the S VIDEO output jack on the accessory device Then connect the red and white AUDIO cables to the AUDIO left and right output jacks on the rear of the accessory device Turn the accessory device ON Press the SOURCE button on the remote control to tune the AV2 channel You are now ready to view the tape or disc on the TV AUDIO IN RED WHITE SMART HELP The S VIDEO and VIDEO AV2 in puts ...

Page 38: ...d on this page If CVI did not appear onscreen as one of the choices available to you by pressing the SOURCE button press the M Link button on the remote con trol to display the M Linkª onscreen menu Press the CURSOR RIGHT or CURSOR LEFT button to highlight AV1 Press the CURSOR UP but ton to toggle from AV1 to CVI Press the STATUS EXIT but ton to remove the M Link menu from the screen Press the SOU...

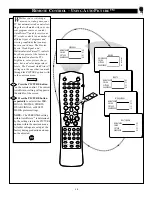
Page 39: ...o controls for a number of different types of programs and viewing conditions that you may have in your home The Movies Sports Weak Signal and Multmedia AutoPicture controls have been preset at the factory to automatically adjust the TV s brightness color picture sharp ness tint and color temperature levels The Personal AutoPicture settings are the ones that you made through the PICTURE options wi...

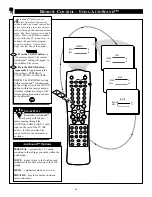
Page 40: ...een Sound menu The three factory set controls Voice Music and Theatre enable you to tailor the TV sound so as to enhance the particular program you are watching Follow these steps to select any of the options Press the SOUND button on the remote control The current AutoSoundTM setting will appear in the middle of the screen Press the SOUND button repeatedly to toggle among the four settings PERSON...

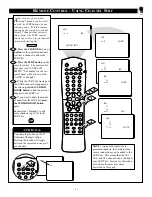
Page 41: ...ntrol The onscreen dis play may read ÒSURF LIST EMPTY Ó The number of the cur rent channel will be shown with ÒADD Ó to the right While the SURF list message or the SURF channel list appears on the screen press the CURSOR RIGHT button to add the present channel to the SURF list If you want to delete the present channel from the SURF list press the CURSOR RIGHT button again Repeat steps 1 through 3...

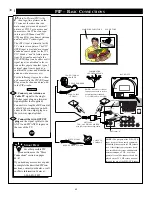
Page 42: ...Antenna or Cable TV signal to the single 75 ohm input plug on a two way signal splitter not supplied Connect two lengths of RF coaxial cable F type connectors on both ends to the two output plugs on the two way signal splitter Connect the twin OUTPUT plugs on the signal splitter to the ANT A and PIP ANT B inputs on the rear of the TV SMART HELP For other possible PIP connections see the More Conne...

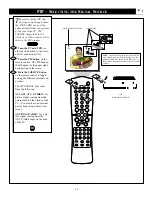
Page 43: ... Turn the TV and VCR or other device hooked to the exter nal A V connections ON Press the PIP button on the remote control The PIP window should appear in the upper right hand portion of the screen Press the SOURCE button on the remote control to toggle among the different external con nections The PIP SOURCE may come from the following AV1 AV2 AV3 S VIDEO for picture signal coming from the extern...

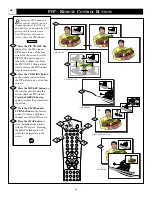
Page 44: ...rol to move the PIP picture to any of the four corners Press the FREEZE button on the remote control to stop the action within the PIP window Press the FREEZE button again to resume the normal view ing action Press the PIP CH annel UP DN buttons on the remote control to choose a different channel or a differet PIP source Press the SWAP button to swap the main screen picture with the PIP picture Pr...

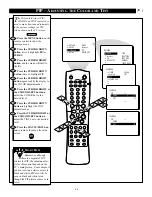
Page 45: ...en menu Press the CURSOR DOWN button twice to highlight FEA TURES Press the CURSOR RIGHT button and the menu will shift to the left Press the CURSOR DOWN button twice to highlight PIP Press the CURSOR RIGHT button again to shift the display to the COLOR adjustment bar Press the CURSOR RIGHT or the CURSOR LEFT button to adjust the COLOR bar to the desired level Press the CURSOR DOWN button to highl...

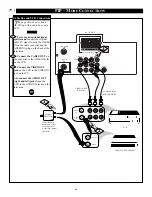
Page 46: ...N on the cable converter and the ANTENNA plug on the back of the television Connect the CABLE OUT on the converter to the ANTENNA IN on the VCR Connect the VIDEO OUT jack on the VCR to the VIDEO IN jack on the TV Also connect the AUDIO OUT right and left jacks from the VCR to the AUDIO IN jacks on the television PIP MORE CONNECTIONS BEGIN BACK OF TV AUDIO CABLES RED AND WHITE VIDEO CABLE YELLOW VC...

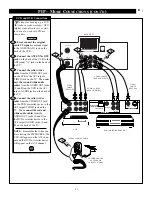
Page 47: ... the VCR to the AV1 in put VIDEO jack on the TV Then con nect the red and white audio cables from the AUDIO OUT jacks L and R on the VCR to the AV1 in put AUDIO jacks on the back of the TV Connect the yellow video cable from the VIDEO OUT jack on the DVD or similar device to the AV2 in put VIDEO jack on the TV Then connect the red and white audio cables from the AUDIO OUT jacks L and R on the DVD ...

Page 48: ...e CHANNEL EDIT control into the TV s memory Check to be sure the TUNER MODES are set to the CABLE option and run the Auto Program feature to find all available channels Please make these simple checks before calling for service Because charges for TV installa tion and adjustment of customer controls are not covered under your warranty these tips can save you time and money CAUTION A video source s...

Page 49: ...io signal that produces a dramatic expansion of the wall of sound that surrounds the listener and heightens overall viewing pleasure Menu An onscreen listing of feature controls that are available for you to adjust Multichannel Television Sound MTS The broadcast stan dard that allows for stereo sound to be transmitted with the TV picture Onscreen Displays OSD The wording or messages generated by t...

Page 50: ...7 Dynamic Noise Reduction DNR Control 7 External Speaker Connections 35 Features 5 Glossary of Television Terms 49 ImageMax 8 Incredible Surround 31 Language Control Q U 3 M Link specific Remote Control Buttons MLink ITR REC Home Video Home Movies Personal Q U 2 Picture Adjustment Controls 6 PIP Picture in Picture Connections 42 46 47 Remote Control Buttons 44 Source Control 43 Tint Control 45 Reg...

Page 51: ...ry Rd Bensalem PA 19020 215 638 7500 51 FACTORY SERVICE LOCATIONS EL4482 3 Rev BB 3135 015 07541 Miami SE Florida Chicago Cleveland N Ohio Tampa W Florida Ft Myers SW Florida San Francisco Metro Area Detroit Toledo Pittsburgh WV Area Philadelphia S New Jersey Atlanta N Georgia Houston Galveston Beaumont Knoxville E Tennessee Charlotte Los Angeles Dallas Columbus Wash Balt Orlando Indicates In Home...

Page 52: ... AVAILABLE Warranty service is available in all countries where the product is offi cially distributed by Philips Consumer Electronics Company In coun tries where Philips Consumer Electronics Company does not distribute the product the local Philips service organization will attempt to pro vide service although there may be a delay if the appropriate spare parts and technical manual s are not read...

Reviews: