background image

3139 116 19511 ( ENG)

10

Dolby Pro Logic

This state of the art Dolby Pro Logic
mini system enables you to experience
and enjoy a Home Cinema sound
ambience. The Pro Logic system allows
more accurate definition of the
individual sound sources. It produces
greater sound separation between
channels and provides pinpoint sound
localization. Pro Logic provides four
sound outputs: Left, Center, Right and
Surround (Rear). Front sounds are
produced from the pair of Left and
Right speakers and a Center speaker.
The surround sound is reproduced by
two speakers placed at the rear of the
listening area. Although the surround
sound is monaural (single-source), a pair
of speakers is necessary to produce the
correct diffused sound.

This Pro Logic decoder enables you to
decode the following modes: 

Dolby

Surround, Center Phantom, Dolby 3
Stereo 

or

 normal Stereo.

Setting up the Dolby Pro
Logic system

You must set up the system properly in
order to enjoy the Home Cinema
sound to the fullest. First, connect the
speakers.

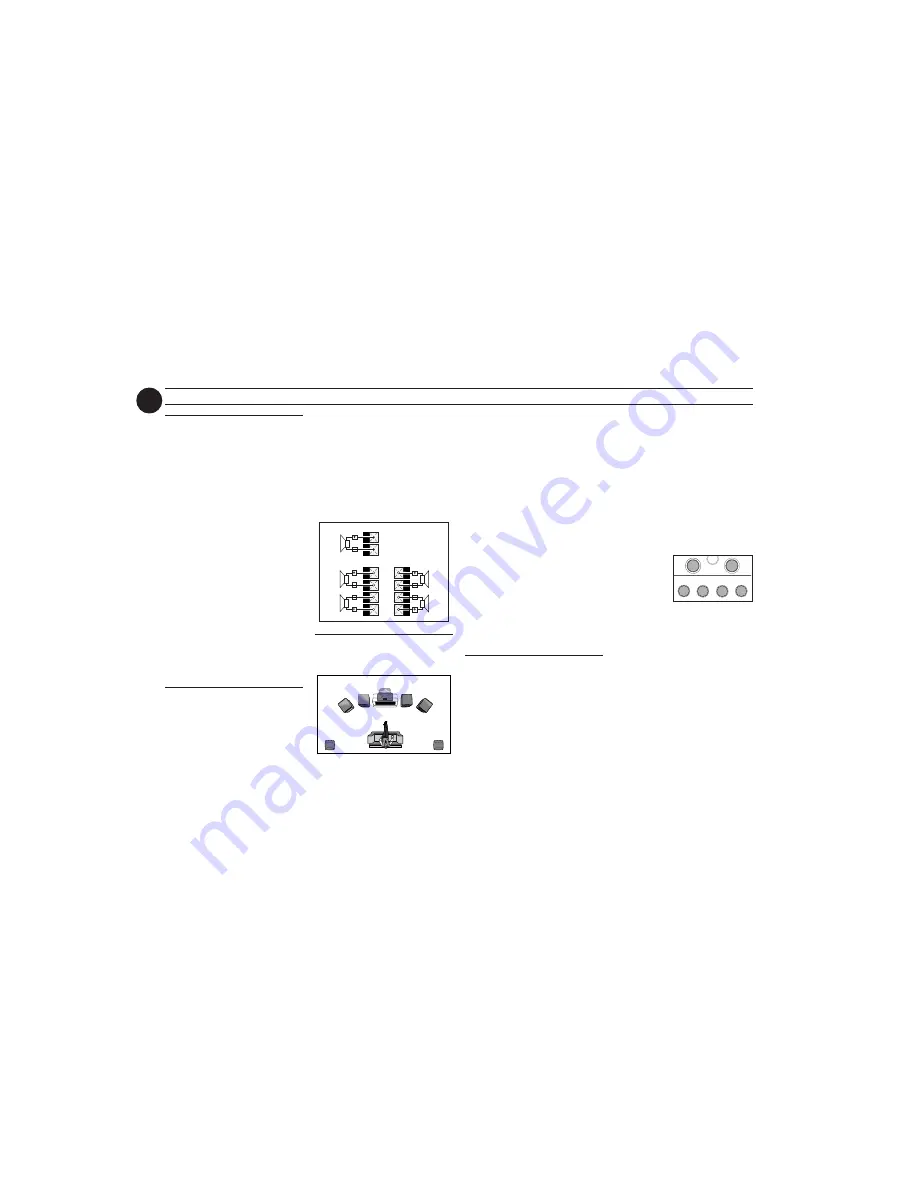
5-Speaker Connection

Front speakers:

 Connect the front

speakers.

Center speaker:

 Connect the center

speaker.

Rear (surround) speakers: 

Connect

either the wired rear surround speakers
or a pair of wireless rear speakers (not
supplied) to the SURROUND OUT
terminals.

SURROUND

FRONT

CENTER

REAR

RIGHT

FRONT
LEFT

FRONT
RIGHT

REAR

LEFT

REAR

Positioning the Speakers

To get the best surround sound effect,
place the speakers as follows.

TV

CENTER

SPEAKER

SURROUND

RIGHT

SURROUND

LEFT

FRONT

LEFT

FRONT

RIGHT

MINI HIFI
SYSTEM

SUB-

WOOFER

Front Left and Right Speakers

For the best sound, place the Left and
Right speakers at an angle of
approximately 45 degrees to the
listener. If the speakers' magnetic field
affects the television picture, increase
the distance between the TV and the
speakers.

Center Speaker

For the best sound, place the center
speaker at the same height as the left
and right speakers. Place the center
speaker directly above or beneath the
television.

Rear (surround) Speakers

The surround speakers should be
placed at normal listening ear level or
mounted on the wall at the back of the
room. Most important, experiment
when placing the surround speakers in
order to obtain the best sound.

Test Tone

This feature enables you to adjust the
Front Left, Front Right, Center and
Surround Sound levels of the respective
speakers in Dolby Pro Logic mode.

You must sit at the ideal sitting
position and use the remote control
to perform this operation.

1

Press 

CD

TUNER

TAPE 

or

 AUX

to switch on the system.

2

Press 

TEST TONE

.

A test signal is generated; it will
move through the Left, Center,
Right, and Surround speakers, in
that order.

"

TEST TONE

" followed by

"

ADAPT BALANCE

,

 CENTER

AND REAR LEVEL

" will be

displayed.

The test signal will last for about
90 seconds.

3

Press

BALANCE

to adjust

the sound of
the front left
speaker.

The display will show  "

BAL

L+XX

".

4

Press 

BALANCE R

 to adjust the

sound of the front right speaker.

The display will show  "

BAL R

+XX

".

5

Press 

CENTER


+


or 

-

 to adjust

the sound of the center speaker.

The display will show either
"

CENT +XX

  or  

-XX

".

6

Press 

REAR


+

 or 

-

 to adjust the

sound of the surround speakers.

The display will show either
"

REAR +XX

  or  

-XX

".

DOLBY PRO LOGIC

BALANCE

CENTER

REAR

REAR

-

+

DPL

-

-

+

-

L

R

Summary of Contents for 3 CD CHANGER PRO LOGIC FWP73P37

Page 1: ...3139 116 19511 ENG Toll Free Help Line Ligne d assistance en service libre Linea de ayuda telefónica sin cargo 800 531 0039 Mini Hi Fi System FW P73 with 3 CD changer ...

Page 2: ...u qualify for as the owner of your model t This bolt of lightning indicates uninsulated material within your unit may cause an electrical shock For the safety of everyone in your household please do not remove product covering s The exclamation point calls attention to features for which you should read the enclosed literature closely to prevent operating and maintenance problems WARNING TO PREVEN...

Page 3: ...receive all the information and special offers for which you qualify plus easy access to accessories from our convenient home shopping network And most importantly you can count on our uncompromising commitment to your total satisfaction All of this is our way of saying welcome and thanks for investing in a Philips product Sincerely Robert Minkhorst President and Chief Executive Officer P S Rememb...

Page 4: ...inet that may impede the flow of air through the ventilation openings 8 Do not install near any heat sources such as radiators heat registers stoves or other apparatus including amplifiers that produce heat 9 Do not defeat the safety purpose of the polarized or grounding type plug A polarized plug has two blades with one wider than the other A grounding type plug has two blades and a third groundi...

Page 5: ...ough there may be a delay if the appropriate spare parts and technical manual s are not readily available MAKE SUREYOU KEEP Please keep your sales receipt or other document showing proof of purchase Attach it to this owner s manual and keep both nearby Also keep the original box and packing material in case you need to return your product BEFORE REQUESTING SERVICE Please check your owner s manual ...

Page 6: ...3139 116 19511 ENG 6 ...

Page 7: ...s and one center speaker GENERAL INFORMATION SAFETY INFORMATION CLASS 1 LASER PRODUCT Safety Information Before operating the system check that the operating voltage indicated on the typeplate or the voltage indication beside the voltage selector of your system is identical with the voltage of your local power supply If not please consult your dealer The typeplate is located at the rear of your sy...

Page 8: ...G 8 PREPARATION Rear Connections AM ANTENNA AC MAINS A B C FRONT AUX IN F SUB WOOFER OUT E AUDIO OUT L R L R FM ANTENNA 300Ω L R G H STANDBY VOLUME SW 030 ACTIVE SUBWOOFER D REAR SURROUND L R R surr L surr CENTER CENTER ...

Page 9: ... to the blue CENTER terminal E Rear Surround Speakers Connection Connect the black non marked wires to the black REAR SURROUND terminals and the colored marked wires to the grey REAR SURROUND terminals F Subwoofer Out Connection Connect the optional active subwoofer to the SUBWOOFER OUT terminal The subwoofer reproduces just the low bass sound effect e g explosions the rumble of spaceships etc Be ...

Page 10: ...NI HIFI SYSTEM SUB WOOFER Front Left and Right Speakers For the best sound place the Left and Right speakers at an angle of approximately 45 degrees to the listener If the speakers magnetic field affects the television picture increase the distance between theTV and the speakers Center Speaker For the best sound place the center speaker at the same height as the left and right speakers Place the c...

Page 11: ...t and right speakers providing conventional stereo across the front Press DPL to select the Dolby Pro Logic Center Phantom mode The message CENTER PHANTOM will be displayed The DPL display panel will light up Dolby 3 Stereo Use this setting when full surround is not required but a wide stereo sound is desired It only requires the left right and center speakers Press DPL to select the Dolby 3 Stere...

Page 12: ...D C 3C H A N G E R MINI HIFI SYSTEM CD1 2 3 VIDEO FM AM TAPE 1 2 TIMER 60Hz 500Hz 250Hz 1KHz 2KHz 4KHz 8KHz VOLUME UP DOWN PLAY STOP OPEN PAUSE RECORD PLAY STOP OPEN PAUSE 1 2 3 6 5 7 8 9 0 S S L R C PRO LOGIC SOUND 4 SOUND NAVIGATION DIGITAL SOUND CONTROL DYNAMIC BASS BOOST S S L R C PRO LOGIC 2 TAPE 1 2 AUX TUNER CD TV 2 1 3 SLEEP TIMER DSC DBB PROGRAM REPEAT SHUFFLE BALANCE CENTER REAR REAR MUT...

Page 13: ... DPL DISPLAY PANEL to view the selected Dolby Pro Logic setting DOLBY PRO LOGIC DPL to select Dolby Surround Dolby Center Phantom Dolby 3 Stereo or Stereo mode MODE SELECTION SEARCH à á TUNING à á for CD to search backward forward forTUNER to tune to a lower or higher radio frequency for CLOCK to set the hour on the system only forTVVOL to adjust theTV volume if the remote operates yourTV STOP CLE...

Page 14: ...standby mode the demonstration will resume five seconds later To stop the demonstration mode Press and hold Ç on the system only for five seconds when the system is in demonstration mode The demonstration will stop DEMO OFF is displayed The system will switch to standby mode Notes When the system is switched on from the main power outlet the CD carousel tray may open and close again to initialize ...

Page 15: ...ates the selected source Note For an external source make sure you have connected the audio left and right OUT terminals of the external equipment TV VCR Laser Disc player DVD player or CD Recorder to the AUX IN terminals Selecting the Equalizer Display You can select the desired equalizer display for the system You must not press the DSC button on the system before using the SOUND 3 or 4 controls...

Page 16: ...T will be displayed To switch off DBB Press DBB briefly until DBB OFF is displayed Note Some CDs or tapes might be recorded in high modulation which causes a distortion at high volume If this occurs switch off DBB or reduce the volume OPERATINGTHE SYSTEM Automatic DSC DBB selection The best DBB setting is generated automatically for each DSC selection You can manually select the DBB setting that b...

Page 17: ...D Changer 1 Press CD to select CD mode 2 Press OPEN CLOSE The CD carousel tray slides out 3 Load a CD with the printed side up in the right tray You can load another disc in the left tray To load the third disc press the DISC CHANGE button The CD carousel will rotate until the empty tray is ready for loading 4 Press OPEN CLOSE to close the CD carousel tray The total number of tracks and the playin...

Page 18: ... Press í or ë to select the desired track 5 Press PROG to store the track Repeat steps 3 to 5 to store other discs and tracks CD 6 Press Ç once to end programming The total number of tracks programmed and total playing time appear on the display Notes If the total playing time is more than 99 59 or if one of the programmed tracks has a number greater than 30 then appears on the display instead of ...

Page 19: ...rent track or all available discs will be played repeatedly TRACK or ALL will be displayed The REPEAT and SHUFFLE appear on the display 2 Press SHUFFLE again to resume normal playback The SHUFFLE disappears from the display Note REPEAT DISC mode will be cancelled when shuffle is selected TAPE CD PROG CLOCK TIMER NEWS RDS DOLBY B NR STANDBY ON TUNER AUX PRESET STOP CLEAR SEARCH TUNING PLAY PAUSE PR...

Page 20: ... 9 select preset 10 before starting automatic programming only the preset numbers 10 to 40 will be programmed Manual programming 1 Press TUNER FM AM 2 Press TUNER FM AM again to select the desired waveband FM or AM 3 Press PROG for less than one second The PROGRAM starts flashing The next available preset number will be displayed for selection 4 Press à or á to tune to the desired frequency If you...

Page 21: ...the selected tape deck 3 Press PLAYÉ to start playback To interrupt playback press PAUSE To resume playback press PAUSE again 4 Press STOP OPEN to end playback Rewind Fast Forward When playback is stopped 1 You can rewind or fast forward a tape by pressing à or á respectively The tape will stop automatically at the end of rewinding or fast forwarding 2 Press STOP OPEN to stop rewinding or fast for...

Page 22: ...MER NEWS RDS DOLBY B NR STANDBY ON MINI HIFI SYSTEM VIDEO VOLUME S S L R C PRO LOGIC TAPE CD PROG TUNER PRESET STOP CLEAR SEARCH TUNING PLAY PAUSE PREV NEXT CD1 2 3 FM AM TAPE 1 2 60Hz 500Hz 250Hz 1KHz 2KHz 4KHz 8KHz AUX UP DOWN SOUND SOUND NAVIGATION S S L R C PRO LOGIC DYNAMIC BASS BOOST DIGITAL SOUND CONTROL TAPE AUX Before playing a tape check and tighten slack tape with a pencil Slack tape ma...

Page 23: ... recording break out the tab on the left shoulder of the tape side you want to protect OneTouch Recording For OneTouch Recording as soon as you press RECORD the current source CD TUNER or AUX will be recorded on tape deck 1 1 Load a blank tape in tape deck 1 2 Press RECORD on tape deck 1 to start recording The REC starts flashing 3 Press PAUSE to interrupt recording 4 Press STOP OPEN on tape deck ...

Page 24: ...ur mode e g AM 12 00 or 00 00 Before setting the clock you must be in theView Clock mode 1 Press CLOCK TIMER to select clock mode 2 Press PROG on the system only to select 12 and 24 hour mode If 12 hour mode is selected AM 12 00 starts flashing If 24 hour mode is selected 00 00 starts flashing 3 Set the hour with à or á on the system 4 Set the minute with í or ë on the system 5 Press CLOCK TIMER a...

Page 25: ...imer will be activated The selected source will be played Notes During timer setting if no button is pressed within 90 seconds the system will exit timer setting mode automatically If the source selected is TUNER the last tuned frequency will be switched on If the source selected is CD playback will begin with the first track of the selected disc or program If the CD trays are empty TUNER will be ...

Page 26: ...500 Hz 8 dB Signal to noise ratio Normal tape type I 47 dBA Wow and flutter 0 4 DIN SPEAKERS System 2 way shielded bass reflex Impedance 6 Ω Woofer 1 x 5 25 Tweeter 1 x 2 5 Ferrofluid Dimensions w x h x d 8 27 x 12 20 x 9 17 inch 210 x 310 x 233 mm Weight 6 38 pounds each 2 9 kg each CS 120 CENTER SPEAKER System shielded bass reflex Impedance 6 Ω Speaker Driver 1 x 3 full range Dimensions w x h x ...

Page 27: ...tape available at your dealer Warning Under no circumstances should you try to repair the set yourself as this will invalidate the guarantee Do not open the set as there is a risk of electric shock If a fault occurs check the points listed below before taking the system for repair Should any problems persist after you have made these checks consult your nearest dealer or service center CD Player O...

Page 28: ...kers are connected wrongly Check the speaker connections and location Lack of bass sound or apparently imprecise physical location of musical instruments Speakers are connected wrongly Check the speaker connection for proper phasing colored black wires to colored black terminals Remote control has no effect on the system Wrong source is selected Select the source CD TUNER etc before pressing the f...

Page 29: ...l Illustration 6 General Information 7 Safety Information 7 Preparation 8 9 Dolby Pro Logic 10 11 Controls 12 14 OperatingThe System 14 16 CD 17 19 Tuner 19 20 Tape 21 22 AUX 22 Recording 23 24 Clock 24 Timer 25 SleepTimer 25 Specifications 26 Maintenance 27 Troubleshooting 27 28 TABLE OF CONTENTS ...

Page 30: ...3139 116 19511 ENG PAGE GUIDE 2 3 4 5 6 7 8 9 10 11 12 13 14 15 16 17 18 19 20 FRONT PAGE 21 22 23 TABLE OF CONTENTS 24 25 26 PAGE GUIDE 27 28 BACK PAGE BLANK PAGE ...

Page 31: ...FW 890P FW P73 Philips Consumer Electronics Company A Division of Philips Electronics North America Corporation Knoxville Tennessee 37914 1810 USA Printed In China 3139 116 19511 ENG IB8169T001 JP 9945 37 3 E n g l i s h ...

Reviews: