background image

15

        Change TV  preferences

   The  

[Preferences]

  menu allows you to 

customise various features and functions.

      1

 Press 


MENU

 .

    2

 Select 


[Installation]

  >  

[Preferences]

  .

    3

 Press 

   to enter  

[Preferences]

 .


[Location]

 Optimises TV settings for 

your location - home or shop.
     

[Volume bar]

 Displays the volume 

bar when adjusting the volume.
     

[EasyLink]

 Enables one-touch play 

and one-touch standby between 
EasyLink-compliant devices. 
     

[E-sticker]

 For shop mode only. Sets 

the location of the e-sticker.

      4

 Press 


  to select your preference.

    5

 Press 


OK

 .

    6

 Press 


MENU

  to exit.

        Start a TV demo

   You can use demonstrations to better 
understand the features of your TV. Some 
demos are not available on certain models. 
When a demo is available, it is displayed in the 
menu list.


      1

 Press 


DEMO

  on the remote control.

    2

 Press 

      to select a demo and press  

OK


to view it.

    3

 Press 


DEMO

  to exit.

      Update the TV software

  Philips continuously tries to improve its 
products and we recommend that you update 
the TV software when updates are available. 
Check www.philips.com/support for availability.

    Check the current software version

    1

 Press 


MENU

 .

    2

 Select 


[Software update]

  >  

[Current 

software]

  .

     Download the software

    1

  On your PC, open a web browser and go 

to www.philips.com/support.

    2

  Find information and software related 

to your TV and download the latest 
software upgrade  le to your PC.

    3

  Decompress the ZIP- le.

    4

  Copy the  autorun.upg   le to the root 

directory of the USB device.

       Update software (analogue 
broadcasts)

  Before performing this procedure be sure to:

    Set aside some time to complete the 
entire update.
    Have available a USB storage device with 
at least 64MB of storage space.
    Have access to a computer with a USB 
port and internet access.

      1

 Press 


MENU

 .

    2

 Select 


[Software update]

  >  

[Update 

assistant]

  .

    3

 Select 


[Start]

 .

    4

  Connect the USB storage device to your 

computer.

    5

  Follow the on-screen instructions to 

complete the update.

English

EN

Summary of Contents for 32PFL3409/98

Page 1: ...Register your product and get support at www philips com welcome N E User manual 32PFL3409 98 42PFL3609 98 47PFL3609 98 ...

Page 2: ......
Page 3: ...and sound settings 9 Create and use lists of favourite channels 12 Use timers 13 Use child control 13 Use theTV clock 14 Update theTV software 15 ChangeTV preferences 15 Start aTV demo 15 Reset theTV to factory settings 16 6 Install channels 17 Automatically install channels 17 Manually install channels 17 Rename channels 17 Rearrange channels 18 7 Connect devices 19 Back connectors 19 Side connec...

Page 4: ...ts reserved Speci cations are subject to change without notice Trademarks are the property of Koninklijke Philips Electronics N V or their respective owners Philips reserves the right to change products at any time without being obliged to adjust earlier supplies accordingly The material in this manual is believed adequate for the intended use of the system If the product or its individual modules...

Page 5: ... on furniture to reach the TV Risk of overheating Never install the TV in a con ned space Always leave a space of at least 10 cm around the TV for ventilation Ensure curtains or other objects never cover the ventilation slots on the TV Risk of damage to the TV Before you connect the TV to the power outlet ensure that the power voltage matches 2 Important Read and understand all instructions before...

Page 6: ...jects on the power cord To easily disconnect the TV power cord from the power outlet ensure that you have full access to the power cord at all times When you disconnect the power cord always pull the plug never the cable Disconnect the TV from the power outlet and aerial before lightning storms During lightning storms never touch any part of the TV power cord or aerial cable Risk of hearing damage...

Page 7: ...rchase and welcome to Philips To fully bene t from the support that Philips offers register your product at www philips com welcome TV overview This section gives you an overview of commonly usedTV controls and functions Side controls and indicators a POWER Switches the TV on or off The TV is not powered off completely unless it is physically unplugged b P CH Switches to the next or previous chann...

Page 8: ...tions relating to the current activity or selection g OK Con rms an entry or selection and displays the channel grid when watching TV h Navigation buttons Navigates through the menus i INFO Displays programme information if available j Mute Mutes or restores audio output k CH Switches to the next or previous channel l 0 9 Numeric buttons Selects a channel or setting m PICTURE Smart picture Launche...

Page 9: ...tandby To switch on If the standby indicator is off press POWER at the side of the TV If the standby indicator is red press Standby On on the remote control To switch to standby Press Standby On on the remote control The standby indicator switches to red To switch off Press POWER at the side of the TV The standby indicator switches off Tip Though your TV consumes very little power when in standby ...

Page 10: ...rce list appears 2 Press or to select the connected device 3 Press OK to watch the connected device Adjust TV volume To increase or decrease volume Press Press VOLUME on the side of the TV To mute or unmute sound Press to mute the sound Press again to restore the sound EN ...

Page 11: ...re The Picture menu appears 3 Press to select from the following settings and adjust 5 Use more of your TV Access TV menus Menus help you to install channels change picture and sound settings and access other features 1 Press MENU The menu screen appears 2 Press the to select and navigate through one of the following menus Picture Adjusts the picture setting for optimal viewing Sound Adjusts the s...

Page 12: ...and reduces noise in an image Colour temperature Introduces more orange tones Warm or blue tones Cool to the picture Dig CrystalClear Digitally adjusts picture quality to optimal contrast colour and sharpness Dynamic contrast Automatically enhances contrast in an image Dynamic backlight Adjusts the brightness of the TV backlight to match lighting conditions Colour enhancement Makes colours more vi...

Page 13: ...alance of the right and left speakers to best suit your listening position Dual I II Selects between audio languages if dual sound is broadcast Summary of picture formats The following picture settings can be con gured Note Depending on the format of the picture source some picture settings are not available Super zoom Not for HD and PC mode Removes the black bars on the side of 4 3 broadcasts The...

Page 14: ...s 3 Press OK to enter Show favourite ch 4 Press to select a favourite list and press OK to con rm the choice Mono Stereo Selects between mono or stereo if stereo is broadcast Surround Enables spatial sound Auto volume Automatically reduces sudden volume changes for example when switching channels When enabled this produces a more consistent audio volume Delta volume Levels out volume differences b...

Page 15: ...ox will disappear However if the code cannot be set a new dialogue box will prompt you to re enter the code 5 Press to choose the channel that you wish to remove from the list 6 Press OPTIONS 7 Press to select Unmark as fav 8 Press OK The channel is removed from the favourite list Use timers You can set timers to switch theTV on or switch to standby at a speci ed time Automatically switch the TV t...

Page 16: ...you want to change the code select Features Change code 7 Enter your current code using the Numeric buttons If the code is validated a new dialogue box will prompt you to enter your new code 8 Enter the new code using the Numeric buttons A message appears prompting you to enter the new code again for con rmation Tip If you forget your code enter 8888 to override any existing codes Lock or unlock a...

Page 17: ...te the TV software Philips continuously tries to improve its products and we recommend that you update theTV software when updates are available Check www philips com support for availability Check the current software version 1 Press MENU 2 Select Software update Current software Download the software 1 On your PC open a web browser and go to www philips com support 2 Find information and softwar...

Page 18: ...t picture and sound settings of yourTV Channel installation settings remain the same 1 Press MENU 2 Select Installation Factory settings 3 Press to enter the Factory settings menu Reset is highlighted 4 Press OK to reset to factory settings 5 Press MENU to exit EN ...

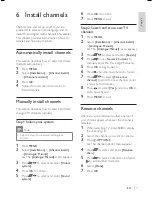
Page 19: ...s to select and enter Rename chan 5 Press to select a character and press to add another character 6 Select Done 7 Press OK 6 Install channels The rst time you set up yourTV you are prompted to select a menu language and to installTV and digital radio channels if available This chapter provides instructions on how to reinstall and ne tune channels Automatically install channels This section descri...

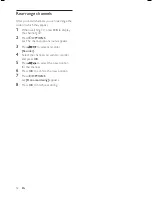
Page 20: ...to display the channel grid 2 Press OPTIONS The channel options menu appears 3 Press to select and enter Reorder 4 Select the channel you want to reorder and press OK 5 Press to select the new position for the channel 6 Press OK to con rm the new position 7 Press OPTIONS Done reordering appears 8 Press OK to nish reordering EN ...

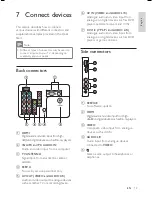
Page 21: ...DEO e Stereo audio output to headphones or earphones 1 2 5 3 4 1 2 5 3 4 7 Connect devices This section describes how to connect various devices with different connectors and supplements examples provided in the Quick Start Note Different types of connectors may be used to connect a device to your TV depending on availability and your needs Back connectors a HDMI Digital audio and video input from...

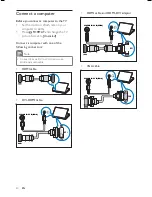
Page 22: ... computer Before you connect a computer to the TV Set the monitor refresh rate on your computer to 60Hz Press FORMAT and change the TV picture format to Unscaled Connect a computer with one of the following connectors Note Connections via DVI or VGA require an additional audio cable HDMI cable DVI HDMI cable DVI PC AUDIO IN PC IN AUDIO DVI PC AUDIO IN PC IN AUDIO EN ...

Page 23: ... controlled by a single remote control Note Philips does not guarantee 100 interoperability with all HDMI CEC devices Note The EasyLink compliant device must be switched on and selected as the source EasyLink features One touch play When you connect your TV to devices that support one touch play you can control your TV and the devices with one remote control For example when you press Play on your...

Page 24: ...Celsius 8 Product information Product information is subject to change without notice For detailed product information go to www philips com support Supported display resolutions Computer formats HDMI Resolution Refresh rate Hz 640x480 800x600 1024x768 1280x768 1280x1024 1360x768 60 72 75 85 60 72 75 85 60 70 75 85 60 60 60 VGA Resolution Refresh rate Hz 640x480 800x600 1024x768 1280x768 1280x1024...

Page 25: ...a clearance of at least 5 5 cm from the back of theTV Warning Follow all instructions provided with the TV mount Koninklijke Philips Electronics N V bears no responsibility for improper TV mounting that results in accident injury or damage TV screen size VESA compatible wall bracket type 32 37 200 x 200 mm M6 42 47 400 x 400 mm M6 42 M8 47 Eng li s h EN ...

Page 26: ... are correctly set The TV did not save your picture settings Check that the TV location is set to the home setting This mode offers you the exibility to change and save settings 9 Troubleshooting This section describes commonly encountered issues and accompanying solutions General TV issues The TV does not switch on Disconnect the power cable from the power outlet Wait for one minute then reconnec...

Page 27: ...ll Try using a different picture format The picture position is incorrect Picture signals from some devices may not t the screen correctly Check the signal output of the device Sound issues There is a picture but no sound from the TV Note If no audio signal is detected the TV automatically switches the audio output off this does not indicate malfunction Check that all cables are properly connected...

Page 28: ... speci cations 22 P Picture format troubleshooting 24 Picture settings 9 PIN code 24 Power 24 10 Index B Batteries 4 24 Bracket 23 C Channel list favourite 12 troubleshooting 24 update 12 Channels favourite list 12 install automatic 17 manual 17 rearrange 18 rename 17 Child lock TV lock 13 Clock 14 Computer format technical speci cations 22 Connections HDMI troubleshooting 25 technical speci catio...

Page 29: ...ftware update analogue 15 version 15 Sound settings 11 Standby troubleshooting 24 T Technical speci cations 22 Timer on timer 13 sleeptimer 13 standby 13 Transmission troubleshooting 24 Troubleshooting 24 TV adjust volume 8 disconnect from mains 19 menu 9 position 21 safety 3 screen care 4 software 15 standby 7 switch channels 7 switch off 7 switch on 7 transporting 3 troubleshooting 24 technical ...

Page 30: ... 2009 Koninklijke Philips Electronics N V All rights reserved Document order number 72 CLICK0 X981C ...

Reviews: